

Here’s how to Squat with proper form:
- Stand with the bar on your back, and your heels shoulder-width apart
- Bend your legs until your hips are lower than the top of your knees
- Keep the bar balanced over your midfoot the whole time
- Squat back up by straightening your knees and hips
- Stand with your hips and knees locked at the top
Hold the weight for a second or two at the top so you can prepare yourself for the next rep. Then take a big breath, hold it, and Squat again. Repeat until you’ve done five reps for five sets on Stronglifts 5×5.
Squats are more than just a “quad” exercise. While your legs are the prime movers, many other muscles work. Your abs and lower back stabilize your trunk so it doesn’t collapse under the weight. Your upper back, shoulders, and arms work to hold and balance the barbell on your back.
The Squat is a compound exercise that works several muscles at the same time. That’s why it’s so effective for building overall strength and muscle. They even train the muscle between your ears. Squats are hard, and so they strengthen your mind and build mental toughness.
This is the definitive guide on how to Squat with proper form.
Contents
Join the Stronglifts community to get free access to all the spreadsheets for every Stronglifts program. You’ll also get 15% off Stronglifts Pro, and daily email tips. Enter your email below to sign up today for free.

Join the Stronglifts community to get a PDF version of this Squat guide for free. You’ll also get daily email tips and a 15% discount on the Stronglifts app.

Why Proper Squat Form Is Important
Proper form is key to maximizing your results with the Squat.
- Using a complete range of motion builds more muscle than only doing half reps.
- Improving your technique helps you lift heavier weights and progress more.
- Proper form makes you less likely to experience aches and pains.
The Basic Squat Technique Explained
Stance:
Depth: How Low Should You Squat?

Squat down until your hips are below your knees. This moves your body through a full range of motion. It strengthens your leg muscles evenly. Thighs parallel to the floor isn’t low enough. You must break parallel so the top of your knees is higher than your hip crease. If you can’t Squat parallel, put your heels shoulder-width apart and toes 30° out. Now Squat while pushing your knees to the sides. You’ll Squat deeper.
Many people do partial Squats. They only Squat a quarter or half the way down. This makes the weight easier to Squat because it moves over less distance. You can Squat more weight. But partial Squats result in less muscle growth. And the rep doesn’t count in competition.
Other people like to Squat deep. “Ass-To-Grass” Squats (ATG) involves Squatting down until your butt touches your ankles. This works your muscles through a greater range of motion. But it also decreases how heavy you can Squat since the bar moves further. Plus, most people lack the flexibility to Squat deep without their back rounding. I recommend you break parallel then stop. No need to Squat deeper to gain strength and muscle.
How to Squat

Squat in the Power Rack for maximum safety. Set the horizontal safety pins so they can catch the bar if you fail. You can also use a Squat Rack or Squat Stands.
Here’s how to Squat in five simple steps…
- Setup. Face the bar. Grab it tight with a medium grip. Put it on your upper back by dipping under the bar. Raise your chest.
- Unrack. Move your feet under the bar. Unrack it by straightening your legs. Step back with straight legs. Lock your hips and knees.
- Squat. Take a big breath, hold it, and Squat down. Push your knees out while moving your hips back. Keep your lower back neutral.
- Break Parallel. Squat down until your hips are below your knees. Thighs parallel to the floor isn’t low enough. You must break parallel.
- Squat Up. Break parallel then Squat back up. Keep your knees out and chest up. Lock your hips and knees at the top. Breathe.
Squat five reps on StrongLifts 5×5 and then rack the weight. Don’t try to Squat the bar straight into the uprights. You could miss them. Finish your set first by holding the bar with locked hips and knees at the top. Then walk forward until the bar hits the vertical parts of your Power Rack. Your feet will be right under the bar. Now Squat down by bending your legs. The bar will land safely into your uprights.
Squat Form 101

Your build determines how proper Squat form looks like for you. The wider your shoulders are, the wider your grip should be. If you have a short torso with long thighs like me, you’ll lean more forward than people with a long torso and short thighs. Don’t try to Squat like someone else does unless you have the same build. Follow these general Squat form guidelines instead and individualize them as you gain experience…
- Stance. Squat with your heels shoulder-width apart. Put your heels under your shoulders.
- Feet. Turn your feet out 30°. Keep your whole foot flat on the floor. Don’t raise your toes or heels.
- Knees. Push your knees to the side, in the direction of your feet. Lock your knees at the top of each rep.
- Hips. Bend your hips and knees at the same time. Move your hips back and down while pushing your knees out.
- Lower Back. Squat with a natural arch like when you stand. No rounding or excess arching. Keep your back neutral.
- Grip. Squeeze the bar hard. But don’t try to support heavy weight with your hands. Let your upper-back carry the bar.
- Grip Width. Use a medium grip, narrower than when you Bench Press. Your hands should be outside your shoulders.
- Bar Position. Put the bar between your traps and rear shoulders (low bar) or on your traps (high bar). Center the bar.
- Wrists. Your wrists will bend and hurt if you try to support the bar with your hands. Carry it with your upper-back.
- Elbows. Behind your torso at the top, not vertical or horizontal. Inline with your torso at the bottom of your Squat.
- Upper-back. Arch your upper-back to create support for the bar. Squeeze your shoulder-blades and raise your chest.
- Chest. Raise your chest before you unrack the bar. Keep it up and tight by taking a big breath before you Squat down.
- Head. Keep your head inline with your torso. Don’t look at the ceiling or at your feet. Don’t turn your head sideways.
- Back Angle. Not vertical or horizontal but diagonal. The exact back angle depends on your build and bar position.
- Unracking. Put the bar on your back and your feet under the bar. Unrack it by straightening your legs. Walk back.
- Way Down. Bend your hips and knees at the same time. Hips back, knees out. Keep your lower back neutral.
- Depth. Squat down until your hips are lower than your knees. Thighs parallel isn’t enough. Break parallel.
- Way Up. Move your hips straight up. Keep your knees out, your chest up and your head neutral.
- Between Reps. Stand with your hips and knees locked. Breathe. Get tight for the next rep.
- Racking. Lock your hips and knees. Then step forward, hit the rack, and bend your knees.
- Bar Path. Move the bar in a vertical line over your midfoot. No horizontal movement.
- Breathing. Big breath at the top. Hold it at the bottom. Exhale at the top.
Muscles Worked
Squats are more than just a leg exercise. Your legs do most of the work to Squat the weight. But your abs and lower back muscles must stabilize your torso while your upper-body balances the bars. Squats work your whole body from head to toe. This is why you can do Squats heavier than other exercises, and why they’re more effective for gaining overall strength and muscle. Squats work the following muscles…
- Thighs. Your legs bend when you Squat while your knees stay out. Everything straightens at the top. This works your knee and hip muscles: your quadriceps, hamstrings, adductors and glutes. The Squat is the best exercise to build strong, muscular legs and a firm butt.
- Calves. Your shins are incline at the bottom of your Squat. They end vertical at the top. This ankle movement works your main calf muscles: your gastrocnemius and soleus. But don’t expect miracles. Genetics play a large role when it comes to building bigger calves.
- Lower Back. Gravity pulls the bar down when you Squat. Your lower back must resist this downward force to keep your spine neutral and safe. This strengthens the muscles on the back of your spine which protects it against injury.
- Abs. Your ab muscles help your lower back muscles to keep your spine neutral when you Squat. This strengthens your six-pack muscles that lie on your belly: your rectus abdominis and your obliques on the side. Stronger abs are more muscular. Eat right and they’ll show.
- Arms. Your arms assist your upper-back muscles to balance the bar on your back. Your hands squeeze the bar which increases tension in your forearms and upper-arms. Squats don’t work your arms like Chinups because your arms don’t bend. But you get isometric arm work.
Squats also work the muscle that pumps blood to your legs: your heart. And it strengthens the muscle between your ears: your mind. Many people hate Squats because they’re so hard. But that’s also why they’re so effective for gaining strength and muscle. The people who have the courage to Squat every week, build discipline that becomes useful in other parts of their lives (like sticking to healthy nutrition and sleeping habits).
If you only have time to do one exercise, then Squat. Squats work more muscles, with more weight, over a greater range of motion, than any other exercise. The weight is heavier than on a leg curl or leg extension. You must balance the weight and yourself unlike on the Leg Press where you’re sitting on a machine. The bar moves twice the distance than on Deadlifts. There’s no substitute for the Squat. Squats are truly king.
Squat Safety
Knee Safety
Squats are safe for your knees if you use proper form. Turn your feet out 30°. Point your knees in the same direction by pushing them to the sides. Squat down by moving your knees and hips at the same time. Move your hips back and down while pushing your knees out. If you do it right, your knees will move the first half of the Squat and then stay where they are. Your hips will finish your Squat and carry most of the weight.
Squats are bad for your knees if you use bad form. Don’t Squat by bending your knees only and moving them all forward. Use your stronger and bigger hip muscles. Squat by bending your knees and hips at the same time. Move your hips back like sitting on a toilet. Push your knees out too so your thighs stay inline with your feet. Don’t let your knees cave in too much during heavy Squats.
Partial Squats aren’t safer for your knees. They work your quads but barely strengthen your hamstrings and glutes which stabilize your knees. Leg curls aren’t effective to strengthen your posterior chain. You must Squat and break parallel to work your whole legs through a full range of motion. This prevents muscle imbalances. It works the muscles around your knee joints. It’s how proper Squats build stronger and healthier knees.
Millions of competitive powerlifters and Olympic lifters Squat worldwide. They break parallel every time and Squat heavy weights. If Squatting deep and heavy was bad for the knees, we would see thousands of athletes hurting their knees. Yet lifting weights has a low risk of injury.
Failing Reps Safely
Squat in the Power Rack and you won’t get stuck under the bar. Power Racks have horizontal safety pins to catch the weight if you fail. These pins are adjustable. Set them lower than your bottom position of your Squat so you don’t hit them on good reps (unlike me in the video below). If you fail to Squat the weight, lower it on the pins by Squatting back down. Here’s an example of me failing safely with 172.5kg/379lb…
You can also Squat safely in a Squat Rack with safety pins. But the pins must be adjustable. if they’re fixed and don’t match your build, you’ll hit them on good reps which will throw you off balance. Better is to use Squat Stands with saw horses. I don’t recommend spotters for Squats. Most people don’t know how to spot so you can get hurt. I always Squat in the Power Rack even if I have a spotter available. It’s safer.
Don’t Squat in the smith machine. It looks safer because the bar is attached to rails. But there are no safety pins. The bar has hooks instead which catch pins on the machine. If you fail, you must rotate the bar quickly so it catches the pins. Miss it and you’ll get sandwiched between the bar and the floor like the guy below. Even if you do it right, machines balance the weight. Squatting free weights builds more strength and muscle mass.
Squat Technique
Squat Stance

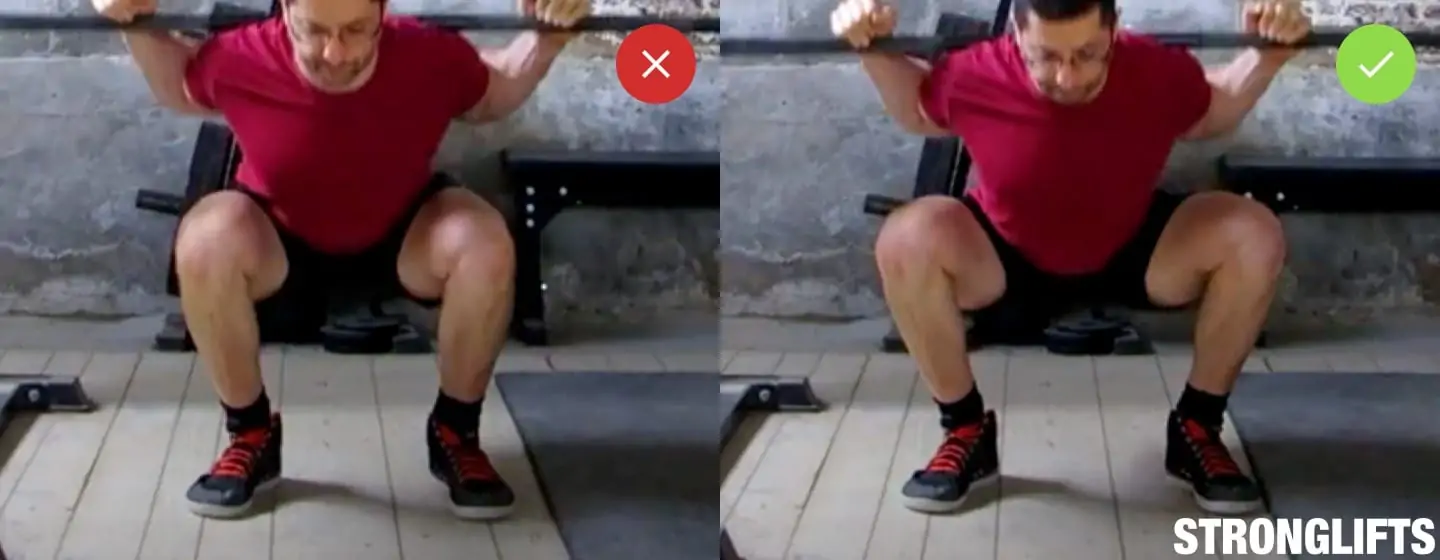
Shoulder-width Stance. Squat with your heels directly under your shoulders. This creates room for your belly to pass through your legs when you Squat down. It makes breaking parallel easier. If you have long thighs with a short torso like me, your heels should be slightly wider apart than if you have short thighs with a long torso. But your heels should always be about shoulder-width apart when you Squat.
No Narrow Stance. It’s harder to break parallel with a narrow stance. Your belly blocks your legs when you Squat down. It stops you from lowering your hips below your knees. Flexibility is not the issue in this case, technique is. Try to Squat with a wider stance. Put your heels shoulder-width apart and turn your toes out 30°. Now Squat down while pushing your knees to the side. You’ll have an easier time breaking parallel.

No Wide Sumo Stance. Don’t Squat with a wide stance. Your feet shouldn’t be touching the side of your Squat Rack. Some powerlifters Squat wide but they usually wear compression Squat suits to protect their groin. We Squat raw. If you try to Squat wide like geared powerlifters do, you risk hurting your groin. Don’t do it. Squat with your heels shoulder-width apart. They should be right under your shoulders when you Squat.
Feet and Toes

Toes Out 30°. Your knees must be out to create space for your belly when you Squat down. Your knees and feet must be inline to avoid twisting of your knee joint. Your toes must therefore be 30° out. This makes it easier to break parallel, keeps your knee joints safe and increases your Squat (by engaging your groin and glutes more). Don’t Squat with your feet straight forward or you’ll struggle to break parallel. Turn them 30° out.
Feet Flat on The Floor. Keep your whole foot flat on the floor when you Squat. Don’t raise your toes or you’ll lose balance backwards. Don’t raise your heels or you’ll lose balance forward. Keep your toes, heels and forefoot on the floor. This increases the surface in contact with the ground. It improves your balance and technique. You’ll Squat heavier weights because the bar will move in a more predictable vertical line.

Don’t Raise Your Heels! Don’t put a piece of wood or plates under your heels. It’s unstable and a band-aid solution. If your heels come off the floor when you Squat, it usually means your Squat form is wrong. Put your heels shoulder-width apart, turn your toes out 30° and push your knees out to the sides. Keep the bar over your mid-foot by bending your knees and hips at the same time. Your heels will stay on the floor if you do it right.
Knees
Push Your Knees Out. Keep your knees inline with your feet. Stand shoulder-width apart with your feet 30° out. Then push your knees to the sides while you Squat. Knees out creates space for your belly and makes it easier to break parallel. It engages your groin muscles which increases your Squat. And it prevents twisting of your knee joints. Don’t let your knees cave in too much during heavy Squats.
Don’t Point Your Knees Forward. Don’t Squat with your knees and feet pointing straight forward. This puts your belly in the way of your legs and blocks you from breaking parallel. Your thighs will smash the front of your hips against your hip bone. Your lower back will round and you’ll get hip pain. You’ll Squat less weight because you can’t engage your groin muscles. Squat with your toes 30° out and push your knees out.
Knees over Toes. Your knees should end above your toes at the bottom of your Squat. They’ll be more forward if you have long thighs like me than if you have short thighs (or long feet). But your knees should end inline with your feet and almost directly above your toes. Squat down by pushing your knees out and hips back at the same time. Your knees will end where they should be if you do it right.
Don’t Let Your Knees Come Too Forward. Your knees should come forward the first half of the way down. But they should then stay there while your hips keep moving down. Don’t Squat down by just bending your knees. They’ll come too far forward which stresses your knees, makes it hard to break parallel and kills strength. Bend your hips and knees at the same time. Push your knees out while moving your hips back and down.
Shins

Incline Shins. Your shins must be incline at the bottom of your Squat. They’ll be more incline if you have long thighs like me than if you have short thighs. But they should never be perpendicular to the floor or you’ll lose balance. Best is not to worry about your shins when you Squat. Focus on Squatting down by pushing your knees out and your hips back at the same time. Your shins will end incline at the bottom of your Squat.
No Perpendicular Shins! You need a wide sumo Squat stance to keep your shins vertical. But this is hard for your hips and groin as explained in the stance section. Squatting with a shoulder-width stance is safer. This moves your shins incline at the bottom to keep balance. Don’t try to keep your shins vertical or you’ll lean forward more, may hurt your lower back and will Squat less weight. Let your shins move incline.
Hips
Hips Back on Way Down. Squat down by bending your hips and knees at the same time. Move your hips back like sitting on a toilet. Push your knees out in the meanwhile. Don’t bend your hips only or your torso will end horizontally. But don’t bend your knees only either or they’ll come too forward. Move your hips and knees at the same time. The bar must stay balanced and move down vertically over your mid-foot.
Hips Up on Way up. Squat back up by pushing your hips straight to the ceiling. Keep your chest up, your upper-back tight and the bar over your mid-foot. Don’t let your hips rise faster than your chest or you’ll lean forward and end in a dangerous goodmorning position. Raise your hips and chest at the same time. Maintain the back angle you had at the bottom. The bar must move up in a vertical line over your mid-foot.
Grip

Medium Grip. Grip the bar like you do for the Bench Press. Put your pinky inside the ring marks of your bar. Then squeeze your shoulder-blades to support the bar with your upper-back muscles. You can grip the bar wider if your shoulders are tight so you can Squat pain-free. But your upper-back will be looser and the bar may dig into your spine. Work on your shoulder flexibility so you can narrow your Squat grip over time.
Squeeze The Bar. The harder you squeeze the bar, the harder your arms, shoulders and upper-back muscles contract. This increases support for the bar, makes it less likely to move around on your back and thus increases strength. Grip the bar tight when you set up for Squats. Grip it tight before you unrack the bar. Squeeze it hard so it can’t move. Don’t relax or open your hands while you Squat. Keep them closed.

Full Grip vs Thumbless. The full grip allows you to squeeze the bar harder which adds strength. It gives you more control over the bar and feels more secure. But your wrists will bend more. The thumbless grip keeps your wrists straighter. But it can feel unsafe, you can’t squeeze the bar as hard and your wrists can still bend if you try to hold the bar with your hands. Try the thumbless grip if your wrists/elbows hurt.
Don’t Hold The Bar with Your Hands. This is a Squat, not a Bench Press. If you try to hold the weight with your hands, your wrists and elbows will hurt once the weight gets heavy. You must support the bar with your stronger upper-back muscles. Hold and squeeze the bar. But let your upper-back support the weight. Squatting with a thumbless grip can teach you to support the bar with your upper-back.
Bar Position

High Bar. The first way to Back Squat is with the bar on your traps, at the bottom of your neck. Squeeze your traps so the bar doesn’t dig into your spine. The narrower your grip, the harder you can squeeze, the more your muscles can support the bar. Your torso will be more vertical when you Squat high bar to keep it balanced over your mid-foot. Your knees will come more forward and your hips will move less back.
Low Bar. The second way to Back Squat is with the bar between your traps and rear shoulders, at the top of your shoulder-blades (scapular spine). Squeeze your shoulder-blades together to create muscle support for the bar and so it can’t dig in your spine. You’ll lean more forward when you Squat low bar to keep it balanced over your mid-foot. Your hips will move back and your knees will come less forward.
High bar vs Low Bar. High bar is easier on the shoulders, wrists and elbows. Low bar increases your Squat by 10-20% by using more hips. That’s why Powerlifters Squat low bar and why I do it too. Most people Squat high bar because it’s more natural. If your shoulders don’t like the low bar position, stick with high bar. It’s better than not Squatting at all. If you want to Squat as heavy as you can, do low bar.
Center The Bar. If you Squat with the bar resting more on one side of your back, you’ll load your spine, hips and knees unevenly. Squat with the bar centered. Center it before you unrack the weight, not after. Ask someone to check if the bar is centered or videotape yourself from the back. After a couple of times you’ll remember what centered feels like and won’t need any feedback.
Elbows

Behind Your Torso At The Top. Don’t Squat with vertical forearms and your elbows under the bar. The weight will compress your wrists, bend them back and cause wrist/elbow pain. But don’t raise your elbows all the way up either until your forearms are horizontal to the floor. This will cause shoulder pain and upper-back rounding. Lift your elbows slightly behind your torso at the top so your forearms are incline.
Incline at The Bottom. Keep your elbows inline with your torso at the bottom of your Squat. Your forearms shouldn’t be horizontal or vertical to the floor. Horizontal forearms cause upper-back rounding and shoulder pain. Vertical forearms cause wrist and elbow pain. Keep your forearms incline. Your elbows should start behind your torso at the top, and stay there while your torso moves from vertical to incline.
Upper-back
Squeeze Your Shoulder-blades. The bar will dig into your spine and hurt if you Squat with your upper-back loose. Tighten your upper-back to create a muscle shelf for the bar to rest on. Squeeze your shoulder-blades together when you setup for the Squat. Squeeze them before you unrack the weight, not after. You don’t need to wrap a towel around the bar or use a foam pad if you Squat with your upper-back tight.
Arch Your Upper-back. The bar will move if your upper-back rounds during Squat. It will roll up and away from your balance point (your mid-foot), and pull you forward. You’ll lean forward, end in a dangerous goodmorning position and put your lower back at risk. Keep your upper-back arched when you Squat. Raise your chest, squeeze your shoulder-blades together and squeeze the bar. Take a big breath between reps to hold it.
Chest
Raise Your Chest. Your upper-back must stay arched when you Squat so the bar can’t move and pull you forward. Raise your chest before you unrack the bar. Raise it again at the top of every rep before you Squat down. Keep your chest up by taking a big breath and holding it before you Squat down. Don’t breathe on the way down or you’ll lose tension and your chest will collapse. Hold your breath until you’re back up.
Head

Head Inline with Torso. Look at a point on the floor in front of you. If you Squat in front of a wall as I do, look at the bottom of the wall. Don’t look at the ceiling or you’ll hurt your neck. Don’t look sideways when you rack/unrack the weight or you’ll twist your neck. Don’t look at your feet or your upper-back will round. Keep your neck inline with your torso. Straight line head to hips. This keeps your neck safe and your chest up.
Don’t Look Up. Looking up during heavy Squats squeezes the spinal discs in your neck. This can cause neck pain. Many strong Squatters look up during Squats and seem to be fine. But you may not be that lucky. The safest position for your neck is always to keep it neutral like when you stand. It will feel weird to Squat like this if you’re used to looking up. But you’ll get used to it if you keep practicing.
Ignore Mirrors. Checking your form by Squatting in front of a mirror forces you to look up at the bottom. This is bad for your neck. Checking your form in the mirror aside from you is even worse because it twists your neck. I don’t have mirrors in my home gym. If you face one when you Squat, look “through it”. Fix a point at the bottom without looking at how you move. Then check your Squat form by videotaping yourself.
Back Angle

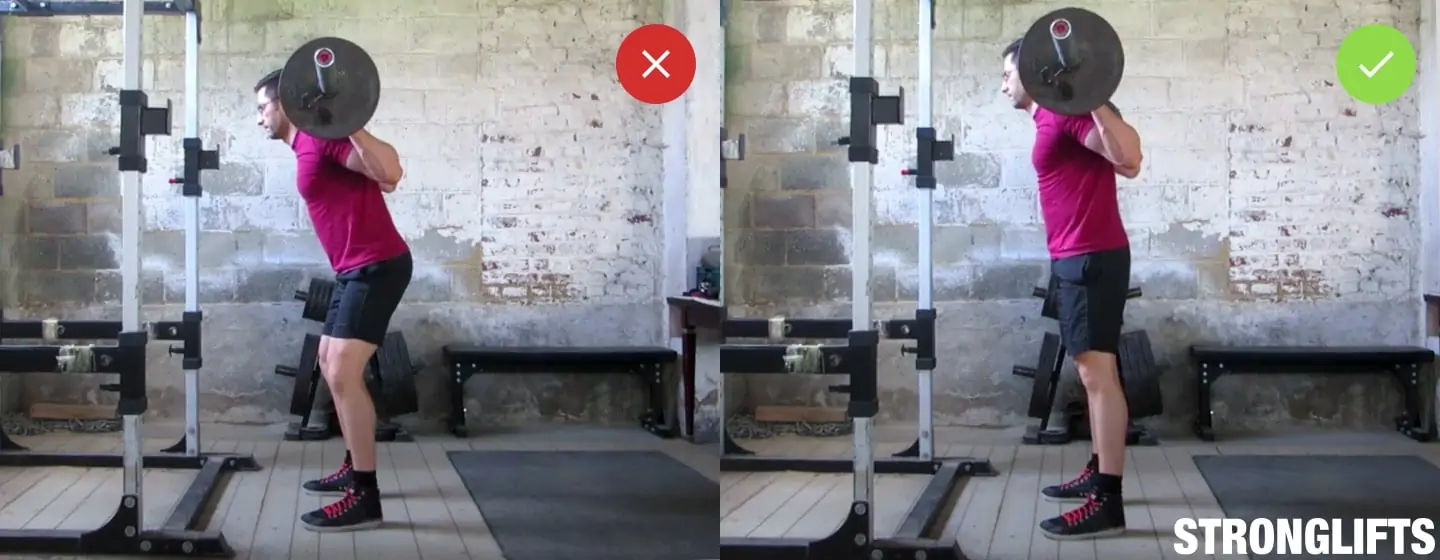
Depends on Build. People with a short torso and long thighs like me lean more forward when they Squat. Long thighs put your hips back more. Your torso must lean forward more to keep the bar balanced over your mid-foot. People with a long torso and short thighs Squat more upright. This means your build determines your best back angle. Don’t copy the Squat form of someone with a different body-type.
Depends on Bar Position. You’ll lean more forward when you Squat low bar than high bar. The lower the bar on your back, the more you must lean forward to keep the bar balanced over your mid-foot. The higher the bar on your back, the more your torso can be upright. Low bar Squats with an upright torso doesn’t work, you’ll fall backward. High bar Squats with forward lean doesn’t work either, the weight will pull you forward.
Bar over Mid-foot Matters. Your back angle is correct if the bar moves over your mid-foot. The middle of your foot is your balance point. The bar is balanced when it starts, moves and ends over your mid-foot. This is regardless of how high or low you put the bar on your back, or how long or short your thighs and torso are. Focus on moving the bar in a vertical line over your mid-foot and your back angle will take care of itself.
Unracking

Setup. Face the bar. It should be at mid-chest level in your uprights. Grab the bar, dip under it and put it on your back. Move your feet under the bar, raise your chest and arch your upper-back. Don’t unrack with a loose upper-back or the bar will press on your spine. Plus you can’t squeeze your back once the unracked bar is crushing you. Get tight before you unrack the bar. And keep your lower back and neck neutral.
Squat Up. Unrack the bar by straightening your legs. Your feet should be under the bar with your hips and knees bent as if doing a half Squat. Now unrack the bar by Squatting up. Don’t unrack with your feet behind the bar or you’ll stress your back. Don’t unrack lunge-style with one foot back or you’ll put uneven stress on your spine. Put your feet under the bar, Squat straight up and keep your heels on the floor.
Walk Back. Unrack the bar by walking back. You want to see the uprights when your set is done so you can rack the weight safely. Face the bar and unrack it by Squatting straight up. Then walk back by taking one step back with each leg. Don’t take a ton of steps back. Keep the walk back short to save strength. This also keeps the uprights close when your set is done. Walk back, lock your hips and knees, and you’re ready to Squat.
Way Down

Knees Out, Hips Back. Squat down by bending your knees and hips at the same time. Don’t just bend your knees or they’ll come too far forward. Don’t just push your hips back either or you’ll lean too far forward. Move them both at the same time. Your knees will move the first half of your Squat but then stay where they are. Your hips then finish the movement by breaking parallel while your lower back stays neutral.
Bar Over Mid-Foot. The bar must move in a vertical line over your mid-foot when you Squat. If it doesn’t, the weight will pull you forward or back and you’ll lose balance. Keep the bar over the middle of your foot by bending your knees and hips at the same time. Lock the bar on your upper-back so it can’t move and cause bad balance. Keep your chest up, pinch your shoulder-blades together and squeeze the bar hard.
Under Control, Not Slow. The faster you Squat down, the harder you’ll rebound from your stretched leg muscles at the bottom and the stronger you’ll be on the way up. But go down too fast and you’ll struggle to Squat with proper form. Bad form negates any advantage Squatting down fast gives. Squat down as fast as you can while maintaining proper form. Don’t be slow but do control the bar on the way down.
Bottom
Break Parallel. The top of your knees must be higher than your hip crease at the bottom of each Squat rep. This means thighs parallel to the floor isn’t low enough. They should be slightly incline so you break parallel. If you can’t, widen your stance so your heels are shoulder-width apart. Turn your toes out 30° and push your knees out while you Squat down. This will create space for your belly to move through your legs.
No Half Reps! Use a full range of motion. Squat down until your hip crease is lower than the top of your knees. Half Squats don’t count. They build less muscle. And they build fake strength: the weight is easier to Squat because it moves less distance. But you’re working less muscles. Break parallel. If you can’t, the weight is too heavy.
Don’t Go “ATG”. You don’t have to Squat “ass-to-grass” until your butt touches your ankles. You do want to use a full range of motion. But you’re already doing that by breaking parallel. Squatting deeper further increases the range of motion. But it also decreases how heavy you’ll Squat. And most people can’t keep their lower back neutral when they Squat deep. Break parallel, then come back up. Don’t go too deep.
Rebound. Squat down, break parallel, then quickly reverse the movement by Squatting back up. The weight will be easier to Squat because you’ll use the Stretch Reflex. Your leg muscles will contract harder because the way down stretched them. The harder your muscles contract, the stronger you are on the way up. The key is to maintain proper form at the bottom by keeping your knees out, hips back and lower back neutral.
Don’t Pause. You lose the Stretch Reflex if you pause at the bottom of your Squat. This makes the weight harder to lift. You’ll Squat more weight if you rebound off your stretched leg muscles at the bottom. Squat down, break parallel, then come back up. Don’t pause at the bottom, reverse the movement quickly instead. Use proper form by controlling the bar. Keep your knees out, hips back and lower back neutral at the bottom.
Way Up

Hips Up, Knees Out. Squat back up by moving your hips straight up. Don’t move them forward or your knees will forward too which kills strength. Don’t move your hips back or your knees will move back and you’ll lean forward more to maintain balance. Squat up by moving your hips straight to the ceiling while pushing your knees out. If you do it right, the bar will move in a vertical line over your mid-foot while you Squat up.
Maintain Your Back Angle. Move your hips and chest up at the same time. If your hips rise faster, you’ll lean forward more which turns your Squats into a goodmorning. This is dangerous for your lower back and ineffective for Squatting heavy. Maintain your back angle when you Squat out of the bottom. It should be constant until you’re about half way up. Keep your chest up and upper-back tight while your hips move up.
Bar over Mid-Foot. You’re Squatting up correctly if the bar moves in a vertical line over the middle of your feet. If the bar moves over your toes when you Squat up, it will pull you forward and out of balance. If the bar moves towards your ankles, it will pull you back and out of balance. The weight is always easier to Squat and safer for your joints if the bar moves over your mid-foot. Think of Squatting the bar straight up.
Between Reps
Lock Your Knees. Finish every Squat rep by locking your knees. Don’t stand with bent legs to keep tension on your muscles. Let your skeleton hold the weight by locking your knees. This works your quads through a full range of motion and makes the bar easier to hold. And it’s safe if you don’t bend your knees backwards and past their normal range of motion. Lock your knees gently at the top. The rep doesn’t count if you don’t.
Lock Your Hips. Every Squat rep must end with locked hips and knees. Don’t stand with your hips unlocked or back at the top. This causes you to lean forward and stresses your lower back. Stand tall and lock your hips so you have a straight line from your shoulders to your ankles. You can squeeze your glutes if it helps by reminding you to lock your hips. But don’t let your lower back round. Keep it neutral at the top.
Get Tight. When you’re ready to Squat your next rep, get tight. Raise your chest, arch your upper-back and pinch your shoulder-blades. Squeeze the bar so it can’t move while you Squat. Then take a big breath, hold it and Squat down. Take your time to get tight before you Squat down. You’ll have better form and more strength. But don’t wait hours at the top. It shouldn’t take you more than a couple of seconds to get tight.
Racking

Finish Your Squat First. Stand tall with your hips and knees locked before you rack the weight. Don’t try to Squat it straight into the uprights. One, that rep doesn’t count because you never locked it out. Two, you’re stressing your lower back by moving the bar in a diagonal line vs a vertical one. Three, you could miss the uprights and get hurt. Stand tall with your hips and knees locked before you rack the bar.
Aim For The Rack. Rack the bar by walking forward until it hits the vertical parts of your Power Rack. Then bend your legs and the bar will land in the uprights. Don’t turn your head to check the uprights or you can tweak your neck. Don’t try to put the bar in the uprights either, you can miss them. Walk the bar against your power rack instead. When the bar touches it, it’s over your uprights. Just bend your legs to rack the weight.
Bar Path
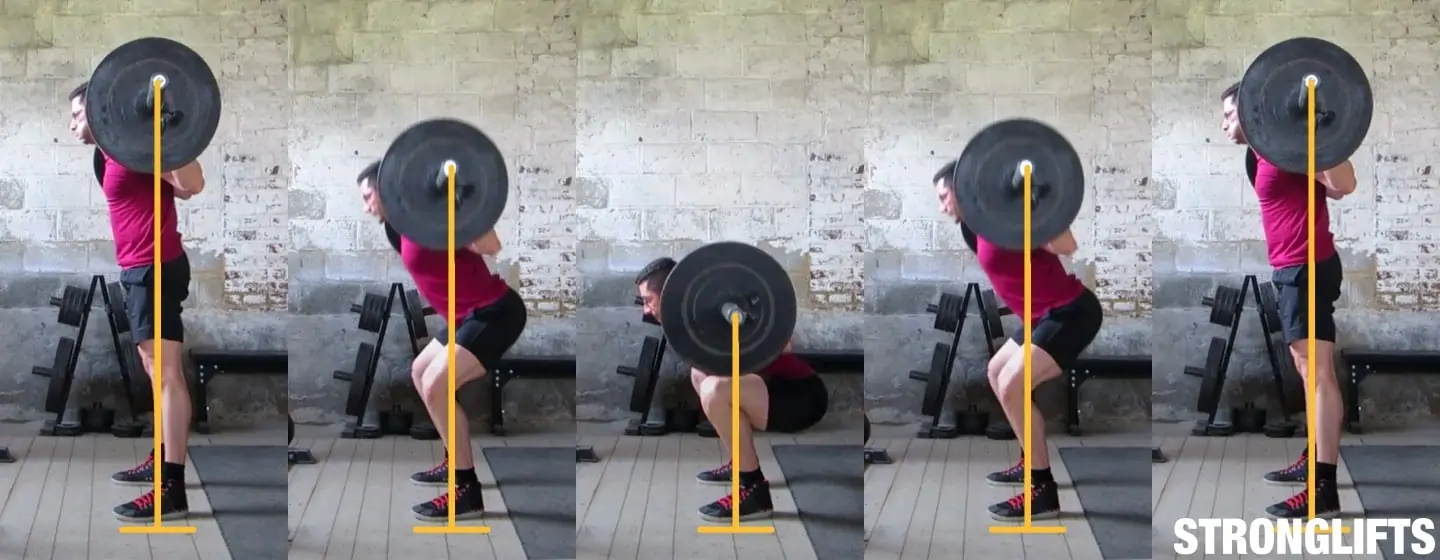
Vertical Line. The bar must move in a vertical line when you Squat. This is the shortest distance to move the bar down and back up. Any horizontal bar movement during your Squat is ineffective. It makes the bar path longer, causes bad balance and stresses your joints. Stand with the bar over your mid-foot, on your back. Squat down by bending your hips and knees. Let your torso go incline so the bar moves over your mid-foot.
Bar over Mid-Foot. The middle of your foot is your balance point. The bar is balanced when it moves over your mid-foot during your Squat. If the bar moves over your forefoot or toes at any point, it will pull you forward and out of balance. If it moves back to your ankles, it will pull you back, you’ll feel like falling backwards and have to take a step back. Keep the bar over your mid-foot when you Squat.
Breathing
Inhale At The Top. Inhale before you unrack the bar and walk it back. Inhale again when you’re ready to Squat, right before you go down. Raise your chest, pinch your shoulder-blades and squeeze the bar. Take a big breath, hold it and then Squat down. Taking this big breath will help you keep your chest up. It prevents your upper-back from rounding which can cause you to lean forward during your Squat.
Hold At The Bottom. Don’t exhale while you Squat down or at the bottom of your Squat. You’ll lose tension in your ribcage and abdomen. Your chest will collapse and your upper-back will round. The bar will move around and cause you to learn forward. All of this decreases strength while putting your spine and joints at risk. Hold your breath on the way down and at the bottom of your Squat.
Exhale At The Top. Squat the weight back up and exhale at the top. You can slowly exhale on the way up against your closed glottis if the weight moves up slowly and the pressure is high. Once you’re at the top, take as many breaths as you want before going back down. Once you’re ready for your next set, raise your chest and arch your upper-back. Then take a big breath, hold it and Squat back down.
Common Issues
Can’t Break Parallel

If you can’t break parallel when you Squat, your stance is too narrow. Put your heels shoulder-width apart and turn your toes 30° out. Then Squat down while pushing your knees out. This creates space for your belly to move through your legs. Most people can instantly break parallel by fixing their Squat stance. If it doesn’t work for you because your hips are tight, do the Toddler Squat described below to increase your flexibility.
Losing Balance
The bar is balanced when it moves over your mid-foot. The middle of your foot is your balance point. Test this by standing with the bar on your back. Lean slightly forward with straight legs and feel how the bar pulls you forward. Lean slightly back and feel how it pulls you back. Stand tall with the bar over your mid-foot and feel how it’s now balanced. Bar over mid-foot is your strongest position where you can stand forever.
If the bar is not over your mid-foot at any point when you Squat, you’ll lose balance. You’ll lose balance forward if the bar comes over your toes. You’ll lose balance backwards if it moves to your ankles. The easy fix is to think of moving the bar in a vertical line over your mid-foot. Make sure you stand with your heels shoulder-width apart and toes 30° out so you can keep the bar over your mid-foot when you Squat.
Don’t use machines because you lose balance when you Squat. The only way to learn how to balance the weight when you Squat is to balance the weight when you Squat. You don’t learn it by relying on a machine that balances it for you. As soon as you move to free weights, you’ll have to start from scratch again. Start with free weights immediately and stick with them. Start light and Squat in the Power Rack if you’re scared.
Leaning Forward
You’ll lean forward on the Squat when your hips rise faster than your chest. Squat up by moving your hips and chest at the same time. Don’t let your hips rise faster than your chest or your torso will end too horizontal with the floor. This can cause the bar to roll up your back, to your neck, and pull you forward. Keep your back angle constant on the way up. Your hips and chest must move up at the same time.
Heels Come Up
Your heels will come off the floor if you Squat with a narrow stance. Put your heels shoulder-width apart. Turn your toes out 30° and Squat down by bending your hips and knees at the same time. Hips back, knees out. Your knees should move the first half of your Squat and then stay there while your hips keep moving. Don’t let your knees come too forward or the bar will end over your toes, pull you forward and raise your heels.
Don’t Squat with a plate or piece of wood under your heels. This is a band-aid solution that creates new issues instead of fixing the bad Squat form. Squatting with elevated heels stresses your knees more by moving them further forward. It’s also unstable and thus dangerous for Squatting heavy weights. And it doesn’t fix flexibility issues or bad Squat form. Keep your heels on the floor instead of putting stuff under them.
If you think your heels come off the floor because your hips or ankles are tight, do the Toddler Squat every day for 10 minutes. This will increase your flexibility for Squats. But remember stretching doesn’t fix bad form. If your heels come off the floor because your stance is too narrow, then widen your stance. Stretching won’t fix that. You have to fix it by Squatting with your heels shoulder-width apart, toes out and knees out.
Check your shoes as well. You need hard soles that don’t compress under the weight. That means no running shoes with air or gel filling. The weight of the bar will compress the soles of running shoes when you Squat. It will compress it in unpredictable ways which can cause your heel to come off the floor. Try barefoot and check if that keeps your heel down. Then get shoes with a hard sole like Chuck Taylor’s.
Lower Back Rounding
Your lower back will round if you Squat with your knees pointing forward. This puts the front of your hips in the way of the top of your thighs. Your hips can’t go below parallel because your thighs are in the way. Squat with your heels shoulder-with apart, toes out and knees out. Your lower back will stay neutral.
Your lower back will also round if you go too deep. Squat down until your hip crease is below the top of your knees. But don’t go deeper and ass-to-grass or your lower back will usually round. If you insist on going deep, make sure you Squat high bar so your torso can stay upright. Squatting ass-to-grass with a low bar position doesn’t work. Your lower back will round at the bottom because your torso is less upright.
The Buttwink is usually just lower back rounding. Don’t go lower than below parallel and push your knees out – solved. Sometimes the buttwink is the result of overarching. You can’t keep your lower back overarched at the bottom. It will move to neutral which can look like lower back rounding. But it’s just a reset. Squat with a natural arch like when you stand. Ribcage down, lower back neutral, abs squeezed. No more buttwink.
Knees Cave In
Squatting with your knees caved in is bad for your knees. It twists your knee joints. Some knee caving in may happen during heavy Squats and max attempts. But excess knee caving in on every rep and set will cause pain inside your knees. Your thighs must stay inline with your feet when you Squat. This prevents twisting of your knee joints and ligaments. It keeps them safe.
Keep your knees out when you Squat. Push them to the side. Push them out both when you Squat down and when you Squat back up. External hip rotation is the goal: rotate your right thigh clockwise and your left thigh counter-clockwise. Your toes should be 30° out so your feet and thighs are parallel. Your heels should be shoulder-width apart. Don’t Squat with a wider stance or it will be harder to keep your knees out.
Fear of Squats
Fear of Squats is normal. Your body has good reason to perceive Squats as a threat: you can fail to Squat the weight back up. That’s why you may feel fear when you approach the bar. You may also feel anxiety leading to the workout, like when driving to the gym. I’ve been Squatting for 16 years and still experience fear sometimes. There’s nothing wrong with this, it’s part of the game.
The best way to overcome fear of Squats is to Squat. Every Squat set you finish safely is positive feedback. This feedback grows your courage and confidence over time. It doesn’t remove the fear of Squats. It just teaches you to be comfortable Squatting despite feeling fear. Because you know, from Squatting safely over and over, that everything is going to be just fine. This is like cognitive behavior therapy for Squats.
The key is positive feedback. Failing a rep isn’t negative feedback. Failing a rep without Power Rack, getting stuck under the bar and then hurting your back is. That causes more fear. You have to Squat safely. Squat in the Power Rack, set the safety pins and use proper form. When you Squat safely this way without hurting yourself because the pins caught the rack, you know you’re safe. This is positive feedback.
Don’t hesitate failing Squats on purpose a few times to overcome the fear of the unknown. This way you know how it will feel when you fail a heavy Squat. When you approach the bar and you feel fear coming up, don’t pay too much attention to it. Notice it, take a few deep breaths to calm you down, and walk to the bar. Setup as you always do, unrack the weight and do your Squats.
Squat Stretches
Hip Flexibility

The Toddler Squat is the best stretch for the Squat. You do it by resting in the bottom Squat position for about a minute. This stretches your hips and ankles so you can break parallel more easily when you Squat. The name comes from toddlers who naturally Squat to play.
Toddler Squats are effective because they stretch all the muscles you Squat with. They stretch them at the same time, using just one exercise and the way you use them for Squats. This beats stretching your hamstrings by touching your toes. Remember Squats are a compound exercise. You have to stretch the whole movement, not a single muscle. The Toddler Squats works because it stretches the Squat movement.
To do the Toddler Squat, Squat down without using weight. Put your heels shoulder-width apart and toes 30° out. Keep your knees out, chest up and head neutral. Rest below parallel for a minute (or less if that’s too long). Then Squat up, rest and repeat. Do 5-10 mins daily and try to hold longer each time. Keep your heels on the floor. Hold on to something if you lose balance. It’s normal for your shins and hips to get sore.
Everyone should be able to do the Toddler Squat for 10 minutes. Remember humans used to Squat daily and break parallel before sitting toilets existed. But most people grow up sitting on toilets, in cars, at work, on the couch and so on. if you stop Squatting below parallel, you eventually lose the ability to do it. Luckily you can regain it quickly and easily if you Squat daily like your ancestors did by doing the Toddler Squat.
Quick warning if you have a history of knee pain: take it slowly. The Toddler Squat will stretch your knee joint. This can be hard on your knees. Don’t drop into the bottom position, control it. Don’t bounce off your knees to Squat lower. Keep your heels on the floor and your knees inline with your feet. Most importantly, let pain be your guide. Some discomfort is fine, you’re stretching. But if your joints are killing you, stop it.
Once you’ve increased your hip flexibility with the Toddler Squat, you can easily maintain it by Squatting several times a week like on StrongLifts 5×5. Squats move your legs through a full range of motion when you break parallel. They stretch and strengthen your hips. They’re your weekly practice of Squatting below parallel so you maintain hip flexibility. Squats don’t make you inflexible because you must be flexible to Squat.
Shoulder Flexibility

Shoulders Dislocations are the best upper-body stretch for the Squat. You do it by lifting a broomstick from your thighs over your head and behind your back. This stretches your chest, shoulders and upper-back. It makes the bar easier to hold across your back for the Squat. And it won’t actually dislocate your shoulders, it just stretches them. Gymnasts have used Shoulders Dislocations for decades as a stretching exercise.
You can do Shoulders Dislocations with a broomstick, resistance band, pvc pipe or rope. Just make sure it’s long enough. The tighter your shoulders are, the wider the grip you need. Don’t do Shoulders Dislocations too narrow or you’ll hurt your elbows and shoulders. I recommend you use a long broomstick with a wide grip. Narrow your grip as your flexibility improves but never go narrower than 1.5x your shoulder-width.
If your elbows bend when you do Shoulders Dislocations, your grip is too narrow. Grip the bar wider so your arms stay straight. The goal is to move from your shoulders, not your elbows. If your elbows bend, your shoulders and chest get less of a stretch. Keep your elbows locked. Keep also your lower back neutral. Don’t compensate for tight shoulders by overarching. Maintain a natural curve in your lower back.
Warmup for Squats by doing 3×10 Shoulders Dislocations first. This will loosen your shoulders and make the bar easier to hold on your back. Your shoulder flexibility will improve even faster if you do Shoulders Dislocations on the days you’re not lifting as well. Meanwhile, grip the bar wider on Squats so it feels less uncomfortable. Narrow your grip as your flexibility improves. Note that Squatting itself will stretch your shoulders.
Don’t try Shoulders Dislocations with a barbell. You may be able to raise it overhead, but dropping it behind your back is dangerous. It can dislocate your shoulders because the weight will be too heavy for your shoulders to control. Use the broomstick. If you want resistance, use a mini resistance band. If you want weight, add the smallest amount of weight possible (0.5kg/1lb). But don’t use a barbell for Shoulders Dislocations.
Equipment
Power Rack
You need a Power Rack to Squat heavy safely. Power Racks have four vertical poles with uprights and horizontal safety pins. You use the uprights to put the bar on and off your back. You use the adjustable safety pins to catch the bar if you fail to Squat the weight back up. The bar moves freely so you decide where it goes and Squat using a natural movement. You balance the weight which builds more strength and muscle mass.
The uprights should be about mid-chest level. Most people set them too high. This is unsafe because you have to get on your toes to rack/unrack the bar. Your whole feet must stay on the floor for proper balance. But the uprights can’t be too low or your legs will bend more to unrack the bar. This wastes strength for your Squats. Set the uprights mid-chest level so you just have to straighten your bent legs to unrack the bar.
The horizontal safety pins must be lower than the bottom position of your Squat. Don’t set them too high or you’ll hit them on good reps. This will throw the bar off balance and is a stupid way to miss reps. Don’t put the safety pins too low either or you’ll have to lean forward or fall backwards to get the bar on the pins. This is a guaranteed way to hurt your lower back or tailbone. Set the pins just below where you break parallel.
When you fail to Squat the weight up, lower the bar to the pins by Squatting straight down. Don’t drop it forward or back or you’ll lose balance. Keep the bar over your mid-foot and Squat back down. Go below parallel until the bar lands on the safety pins. Expect a hard stretch of your hip muscles. Practice failing with a light weight a few times on purpose. This way you know what to expect when you really need to fail.
You don’t need a spotter if you Squat in the Power Rack. Even if you have a spotter, it’s safer to Squat in the Power Rack. If the spotter reacts too late, the pins always catch the bar. Knowing you’re safe increases confidence by overcoming fear. You can Squat all out instead of holding yourself back. Your Squat increases faster as a result, and you gain strength and muscle faster. Here are some Power Racks I recommend…
- Rep Fitness. Handles 700lb and has a pullup bar. But the hole spacing is wider. This can result in the uprights being too low or high when you (un)rack the weight. I trained with a rack like this one for 10 years though, and it did the job.
- Rogue R3. I have a rack similar to this one. It takes less space but needs to be bolted down (that does mean it will be very stable). Pullup bar, safety pins and narrow hole spacing.
- Rep Short Power Rack. This Power Rack will fit under low ceilings. This works great if you train in your basement for example.
I’ve been Squatting mostly alone in my home gym for 20 years. I’ve failed many times with heavy weights. But I’ve always been safe because I Squat in the Power Rack. Squatting without Power Rack is unsafe unless you have a spotter who knows what he’s doing. Squatting without Power Rack or spotter is unsafe. Worse, it will limit your progress on Stronglifts 5×5 because you can’t Squat heavy to gain strength and muscle.
Unfortunately, not all gyms have Power Racks. You may have to find a better gym that has one. Or you may have to buy your own Power Rack, put it in your garage, basement or shed, and build a home gym as I’ve done. This takes time, effort and cash. But it takes less of it than trying to gain strength and muscle without doing Squats. Because no substitute to the Squat exists. Get access to a Power Rack so you can Squat.
Power Rack Alternatives
Squat Racks look like a half Power Rack. They have uprights to safely get the bar on and off your upper-back. But they don’t always have horizontal safety pins. The ones that do often have non-adjustable safety pins that can be too high or low for your build. I used a Squat Rack the first five years when I trained in a gym. It works fine if you know what you’re doing. But the Power Rack is safer for Squatting heavy alone.
Squat Stands are two vertical poles with uprights. They’re usually not connected so you can easily move them and save space. But Squat Stands rarely have stable safety pins. They’re made for experienced Olympic Lifters who use bumper plates and throw the bar on the floor when they fail. You’ll get the bar on your back with Squat Stands. The Issue is getting away from the bar when you fail to Squat without spotter or safety pins.
Saw horses can serve as safety pins for your Squat Stands. You can get adjustable ones that handle 450kg/1000lb in most hardware stores (they’re cheap). Put the pair next to your Squat Stands to catch the bar if you fail. Just make sure the bar doesn’t roll off the safety pins and crash on your floor. Squatting with Squat Stands and saw horses works if you know what you’re doing. But again, using the Power Rack is always safer.
Cleaning the bar doesn’t work. You can pull light weights from the floor to your shoulders and even behind your head. But the heavier the weight, the harder it will be to clean and the more this will limit your Squat. You’ll be tired before you even Squat, or fail to clean the bar. Whatever you clean, you can Squat more. So you’re never Squatting heavy. And you never have safety pins to catch the bar if you fail to Squat the weight up.
Don’t Use Machines. Squatting in the Smith Machine forces you into a fixed bar path because the bar is attached on rails. This can hurt your lower back and knees. It’s also ineffective to gain strength and muscle fast because the machine balances the weight. Same deal with the Leg Press, plus the weight moves, you don’t. Machines are no substitute for Squatting heavy with free weights. Don’t expect the same results.
Olympic Barbell
Squat with an Olympic Barbell. It’s the long and heavy one: 2m20/7′ and 20kg/45lb. The main part is 28mm thick, the outer part 50mm/2″. The bar has knurling for your hands and center knurling for your upper-back. it gives you a solid grip and prevents the bar from moving up or down your back when you Squat. Olympic Power Bars are stiff and don’t bounce around. They can easily handle 450kg/1000lb of weight.
The sleeves of Olympic Barbells rotate. The outside part where you put the plates on can rotate independently from the bar. This is crucial because the plates spin when you Squat. If the sleeves are fixed, the inner part can’t turn. This beats up your wrists, elbows and shoulders. Squatting with an Olympic Barbell with revolving sleeves is better for your joints. Oil and maintain it so the sleeves rotate properly.
Many gyms have cheap bars because quality ones are expensive. Cheap bars are often lighter and shorter. They may weigh only 10-15kg (20-30lb) and bend when you load two big plates on each side. They’re often smooth in the middle which causes the bar to move around when you Squat. And the sleeves can be fixed which causes wrist, elbows and shoulder pain. The heavier you Squat, the more cheap bars become an issue.
Quality bars make a difference. They feel more secure. They don’t bend as quickly. They don’t stress your joints. They don’t make you wonder mid-set if the bar will break in two while you Squat. You have better form because the bar doesn’t move around. You have more confidence because you feel safe about your equipment. Squats are intimidating. You don’t want to make it worse by using cheap equipment that feels unsafe.
Quality barbells are expensive. But they last a lifetime. The first bar I bought, I used for ten years in a garage where it freezes and gets humid. The bar handled it fine. I gave this bar to my brother for his home gym. He can use it for another 10 years. Buy a quality bar and you’ll only need to buy one ever. You’ll use it every StrongLifts 5×5 workout, for every exercise, so don’t be cheap. Check these barbells…
- Rogue Ohio Bar. I had one like this before, really good.
- CAP Barbell. Make sure you get the one with center knurling (so the bar doesn’t slide off your back when doing Squats).
Collar your bar so your plates can’t move while you Squat. Some bars have slippery sleeves on which the plates move more easily. You don’t want a plate to slide off the bar mid-set, tip it over and then hurt yourself. Put spring clips or lock-jaw collars on your bar when you Squat. I put them on for every set, including my warmup sets, because I hate the distraction of hearing plates move.
You don’t need a foam pad. If your neck hurts when you Squat, you’re holding the bar wrong. Your muscles must support the bar so it can’t dig into your spine. Squeeze your shoulder-blades before you unrack the bar. If you do it right, you’ll be able to Squat 180kg/400lb and more wearing just a T-shirt as I’ve done. Don’t mask neck pain with band-aid solutions and then keep Squatting with bad form.
Squat Variations
Olympic Squat
The Olympic Squat is a Squat with a high bar position. The bar rests higher on your back, at the bottom of your neck, on top of your trap muscles. This puts your torso more upright to keep the bar balanced over your mid-foot. Your knees come more forward as a result and your hips are less back. Olympic Weightlifters Squat high bar because it mimics the catch during cleans. Bodybuilders usually also Squat high bar.
The Olympic Squat is easier on your shoulders because the bar rests higher. For some people this is the only way to Squat without shoulder, wrist or elbow pain. If the low bar Squat hurts despite using proper form, widening your grip and working on your shoulder flexibility, then Squat high bar. You need to Squat to gain strength and muscle. Squatting high bar is better than not Squatting and doing leg extensions instead.
But the low bar Squat is better to Squat as heavy as you can. You’ll Squat 10-20% more weight because you can engage your hips more and keep your chest up more easily. That’s why Powerlifters always Squat low bar. Olympic Lifters don’t Squat low bar because the Squat is not a contested lift for them. They Squat to improve their Snatch and Clean & Jerk. They don’t Squat to increase their Squat, unlike Powerlifters do.
If your main goal is to gain muscle, any heavy Back Squatting is fine. It’s true high bar Squats work your quads more while low bar works your hips more. But the difference is insignificant. Your quads and hips always work. And your legs will become muscular if you Squat heavy. Low bar may be better because you can go heavier, high bar because the range of motion is longer. But any Back Squatting beats not Back Squatting.
Some people prefer to Squat high bar because it keeps their torso more upright. They’re afraid of the forward lean during low bar Squats. But your torso will lean forward too during heavy high bar Squats. The bar is higher on your back which makes it harder to keep your chest up. The low bar Squat has more forward lean. But it’s easier to keep your chest up, upper-back tight and back angle constant than with high bar Squats.
I did high bar Squats when I started lifting. It was the natural way to hold the bar on my back. When I became interested in training for strength five years later, I switched to the low bar Squat powerlifters do. I can lift about 10% more weight using low bar. I still do high bar sometimes for my secondary Squat exercises, but always do low bar for my main Squat.
Ass-to-Grass Squat
Ass-to-Grass or ATG Squats is Squatting all the way down until your butt touches your ankles. This works your muscles through a longer range of motion. Olympic Weight Lifters Squat ATG and sometimes pause at the bottom. This mimics the catch during heavy Squat cleans. Powerlifters don’t Squat Ass-to-Grass because the lower you go below parallel, the less weight you’ll Squat. They must Squat the heaviest possible to win.
Here’s a video of the weightlifter Dimitry Klokov Squatting Ass-to-Grass. He Squats all the way down and even pauses. The bar rests high on his back (high bar) which is the only way to Squat ATG. He wears knee wraps, most likely to absorb some of the weight (check how bent his knees are at the bottom). His torso is vertical at the bottom, but he leans forward on the way up to engage his stronger hips while keeping his chest up.
Most people don’t have the hip flexibility and structure to Squat Ass-to-Grass with proper form like Klokov does. Your lower back will most likely round at the bottom. Your knees can also take a beating with ATG Squats if you drop down fast and rebound off your knee joints instead of your muscles.
Don’t Squat ATG. You should use a full range of motion by Squatting down until your hip crease is below the top of your knees. But don’t go deeper. Break parallel and come back up. You’ll Squat heavier. If you want to stretch your hips, do deep Toddler Squats separately. If you insist on Squatting ATG, go high bar and wear weight lifting shoes. You’ll go deep more easily and your heels will stay down. But watch your back and knees.
Front Squat
Front Squats are Squats where the bar rests on your front shoulders. Your torso is more vertical to keep the bar balanced over your mid-foot. Your knees come more forward and your shins end more incline than on a Back Squat. But your hips move less back. Olympic Weight Lifters Front Squat because this movement is part of the Squat clean. Bodybuilders also often Front Squat to “target their quads” but using a cross-arm grip.
Here’s Dmitry Klokov doing Front Squats with 265kg/583lb. He uses a clean grip. His hands are open so his shoulders support the weight, not his hands. He Squats down until his hip crease is below the top of his knees. He wears knee and wrist wraps to absorb some of the weight (his elbows are quite low, yours would most likely hurt if you try this without wrist wraps). His torso stays upright to keep the bar on his shoulders.
Front Squats are harder on the knees, elbows and wrists than Back Squats. Your knees move more forward at the bottom to keep the bar balanced over your mid-foot. Your elbows are fully bent and your wrists stretched back. Front Squats are a bad idea if you’ve had knee pain or knee surgery in the past. Your wrists and elbows will hurt if they’re tight (unless you start stretching the hell out of them daily).
You can overcome tight wrists by Front Squatting with a crossed-arm grip. This is the grip bodybuilders typically use. But it makes it harder to keep your elbows up. If they drop, your chest collapses and back rounds. The bar then rolls off your shoulders and pulls you forward. You lean forward and lose the bar. Olympic Lifters use the clean grip because it’s easier to Front Squat heavy. You just need to stretch your wrists.
Front Squats feel harder than Back Squats because the bar is harder to hold. Your chest and elbows must stay up to keep it on your shoulders. But you’ll want to lean forward during heavy sets to engage your hips. Do it too much, and you’ll lose the bar. You can lean forward more easily without losing the bar on Back Squats (especially low bar). That’s why you can easily Back Squat 30% more than you can Front Squat.
Front Squats work your quads more than Back Squats. Your knees are more forward and bent at the bottom. But this is also why Front Squats are harder on your knees than Back Squats. Plus it’s not like Back Squats don’t work your quads. They do. Your legs bend and straighten on every rep when you Back Squat. This works your quad muscles without the more stressful forward knee position of Front Squats.
Your Back Squat won’t increase if you only Front Squat. I tried it years ago. I Front Squatted 3x/week for months. Ran Smolov for Front Squats even. My Front Squat increased but my Back Squat hardly did. It doesn’t matter if Front Squats feel harder. It’s not the same and not specific. If you want to get better at tennis, you must play tennis not badminton. If you want to get better at Back Squats, Back Squat. Don’t Front Squat only.
Some people Front Squat because they don’t have a Power Rack. They pull the bar from the floor on their front shoulders and then Front Squat it. This works but only for a while. Eventually the weight becomes too heavy to pull on your shoulders. The clean limits how hard you can work your muscles by Squatting. You can’t reach your potential. Even if you can clean everything, you’ll always Back Squat more with a Power Rack.
Front Squats are no substitute for Back Squats. Back Squats must be the backbone of your training (cfr StrongLifts 5×5). Focus on Back Squats until you can do 140kg/300lb. Don’t alternate with Front Squats, form is different and you’ll get confused. If you’re cleaning the bar to Squat, get a Power Rack so you can Back Squat heavy and reach your potential. Once you’re strong at Back Squats, you can add Front Squats for variety.
Box Squat
Box Squats are Squats where you sit on a box and Squat back up. The box helps you break parallel consistently and prevents Squatting too low. It also helps you sit back more to emphasize your hips without losing balance. Louie Simmons from Westside Barbell popularized Box Squats in the 1990s. Geared powerlifers Box Squat because it mimics Squatting in compression Squat suits which stretch at the bottom and help the way up.
But Box Squats don’t work for raw lifters like us because technique is different. Your shins are more vertical on Box Squats and the box is holding you at the bottom. With free Squats your shins come more forward and your hips must stay tight at the bottom. If you never free Squat but only Box Squat, you’ll lose balance and get crushed by the weight when you try to free Squat. You must free Squat to get better at free Squats.
I made this mistake. After that Front Squat experiment, I spent months Box Squatting only, Westside style. My Box Squat increased so I tested my Free Squat. I expected it to be higher than my Box Squat. But to my surprise I never got close to what I was Box Squatting. I couldn’t stay tight in the bottom, got crushed by the weight and it dropped on the pins. I was weaker on free Squats because I never did them. Lack of specific training.
The box is also a bad tool to break parallel consistently. It only works as long as you use it. Try to Squat without and you’re lost. Because the box makes you rely on contact with an external object to judge depth. It doesn’t teach you to focus on how your muscles feel when you break parallel, and then remember it. That only comes by doing free Squats consistently. Videotape yourself if you want feedback. But don’t use a box.
Box Squats are no substitute for Back Squats. They won’t teach you to break parallel consistently because the box becomes a crutch.
Smith Squat
Smith Squats are Squats inside the smith machine. The bar is attached on rails and the machine balances it for you. The bar can only move up and down although some gyms have newer 3D Smith Machines that allow some horizontal bar movement. The bar of the smith machine has hooks to rack and unrack the weight by rotating your hands. Bodybuilding legend Jack Lalanne invented the Smith Machine in the 1950s.
Smith Squats are no substitute for Squatting free weights. Smith Squats are less effective for gaining strength and muscle because the machine balances the weight. That’s why people can Smith Squat more than with free weights. Worse, Smith Squats are dangerous for your spine and joints. You don’t decide where the bar goes, the machine does.
I started Squatting on the Smith Machine when I joined the gym because that’s what everyone did. I did them every week for a year and tried to go heavier each time. One day the Smith Machine was taken and my training partner and I didn’t want to wait. So we decided to do free Squats in the Squat Rack that was gathering dust. To our surprise, we couldn’t Squat what we did in the Smith. I never did Smith Squats again after that.
Maybe you want to do Smith Squats because you’re intimidated by free weights. Smith Squats first, real Squats later. But this is like using training wheels to learn how to ride a bike. And it’s equally ineffective because you learn to depend on a machine. The only way to learn how to balance the weight is by balancing it yourself. The only way to get comfortable Squatting free weights is by Squatting free weights. This is the shortcut.
Leg Press
The Leg Press is a machine where you push weight away with your feet. Some Leg Press machines are 45° incline, others are horizontal. But they’re never substitutes for Squats. The weight moves, you don’t. You don’t balance the weight, the machine does. Go too deep and your lower back will round at the bottom and squeeze your spinal discs. Unless you have no arms to hold the bar on your back, stick with free weight Squats.
Dumbbell Squat

Dumbbell Squats are Squats with dumbbells. Hold them on your front shoulders and Squat. Benefit: you don’t need a Power Rack. Drawback: you can’t go heavy. Holding 50kg on each shoulder is harder than a 100kg bar on your back. And you must get those dumbbells on your shoulders first. Progression is also harder because most dumbbells go up by 2kg/5lb. This forces you to add 4kg/10lb each workout vs 2.5kg/5lb with barbells.
You could hold the dumbbells by your side. But this turns Dumbbell Squats into Dumbbell Deadlifts. Because dumbbells hit the floor before you can break parallel. Your hips can’t go below your knees. You can’t work your legs and body through a full range of motion unlike when you Squat with a bar on your back. You’re doing half Squats instead. And your grip will fail before your legs do unless you use straps.
Dumbbell Squats are better than doing nothing. If you never did any physical activity in your life and are out of shape, they’ll give your body some work to do. But dumbbells eventually become easy and they make it hard to Squat heavy.
If you want to train with dumbbell-only, check out the Quarantine program. It’s a hotel-gym workout based on what I did during a 14 day quarantine when the Covid lockdowns happened.
Squat Frequently Asked Questions
Join the Stronglifts community to get free access to all the spreadsheets for every Stronglifts program. You’ll also get 15% off Stronglifts Pro, and daily email tips. Enter your email below to sign up today for free.
Join the Stronglifts community to get a PDF version of this Squat guide for free. You’ll also get daily email tips and a 15% discount on the Stronglifts app.
What are the benefits of doing Squats?
Many lifters consider the Squat the king of all exercises. Bodybuilders, powerlifters, Olympic weightlifters, Crossfitters, and athletes of all kinds include Squats in their training. It’s considered a fundamental exercise.
- More Strength. Squats strengthen your legs, abs, and back. You use these muscles every day when walking, cycling, hiking, climbing stairs, sitting and standing back up, etc. Stronger legs make those activities easier because they require less effort than before. You get less tired and have more energy. Stronger legs are very important to prevent falls and broken hips in older age.
- More Muscle. Squats work various muscles in your body – your legs, glutes, calves, abs, lower back, and even your arms from holding the bar. Squats can replace several leg exercises, making them more time-efficient for building muscle mass. Building and maintaining strong, muscular legs is important to combat age-related muscle loss.
- More Fitness. Squats are a compound exercise. They work several muscles at the same time. This puts a greater demand on your cardiovascular fitness than isolation exercises like leg curls or leg extensions that only work one muscle at a time. Squats increase your VO2 max more, a strong predictor of overall cardiovascular fitness.
- More Energy. Squats strengthen the legs. This helps you go faster and further because each step takes less effort. You won’t get as tired as you did before. Squats also increase blood flow to your legs which can help reduce fatigue. They strengthen your back muscles which can help you maintain a more upright posture throughout your day.
- Denser Bones. Squat increase the density of your bones. Bones are hard and respond better to heavy weights. When you Squat with a heavy weight on your upper back, it compresses everything under the bar. Your bones respond to this compression by increasing in density. This makes them stronger and less likely to break. It protects you against osteoporosis and broken bones during falls.
- Strengthen Joints. Squats strengthen the muscles around your knee joints, hip joints, ankle joints, spine, and so on. It also strengthens your tendons and connective tissues. This creates support for your joints and spine. It protects them against injuries. And it can help you recover from lower back or knee pain. The key is to Squat with proper form so you strengthen your joints instead of stressing them.
- Increase Flexibility. Squats won’t make you inflexible and “muscle-bound”. Most people who Squat for the first time realize they’re inflexible because they haven’t Squatted below parallel for years. Squats can’t make you inflexible because you must be flexible to Squat. Squatting each week moves your legs through a full range of motion. This maintains proper hip flexibility which can prevent lower back pain.
- Improve Balance. Squats train you to balance the bar while your body moves. This improves your balance and coordination. It also increases your ability to feel your body move through space. Squats make you better at sports and learning new skills. They make you less likely to fall when walking upstairs or in the dark. Don’t Squat with machines. Squat free weights so your balance improves.
- Build Discipline. Squats are hard. Doing hard things, even when you don’t feel like it, trains the muscle between your ears: your mind. This builds discipline and mental fortitude which is crucial to get results in the gym. It also builds discipline that transfers to other areas of your life. It helps you stick to good nutrition habits, go to bed on time, do the work, and so on. Squats build discipline.
There’s a lot more. Squats are the best weight training exercise you can do because they work more muscles, over a longer range of motion, and with more weight than any other exercise. It’s therefore the best exercise you can do in the gym. It’s the only one you should do if you only have time for one.


