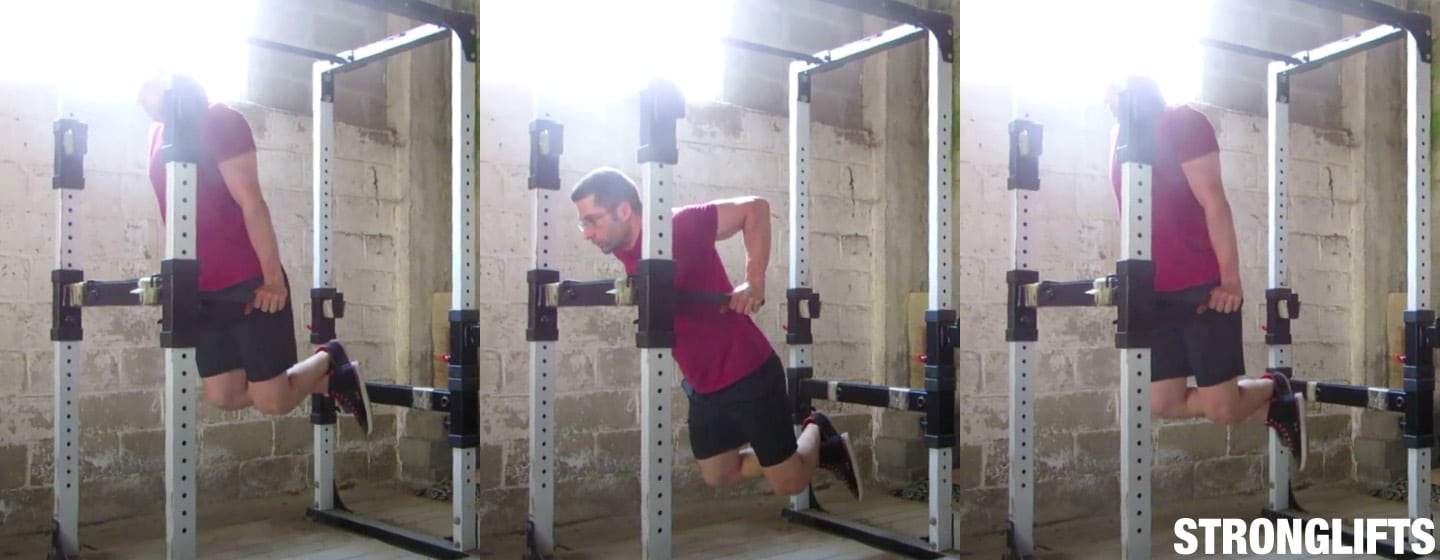
Here’s how to do Dips with proper form:
- Grab the parallel bars and jump up, straighten your arms
- Lower your body by bending your arms while leaning forward
- Dip down until your shoulders are below your elbows
- Lift your body up by straightening your arms
- Lock your elbows at the top
Dips are a compound, body-weight exercise. You do Dips by first raising yourself on two dip bars with straight arms. Lower your body until your shoulders are below your elbows. Push yourself up until your arms are straight again. Dips work your chest, shoulders, back and arm muscles.
Proper Dip form is key to avoid shoulder and chest pain. Don’t let your shoulders roll forward. Don’t shrug them either. Keep your shoulders back and down. Lower yourself until your shoulders are below your elbows, but don’t go lower. Do Dips on fixed parallel bars and avoid Ring Dips.
Dips aren’t part of StrongLifts 5×5 by default. You don’t need them to gain strength and muscle. If you want to emphasize your arms and have time to do more, you can add Dips to workout A. But stay focused on increasing your Squat. It matters most for gaining overall strength and muscle.
This is the definitive guide to proper form on Dips. It also covers variations like Weighted Dips.
Contents
Join the Stronglifts community to get free access to all the spreadsheets for every Stronglifts program. You’ll also get daily email tips to stay motivated. Enter your email below to sign up today for free.
Introduction
How to Do Dips
You need two Dip bars to do Dips. These bars should be parallel, fixed and stable. Most gyms have a Dip station that you can also use for Pullups and hanging knee raises. You can do Dips in the Power Rack as well if you get two dip handles that fit in the safety pins. Don’t do Dips on Rings or between benches, both can hurt your shoulders. Use parallel bars instead. Here’s how to do Dips with proper form in five simple steps…
- Setup. Grab the bars and jump up. Balance yourself with locked elbows.
- Dip. Lower your body by bending your arms. Lean your torso slightly forward.
- Break Parallel. Go down until your shoulders are below your elbows at the bottom.
- Rise Up. Lift your body back up to the starting position by straightening your arms.
- Lockout. Balance yourself with your shoulders over your hands. Lock your elbows.
If you lack the strength to do a single Dip, do negatives. Skip the way up for now and only do the way down on which you’re stronger. Grab the dip bars, jump up and straighten your arms. Lower yourself slowly until your shoulders are below your elbows. Then put your feet on the floor and jump back on the dip bars with straight arms. When you can do 10 negatives with proper form, you can do one Dip.
Dips Form 101
The ideal way to do Dips is with your hands under your shoulders. This keeps your arms close to your body. Wider shoulders thus need a wider grip. But you need angled bars to adjust it. My bars are parallel so my grip width follows my equipment. This works fine if you have an average build. But it can be an issue for special body-types. Keep it in mind and follow these guidelines to do Dips with proper form…
- Grip Width. Your hands should be under your shoulders and just outside your hips.
- Grip. Hold the bars low hand, close to your wrists. Use a full grip and squeeze the bars.
- Forearms. Keep your forearms vertical from all angles, on the way down and the way up.
- Elbows. Lock them at the top. Tuck 45° at the bottom. Don’t flare them or touch your torso.
- Chest. Raise your chest before lowering yourself. Raise your chest between reps at the top.
- Shoulders. Push them back and down. Don’t let them roll forward. Don’t shrug them either.
- Head. Keep your head inline with your torso. Don’t look at the ceiling. Look at the floor in front.
- Torso. You torso must be slightly incline for balance. Lean slightly forward while you lower yourself.
- Lower Back. Don’t over-arch your lower back. Stay neutral. Straight line from shoulders to knees.
- Legs. Bend your knees and cross your feet. You can keep your legs straight if you have high bars.
- Top. Arms straight. Elbows locked. Chest up. Shoulders pushed down. Torso slightly incline.
- Way Down. Raise your chest, take a big breath and bend your arms. Lean slightly forward.
- Bottom. Break parallel by lowering yourself until your shoulders are below your elbows.
- Way Up. Rise up by straightening your arms. Don’t look up. Keep your shoulders down.
- Lockout. Arms straight. Elbows locked. Chest up. Shoulders down. Head neutral.
- Breathing. Inhale at the top. Hold it on the way down. Exhale at the top again.
Muscles Worked
Dips work more than just your triceps. Your arms bend and straighten to move your body. But they get help from your shoulders, chest and back muscles. And many more muscles work to keep you balanced while your body moves. This is why Dips are a compound exercise: they work many muscles at the same time. This is also why you can go heavier: more muscles working is more strength. Muscled worked on Dips…
- Arms. Your triceps straightens your arms to move your body up. Your triceps is your largest arm muscle on the back of your upper-arm. The stronger your triceps is, the more muscular it will be and the bigger your arms. Your forearms muscles also work to hold the bars tight.
- Chest & Shoulders. Dips are like a vertical Bench Press. You’re pushing you body up on Dips like you’re pressing the bar away on the Bench. Your upper-arms are parallel to the floor at the bottom and must get vertical to lockout. This works your chest and shoulder muscles.
- Abs. Your ab muscles keep your lower back neutral while your body moves up and down. They prevent your torso from arching excessively and keep it neutral. This develops the “six pack” muscles running over your belly, your rectus abdominus. They’ll show if you eat right.
Dips work similar muscles as the Bench Press and Pushup. The difference is you can go heavier on the Bench than Dips, and on Dips than Pushups. On the Bench you just add plates on the bar. On Dips you can easily add weight using a dip belt. Pushups are hard to do weighted. You need an x-vest or chains around your neck or someone has to put a plate on your back. The Bench Press and Dips are easier to do heavy.
Dips beat triceps pushdowns or skullcrushers for building bigger arms. The weight on Dips is higher. You must lift your weight. The average 75kg guy like me can easily do body-weight Dips. I can do them with 20kg extra which is 95kg total weight. Try pushdowns or skullcrushers with 95kg… Dips are more effective because they work your triceps with heavier weight. More weight is more strength is more muscle.
Dip Technique
Grip
Full Grip. Grip the dip bars with your thumbs around. Squeeze the bars hard so your hands can’t slip while your body moves. This prevents your wrists from bending back and hurting when you do Dips. It also increases strength because your arms, shoulders and chest muscles can contract harder when you squeeze the bars. Don’t do Dips with a thumbless grip. Use the full grip so you have more strength and better form.
Grip Low Palm. Put the heels of your palms on the dip bars. Your wrists and forearms must be inline with the bars so they can push straight into it. This increases strength and prevents wrists pain. Gripping the bars mid-palm is wrong because it doesn’t put your forearms over the dip bars. And the pressure of your body will bend your wrists, stretch them back and cause pain. Grip the bars low palm like when you Bench Press.
Grip Width
Narrow Grip. Grip the dip bars shoulder-width apart. Your hands should be under your shoulders and just outside your hips. This keeps your arms close to your body and your shoulders tight. You can grip the bars wider if you have wide shoulders and access to angled dip bars. If you have fixed dip bars like me, your equipment will determine your grip width. This usually works fine unless you have very small/wide shoulders.
Forearms
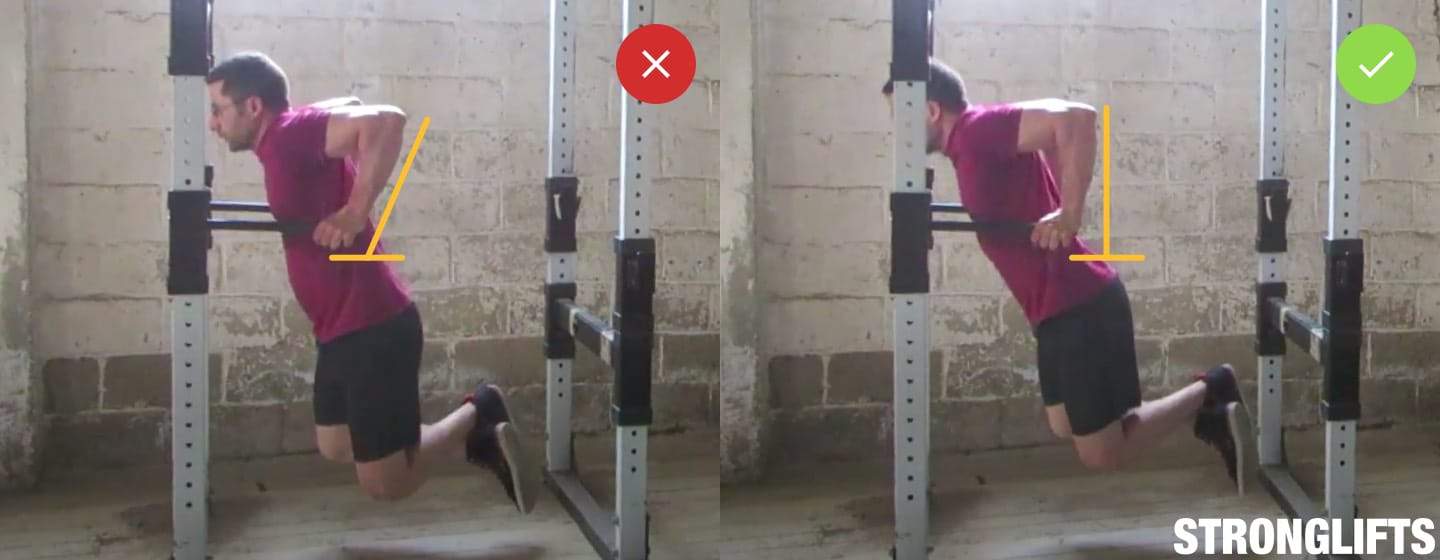
Vertical From The Side. Keep your forearms vertical while your body moves up and down. This increases strength because your forearm bones can push straight into the dip bars. The only way to keep your forearms vertical during Dips is to lean slightly forward on the way down. Keeping your torso vertical is ineffective because it puts your forearms back and incline at the bottom. Lean forward slightly on the way down.
Vertical From The Front. Your forearms must also be vertical to the floor when looking from the front and back. If your forearms are incline, your grip is too narrow or wide. Too narrow is like a Close Grip Bench Press. Too wide is bad for your shoulders. Adjust your grip so your hands are just below your shoulders and outside your hips. You’ll need access to angled dip bars for this. But it will increase your strength on Dips.
Elbows
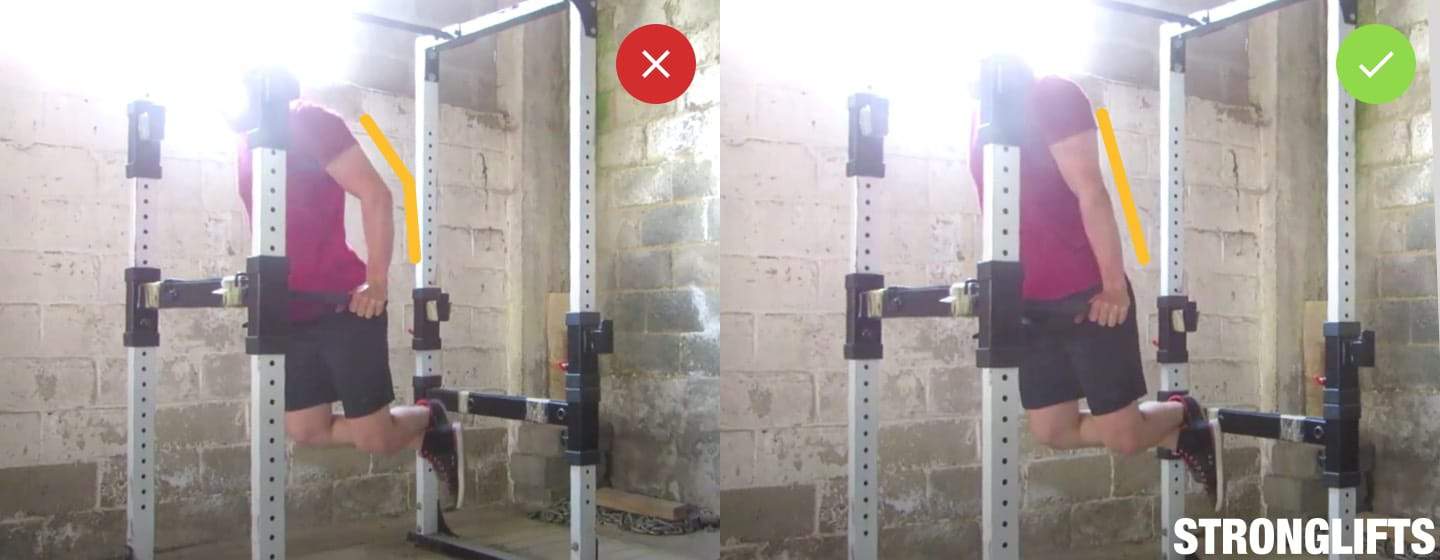
Lock At The Top. Start and finish every rep with straight arms or the rep doesn’t count. Lock you elbows before you go down. Lock them again at the top of each rep. This works your upper-body muscles through a full range of motion. You’ll build stronger and bigger arms. Don’t do half reps or you’ll get half the gains. Lock your elbows. As long as you don’t hyper-extend but lock gently, your joints will be fine.
Elbows 45°. Keep your arms close to your body. They shouldn’t touch your torso at the bottom. But they shouldn’t flare and end perpendicular either. Grip the dip bars narrow so your hands are under your shoulders. Then tuck your elbows 45° on the way down and keep your forearms vertical. This may be harder at first if you’re used to flaring your elbows. But it’s better for your shoulders and you’ll get stronger.
Chest
Lift Your Chest. Raising your chest stops your upper-back from rounding which can cause chest pain. It also helps keeping your shoulders back so they don’t hurt. Make a big chest at the top of every rep. Take a big breath, hold it and lower yourself. Break parallel by dipping until your shoulders are below your elbows. Come back up by straightening your arms. Lockout your Dips by raising your chest at the top again.
Shoulders
Push Your Shoulders Down. Don’t let your shoulders roll forward or they’ll hurt. Keep them back by raising your chest before you lower yourself. Finish each rep by raising your chest again so your shoulders stay back. You don’t have to squeeze your shoulder-blades. But your shoulders can’t come forward or shrug against your ears. If they do, push your shoulders down while you do Dips. And remember to raise your chest.
Head
Head Neutral. Don’t look at the ceiling or your neck will hurt and your shoulders will come forward. Your head must stay inline with your torso. But you have to lean slightly forward on the way down to keep your forearms vertical. This means you can’t look straight forward or your head won’t stay inline with your torso. Instead, look at the floor in front of you while you do Dips. This keeps your neck neutral and safe.
Torso
Lean Forward. Your forearms can’t stay vertical if you keep your torso upright. They’ll end incline at the bottom which is ineffective and can cause you to lose balance backwards. You must lean slightly forward on the way down. Don’t overdo it or you’ll lose balance forward. The point is to get your forearms vertical at the bottom. If you do it right, you’ll feel it more in your chest and have more strength.
Lower Back
Natural Arch. Your lower back must stay neutral when you do Dips. Neutral means keeping a natural arch like when you stand. Your lower back shouldn’t be flat or curve too much. If you hyper-extend, you’ll squeeze your spinal discs and can get back pain. Keep your lower back neutral by squeezing your abs and holding your ribcage down. Do Dips with a straight line from shoulders to knees when looking from the side.
Legs
Bent Knees vs Straight Legs. You can keep your lower back neutral more easily if you do Dips with straight legs. This is because you can squeeze your glutes harder which prevent excess lower back arching. But your feet will hit the floor unless you use high dip bars to do Dips with straight legs. I prefer to bend my legs. If you do this, make sure you keep your lower back neutral by squeezing your abs and glutes.
Top
Straight Arms. Lock your elbows before you lower yourself. Starting your Dips with bent elbows doesn’t count just like Squatting half reps doesn’t count. Bent elbows make Dips easier by shortening the range of motion. You must work your upper-body muscles through a full range of motion to gain maximum strength and build muscle mass. Straighten your arms before you lower yourself. Lock your elbows again to finish your rep.
Chest Up. Raising your chest prevents your upper-back from rounding. It helps keeping your shoulders back and down so they don’t hurt. Make a big chest before you lower yourself. Keep it up by filling your ribcage with air. Chest up, big breath, hold it. Then dip down until you break parallel. If your shoulders don’t stay back, push them down. Don’t let them roll forward or shrug against your ears.
Way Down
Lean Forward. Dip down by bending your arms. Keep your forearms vertical by leaning slightly forward. The exact torso angle depends on your bodytype. But the goal is to keep your forearms vertical when looking from the side. This increases control and strength on the way up because your forearms can push straight into the dip bars. Don’t dip your body straight down. Lean slightly forward.
Bottom
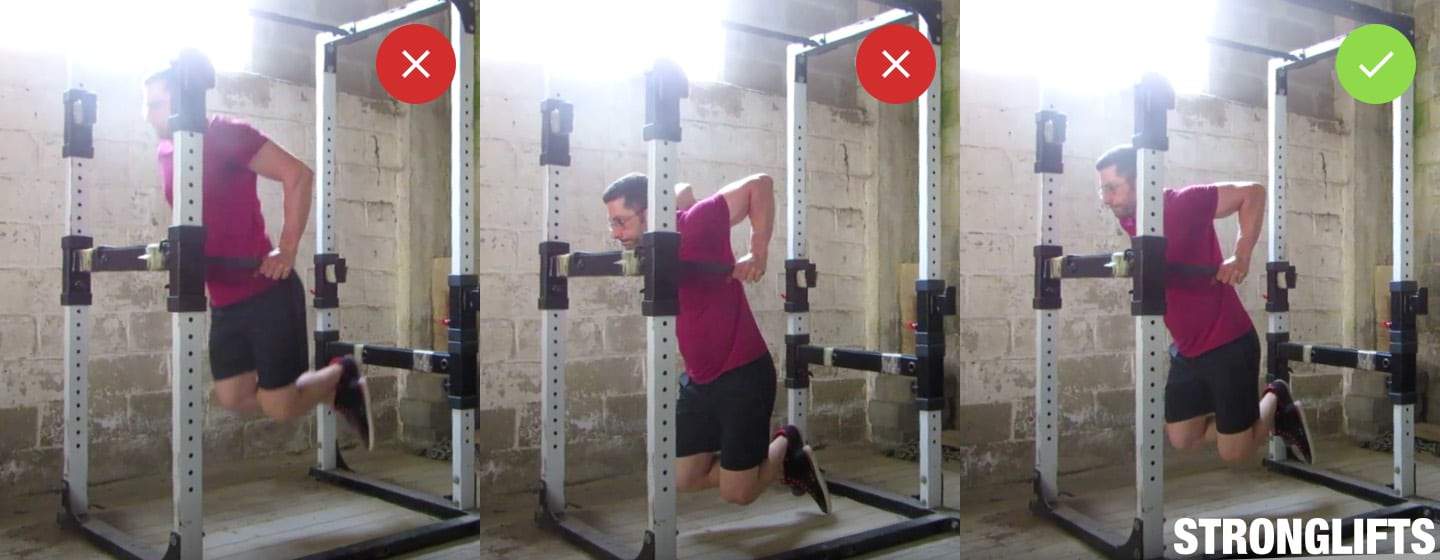
Break Parallel. You don’t have to go as low as you can to get a bigger stretch. You shouldn’t because that can hurt your shoulders. But upper-arms parallel to the floor or anything higher isn’t low enough. You must break parallel by going down until your shoulders are below your elbows. This is the only way Dips will work your upper-body muscles through a full range of motion. It’s how you get the maximum strength and muscle gains.
Breathing
Breathe at The Top. Balance yourself on the dip bars with locked elbows and your feet in the air. Raise your chest to keep your shoulders down. Then take a big breath, hold it and dip down. Hold your breath on the way down and at the bottom. Come back up, raise your chest and lock your elbows. Exhale, gather yourself for a second and repeat. Don’t breathe during your Dips or you’ll lose tightness and your chest will collapse.
Common Issues
Cheating
Proper form on Dips starts with locked elbows and ends with your shoulders lower than your elbows. This works the most amount of muscles at the same time. It works your arms, shoulders and chest through a full range of motion. But it also makes Dips harder because your body moves over a greater distance. Many people cheat by only dipping half the way down. But this results in half the strength and muscle gains.
Lock your elbows at the top. Start each rep with straight arms. Dip down until your shoulders are below your elbows. Then rise up, straighten your arms and lock your elbows. Don’t try to get more tension by keeping your elbows unlocked at the top. This shortens the range of motion. Finish all reps by locking your elbows. Your joints will safe if you don’t take your elbows past their normal range of motion but lock gently.
Break parallel at the bottom. Lower yourself until your shoulders are lower than your elbows. You don’t have to go down as low as you can to get a bigger stretch. Your shoulders and chest can hurt if you overdo it by going too low – don’t do that. But upper-arms parallel with the floor isn’t low enough. You must break parallel by bringing your shoulders below your elbows. Ask someone to check or videotape yourself doing Dips.
Dips are harder when you use a full range of motion. But that’s also why they’re more effective for gaining upper-body strength and muscle. Don’t be that guy doing Dips with 20kg attached to his belt but only going half the way down. That’s like the guy bragging he Benches 300lb but his butt comes up on every rep and he never touches his chest. It’s not effective and it doesn’t count. Do your Dips properly.
Can’t Do One Dip
Dips force you to lift your weight. This is often too heavy when you’re new to strength training. It’s why I prefer barbells: they’re easier to scale. Let’s say you weigh 75kg like me, you don’t start StrongLifts 5×5 with 75kg on Squats. You start with the empty 20kg bar. But you can’t start lighter with Dips. You could lose weight but that takes time and you won’t get to 20kg. Dips are harder because you have to start heavy.
The best way to make Dips easier if you can’t do one rep is to do negatives. Focus on doing the way down only, the negative. Lower yourself slowly until your shoulders are below your elbows. Then put your feet on the floor and jump back on the dip bars with straight arms. You’re stronger on the way down than up so you can do this. Once you can do ten negatives with proper form, you can do one Dip.
You can also ask someone to help you by grabbing your sides with his hands to help you on the way up. Getting assistance from a resistance band doesn’t work on Dips, forget about it. Forget also about the assisted Dip machine. It moves your arms and the weight but not your body. It looks the same but isn’t. It will make you better at dipping on a machine but that’s it. The best way to get stronger at Dips is to do Dips.
To get stronger at Dips as fast as possible, do Dips daily. You can easily do Dips at home by putting two chairs back to back. Dip inbetween several times a day. Lower yourself slowly until your legs touch the floor. Rise up and repeat. After a few weeks you’ll have the strength to do a full Dip. This technique Pavel Tsatsouline calls “Greasing The Groove”. You’ll get stronger at Dips if you do Dips and do them frequently.
Shoulder Pain
Dips will hurt your shoulders if you fail to keep them in position. Don’t let your shoulders roll forward. Don’t shrug them against your ears. Push your shoulders back and down. Raise your chest at the top before you lower yourself. Take a big breath before you dip and hold it on the way down. Don’t exhale or you’ll lose tightness. Dip down, break parallel and come back up. Exhale, lift your chest, repeat.
Make sure you don’t go too low. You must use a full range of motion to gain maximum strength and muscle with Dips. But that doesn’t mean you should go all the way down to get a bigger stretch. Most people lack the flexibility to go deep. Your shoulders will usually roll forward which puts them at risk. Dip with a full range of motion. But stop when your shoulders are below your elbows. No need to go lower.
Chest Pain
Pain in your chestbone or collarbone happens if your upper-back rounds during Dips. Your upper-back will round if you fail to keep your chest up. Raise your chest at the top before you dip down. Keep it up by filling your ribcage with air. Big breath, hold it, then go down. Break parallel at the bottom without going too low or exhaling. Then come back up, lock your elbows and raise your chest again. Keep your shoulders down.
Dips Variations
Weighted Dips
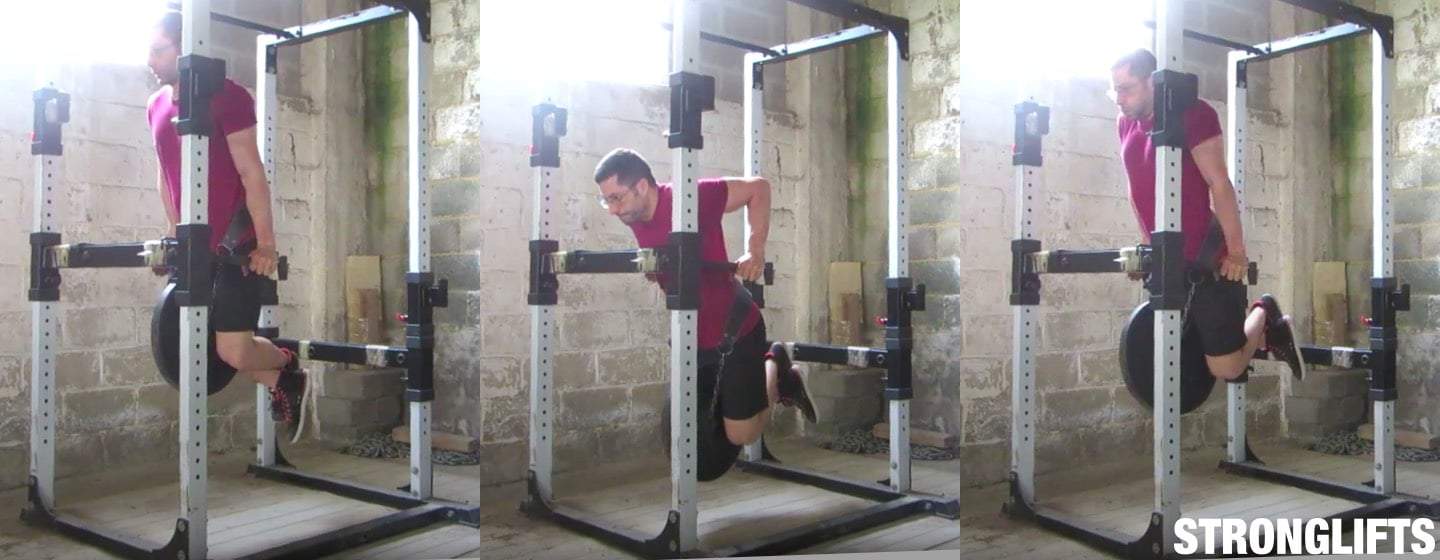
Weighted Dips are Dips with extra weight. You put a dip belt on with plates hanging on a chain to your waist. You then dip by bending your arms and rise back up. Adding weight is crucial once you can do ten Dips with proper form. Doing high rep Dips is ineffective for building strength and muscle, It builds endurance. You don’t Bench Press 20 reps to build a bigger chest. You add weight. Same on Dips: add weight.
The easiest way to do Weighted Dips is using a dip belt. This is a belt you put around your waist. It has a chain that goes in the holes of the plates you put on the bar. The plates hang on that chain and the belt between your legs while you do Dips. Quality belts easily handle over 80kg/150lb.
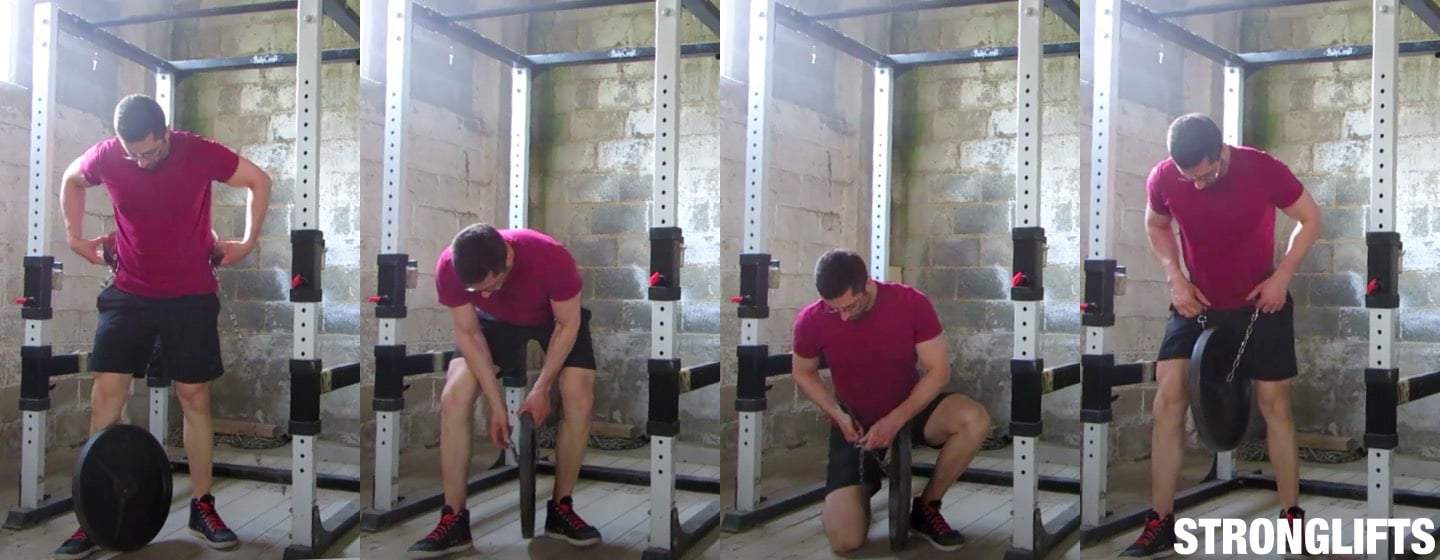
Don’t put a chain on the belt you use for Squats and Deadlifts. You’ll damage it. Get a dip belt instead. Here are some I recommend…
You can also do Weighted Dips by holding a dumbbell between your feet. But this only works with light weights. A heavy dumbbell will drop out of your feet. Even if you can hold it, your legs can’t be bent but have to be straight. This means your dip bars must be higher so your feet don’t touch the floor while you’re holding the dumbbell between your legs. Seriously, just get the dip belt. It’s easier to use and saves time.
Switch to Weighted Dips once you can do 10 Dips with proper form. Start with 2.5kg/5lb for two sets of five and add weight each workout. Best is to microload. Dips use smaller muscles like the Bench Press and Overhead Press do. You’ll progress longer if you add add only 1kg/2lb each workout. I like to do two sets of five Weighted Dips at the end of my workout, followed by one set body-weight Dips for as many reps as I can.
The StrongLifts 5×5 app for iPhone and Android allows you to add Dips to StrongLifts 5×5. The app tells you how many reps to do each workout. It keeps track of how many reps you did. And it then tells you when to switch to Weighted Dips once it detects you’re ready for it. You can download the app for free on iPhone and Android. Then upgrade to StrongLifts Pro to add Dips or Weighted Dips to StrongLifts 5×5.
Bench Dips
Bench Dips are Dips between two flat benches. You put your hands on the bench behind your back. Your feet go on the bench in front of you. Raise your butt off the floor by straightening your arms. Bend your legs slightly to avoid pressure on your knee joints. Then dip by bending your arms until you break parallel. Rise up and repeat. You can add weight by putting a plate on your thighs, in your lap, while you do Bench Dips.
Bench Dips are terrible for your shoulders. Your hands aren’t next to your torso like when you do Dips on bars. They’re behind you because that’s where the bench is. This makes it impossible to keep your shoulders back and down. They will come forward. And the deeper and heavier you go, the more your shoulders will come forward. This stresses your shoulder joints and can injure them. Don’t do Bench Dips. Dip on bars.
Ring Dips
Ring Dips are Dips using gymnastic rings instead of dip bars. Grab the two rings and jump up to raise your legs off the floor. Bend your arms and dip while keeping your hands close to your body, don’t let them drift away. Break parallel, come back up and repeat. Doing Dips on rings is harder than on parallel bars because the rings are unstable. Your muscles have to stabilize them which adds to the challenge.
But Ring Dips are dangerous for your shoulders. Their main benefit is also their major drawback. Your hands must stay close to your body to keep your shoulders tight. But the rings work against you because they aren’t fixed. They can move away from your body and put your shoulders in a weak position. This can injure your rotator cuff muscles which hold your shoulders together. Forget about the rings and do dips on bars.
Dip Machines
The Assisted Dip Machine is a machine that helps you to do Dips when you lack strength. You setup with your knees or feet on a platform. You then grab the bars, dip and come back up. The machine will help you on the way up by raising the knee padding. It uses counter-balance weight for this. The higher the weight you set on the machine, the more assistance it gives you on the way up to complete your Dips.
There’s another Dip Machine where you sit on a bench with your thighs blocked under supports. You grab the dip bars next to you, bend your arms and straighten them again. This machine is to Dips what the Lat Pulldown is to Pullups. You can set the weight on the Dip machine lighter than your weight. You don’t have to lift your body-weight unlike when you do regular Dips. The Dip machine is therefore easier to get started with.
But machines aren’t the same. Your muscles don’t have to balance your body because you’re resting on a platform or bench. Your abs and lower back muscles don’t have to stabilize your torso for the same reason. Your body doesn’t move on the Dip Machine, only your arms do. This means less muscles work than on regular Dips. That’s why machines are less effective to gain upper-body strength and muscle.
Maybe you want to use machines because you can’t do one Dip. Or you want to use the machine to get stronger so you can move to regular Dips later. But this rarely works. And when it does, it always takes longer than just doing Dips. Because using machines to get better at dips is like trying to get better at tennis by playing ping pong. They look the same, but aren’t. Gotta play tennis to get better at tennis. Same with Dips.
The fastest and most effective way to get better at Dips is to do Dips. If you can’t do one rep, do negatives. Do the way down only. Lower yourself slowly until you break parallel. Then put your feet on the floor and jump up again to the starting position. This works because you’re stronger on the way down than up. Once you can do ten negatives with proper form, try to do a full Dip. You’ll be able to do it.
Join the Stronglifts community to get free access to all the spreadsheets for every Stronglifts program. You’ll also get daily email tips to stay motivated. Enter your email below to sign up today for free.


