

Here’s how to Deadlift with proper form:
- Stand with your mid-foot under the barbell
- Bend over and grab the bar with a shoulder-width grip
- Bend your knees until your shins touch the bar
- Lift your chest up and straighten your lower back
- Take a big breath, hold it, and stand up with the weight
Hold the weight for a second at the top, with locked hips and knees. Then return the weight to the floor by moving your hips back while bending your legs. Rest a second at the bottom and repeat. Do five reps on the StrongLifts 5×5 program.
The fastest way to increase your Deadlift is to improve your form. By pulling more efficiently, you can use more muscles and Deadlift heavier weights. This results in more strength and muscle gains. The best way to improve your form is by practicing Deadlifts with proper form.
This is the definitive guide to proper form on the conventional Deadlift
Contents
- Deadlift Basics
- Deadlift Technique
- Special Cases
- Grip Strength
- Equipment
- Deadlift Mistakes
- Deadlift Issues
- Deadlift variations
- Popular Deadlift Questions
- I’m afraid of Deadlifts. What should I do?
- Can I Deadlift in the smith machine?
- Should I Deadlift in the Power Rack?
- How do I prevent calluses from Deadlifts?
- Why do Deadlifts hurt my hands?
- How do I remove calluses on my hands?
- What if my grip fails during Deadlifts?
- Should I hook grip or mixed grip?
- How do I Deadlift with hex plates?
- Should my back be sore after Deadlifts?
- What’s a good lower back stretch?
- Should I Squat my Deadlifts?
- Should I drop my hips into my Deadlift?
- If rounded back Deadlifts are bad, why do some powerlifters do it?
- How can I increase my Deadlift?
- How can I improve my form?
Join the Stronglifts community to get free access to all the spreadsheets for every Stronglifts program. You’ll also get 15% off Stronglifts Pro, and daily email tips. Enter your email below to sign up today for free.

Deadlift Basics
How to Deadlift

The “dead” in Deadlift stands for dead weight. So every rep must start on the floor, from a dead stop. You don’t Deadlift top-down like on the Squat or Bench Press. You start at the bottom, pull the weight up and then return it to the floor. Here are the five steps to Deadlift with proper form…
- Walk to the bar. Stand with your mid-foot under the bar. Your shins shouldn’t touch it yet. Put your heels hip-width apart, narrower than on Squats. Point your toes out 15°.
- Grab the bar. Bend over without bending your legs. Grip the bar narrow, about shoulder-width apart like on the Overhead Press. Your arms must be vertical when looking from the front.
- Bend your knees. Drop into position by bending your knees until your shins touch the bar. Do NOT let the bar move away from your mid-foot. If it moves, start from scratch with step one.
- Lift your chest. Straighten your back by raising you chest. Do not change your position – keep the bar over your mid-foot, your shins against the bar, and your hips where they are.
- Pull. Take a big breath, hold it and stand up with the weight. Keep the bar in contact with your legs while you pull. Don’t shrug or lean back at the top. Lock your hips and knees.
Return the weight to the floor by unlocking your hips and knees first. Then lower the bar by moving your hips back while keeping your legs almost straight. Once the bar is past your knees, bend your legs more. The bar will land over your mid-foot, ready for your next rep.
Rest a second between reps. Stay in the setup position with your hands on the bar. Take a big breath, get tight, and pull again. Every rep must start from a dead stop. Don’t bounce the weight off the floor or you’ll pull with bad form. Deadlift sets of five reps every workout B on StrongLifts 5×5.
Main Deadlift Cues

Your build influences how proper Deadlift form looks like for you. If you have short thighs with a long torso, you’ll usually setup with lower hips than someone with long thighs and a short torso like me. So don’t mimic someone else’s Deadlift form (not even mine) unless you have the same build.
Use these cues instead and you’ll Deadlift with proper form. They work whether you’re young or old, beginner or advanced, short or tall, skinny or fat, weak or strong, male or female. Try them.
- Bar Path: vertical line over your mid-foot when looking from the side
- Barbell: on the floor, over your mid-foot, at the start of each rep
- Stance: heels hip-width apart, narrower than on the Squat
- Feet: whole foot flat on the floor, toes turned out about 15°
- Grip width: narrow, hands about shoulder-width apart
- Grip: thumbs around bar, bar close to fingers, both palms facing you
- Arms: vertical when looking from the front, slightly incline from the side
- Elbows: locked before and during the pull, until lockout. Never bent.
- Chest: up to avoid back rounding, do NOT squeeze your shoulder-blades
- Lower Back: neutral – the normal inward curve. No rounding or excess arch
- Shoulders: in front of the bar from the side view, relax your shoulders and traps
- Shoulder-blades: over your mid-foot when looking from the side, don’t squeeze them!
- Head: inline with the rest of your spine, don’t look up, don’t look at your feet either
- Hips: setup looks like a half Squat, hips higher than parallel. Don’t Squat your Deadlifts
- Setup: bar over mid-foot, shoulder-blades over bar, straight line from head to lower back
- Breathing: take a big breath at the bottom, hold it at the top, exhale at the bottom, repeat
- Way up: don’t jerk the bar off the floor, pull slowly while dragging the bar over your legs
- Way down: hips back first, bend your legs mostly once the bar reaches your knees
- Between Reps: don’t bounce, rest a second, lift your chest, breathe, pull again
- Traps: let them hang, relaxed. Don’t shrug or roll your shoulders at the top
- Knees: push them to the sides on the way up, lock them at the top
- Shins: touch the bar with your shins during your Deadlift setup
- Lockout: lock your hips and knees. Don’t lean back at the top
Muscles Worked
Deadlifts work your whole body. Your legs are the prime movers. Your back muscles keep your spine neutral. And your arms keep the bar in your hands. But since the weight is heavier than on any other exercise, every other muscles has to work too. Otherwise you can’t Deadlift the weight.
The Deadlift is more for the back than the legs compared to Squats. But every muscle works when you Deadlift heavy. That’s why Deadlifts are a full body, compound exercise – they work several muscles at the same time. Here are the main muscles Deadlifts work…
- Legs. Your hamstrings and glutes straighten your hips. Your quads straighten your knees. Your calves straighten your ankles. The range of motion is smaller than on Squats since you start in a half Squat position. But the weight is heavier and starts from a harder dead stop.
- Back. Your back muscles contract to keep your spine neutral while gravity tries to bend it. Your lats keep the weight close to your body so it doesn’t drift away. Deadlifts are the best back-builder because they work your whole back with heavier weights than any other exercise.
- Traps. Your trapezius muscles contract to keep you shoulders in place and transfer force to the bar. Even your shoulders and chest muscles contract to add support. The heavier you Deadlift, the harder your traps work, the bigger they become. You don’t need to do shrugs.
- Abs. Your abdominal muscles and obliques contract to support your lower back. The heavier your Deadlifts, the stronger and more muscular the become. Eat right and they’ll show.
- Arms. Your hands hold the bar tight. This strengthens your grip and forearms. But everything upstream tightens as well during heavy Deadlifts, including your biceps and triceps. They don’t bend but work isometrically, like your lower back, to hold your body in position.
The Deadlift is the best exercise for your back. Add Barbell Rows and maybe Pullups and you don’t need more to build a v-shape back. Go heavy and you can build a great physique doing just two to three exercises per workout. This is why StrongLifts 5×5 is so effective.
Safety Concerns

The safest way to Deadlift is with your spine neutral. Setup with the normal inward curve in your lower back. Maintain this position while you pull the weight off the floor to the lockout. The pressure on your spinal discs will be even.
Many people have improved their bad back with Deadlifts. Dr Stuart McGill Phd says your spine is like the mast on a ship – the rigging holds it firm so it can’t buckle. Your trunk muscles around your spine are that rigging. They hold your spine firm so it can bear heavy loads safely and pain-free.
The Deadlift can turn a weak back strong by strengthening your trunk muscles. It also increases back endurance and builds safe movement habits. Here’s how it does this:
- Gravity pulls the bar down when you Deadlift. Your trunk muscles contract to fight this force so your spine doesn’t bend. The heavier the weight you can pull with a neutral spine, the stronger your trunk muscles become. The stronger they are, the more they support your spine.
- Stronger muscles last longer. The same movement takes less effort from your stronger trunk muscles. It takes longer to tire your back. You can therefore lift longer with a neutral spine. And since your back is in a safer position more often, you’re less likely to hurt it.
- Deadlifts are practice for picking up weight by bending through your legs with a neutral spine. Repeating this in the gym builds safe movement habits that transfer to daily life. You’re less likely to hurt your back when picking up something at work for example.
Start light, use proper form, and slowly add weight. Your trunk muscles will get stronger as the weight increases. This will build a stronger back that is harder to injure.
Videos
Here’s a video of me Deadlifting 210kg/451lb. During the setup the bar is over my mid-foot with my shoulder-blades over the bar. I drag the bar over my legs to the top. My lower back remains fairly neutral. I don’t use the mixed grip and belt on the lighter sets. I keep them for the heavier sets.
Here’s a second video where I do Deadlifts as part of the StrongLifts 5×5 workout B. I also answer common questions about the Deadlift. Watch from 20:59 onwards…
And here’s a video of my good friend Mike Tuchscherer Deadlifting about 300kg at the StrongLifts London 2014 seminar. Mike is a powerlifting champion and Deadlifts exactly as laid out in this guide: bar over mid-foot, shoulder-blades over bar, neutral back. Watch and learn…
Deadlift Technique
Stance

Setup with your heels hip-width apart for Deadlifts. The distance between your heels should match the width of your hips. So the wider/narrower your hips, the wider/narrower your stance. The goal is to create space for your arms so they don’t get blocked by your legs during the setup.
Don’t Deadlift with your Squat stance. Standing with your heels shoulder-width apart is too wide for Deadlifts. Your legs will bock your arms when you setup because they won’t have space. They’ll make you pull with bent arms which is dangerous for your biceps and elbows.
You could solve this by gripping the bar wider. But this increases the distance the bar has to travel to reach the top. It makes the weight harder to Deadlift. Your arms should be vertical when you face the bar. You need a narrow stance for that. Deadlift with your heels hip-width apart.
Feet

Setup with the bar over the middle of your foot. Your mid-foot is your balance point. If you pull the bar over your mid-foot, you’ll have better balance. This makes the weight easier to Deadlift.
Most people setup with the bar almost over their toes to avoid hitting their shins. But this puts the bar in front of your balance point and further from your center of mass. The weight will pull you forward when it leaves the floor. It will make you lose balance and feel harder on your lower back.
Heavy weight is impossible to pull from your toes. The bar will move to your mid-foot after it leaves the floor because that’s the stronger position. It will hit your shins in the process. Better is to setup with the bar over your mid-foot so you don’t waste energy moving it there during a heavy Deadlift.
Some people setup with the bar too close. Your shins should only touch the bar during your setup. If they touch it when you stand, the bar will block your shins from coming forward when you setup. They’ll have to stay almost vertical which causes bad balance and is just ineffective.
Your shins will usually push the bar to your mid-foot if it was too close. This puts you in a stronger position to pull. But again, it’s better to setup with your mid-foot under the bar rather than moving the bar there later. The more consistent your setup, the more consistent your form.
Your mid-foot is the middle of your whole foot. When you stand in front of the bar and look down, you won’t see the part of your feet under your legs. Most people will therefore put the middle of the visible part of their foot under the bar. But this puts the bar too far forward.
The simple trick is to check your shoe sole. Find its center and remember the lace above it. For me it’s usually lace five but this depends on your shoe brand and size (I wear 43). Put that lace under the bar when you stand in front of it. It may look too close but it won’t if you did it right.
Setup with your toes pointing about 15° out. This makes it easier to push your knees out on the way up. Knees out helps engaging your groin muscles to Deadlift more weight. Knees out also keeps long thighs line mine back and out of the way of the bar so you don’t hit your knees on the way up.
Keep your feet on the floor. If any part of your foot comes up when you Deadlift, you’ll lose balance. You want the greatest surface in contact with the floor. Keep your heels, mid-foot and toes down. It may help to try to grab the floor with your feet like grabbing a basketball.
Grip

Grip the bar narrow, about shoulder-width apart. This puts your arms vertical to the floor when looking from the front. The bar will hang at the lowest position possible which decreases the distance it must move to reach the top. You’ll be able to Deadlift more weight with the narrow grip.
Create space for your arms and legs by putting your heels hip-width apart. Don’t stand wide or your legs will push against your arms. Don’t try to fix that by gripping the bar wider – it will hang higher which increases the distance it travels. Grip narrow and stand with your heels hip-width apart.
Grip the bar with both palms facing you. This is the normal or double overhand grip. You can use the mixed grip later when you can’t hold it with a normal grip. But don’t use it on every set or you’ll have nothing to switch to when your grip fails. Deadlift most sets with the normal grip.
Wrap your thumbs around the bar. The thumbless grip makes no sense on the Deadlift as it makes the bar harder to hold. Use a full grip so you can Deadlift more weight. If you “don’t feel your muscles” as well with the full grip, add weight on the bar. You’ll feel it once things get heavy.
Most people make the mistake of gripping the bar in the middle of their palms. Gravity pulls the bar down when you Deadlift. The bar will slide down your palm and fold the skin under it. It will then put pressure on those skin folds. This causes hand pain and big callus that tear more easily.

The proper way to grip the bar on Deadlifts is low hand. Hold the bar lower, close to your fingers. Put it on top of your main callus not above them. This stops the bar from folding and squeezing your skin. Your hands will no longer hurt and you’ll quit forming big callus that easily tear.
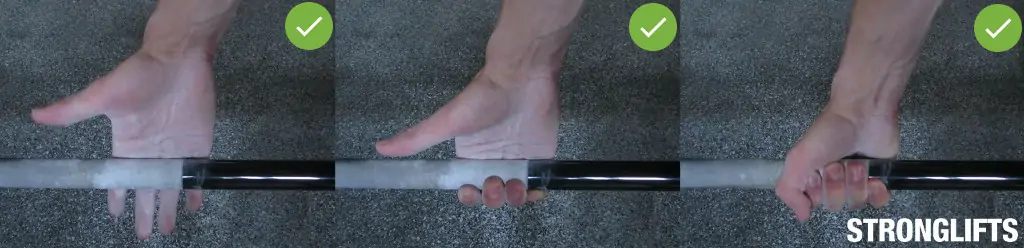
This low hand grip is not weaker. You have the same amount of thumbs and fingers around the bar. It’s more secure because you’re not trapping skin and calluses that makes you relax your grip mid-set. If it feels weak or weird it’s because you’re not used to it. Stick with it to get used to it.
Your hands may hurt when you start Deadlifting. This is because you don’t have calluses yet. Don’t use gloves but stick it out. Your skin will form calluses to protect against the pressure of the bar. The pain will be gone once you have calluses. It only takes a couple of workouts.
Arms

Your arms must be vertical when looking from the front. This decreases the distance the bar travels because the bar hangs lower at the top. You can Deadlift more weight if you grip the bar narrow, about shoulder-width apart. Your heels should be hip-width apart to create space for your legs.
From the side, your arms should be incline during your setup. Vertical arms doesn’t work because it puts your hips too low. Your knees will come too forward and in the way of the bar. Your hips should be higher so your shoulder-blades are over the bar. This puts your arms incline from the side.
Lock your elbows. Straighten your arms before you pull the weight off the floor. Keep them straight during the whole movement until the lockout. Never pull with bent arms. Keep them straight. It may help to contract your triceps during your setup.
Remember your Deadlift weight is easily five times heavier than what you curl. Don’t try to pull with your arms. They’re not strong enough. Let your stronger legs and back muscles lift the weight.
Bar
The bar must leave the floor from your mid-foot on every rep because that’s your balance point. It must then move up in a vertical line because that’s the shortest distance to reach the lockout. There should be no horizontal bar movement because that makes the bar path longer.
Always start by putting your mid-foot under the bar. Don’t drop into position and then try to roll the bar over your mid-foot. It’s harder to get the bar in proper position this way. Move your mid-foot under the bar before you setup rather than moving the bar over your mid-foot later.
The bar must be still before you setup so you have a consistent starting position on every rep. Your floor should therefore be even. If it isn’t, stop the bar from rolling before you setup. You may have to move the bar around until you find a position where it’s still. Don’t setup until you’ve found one.
If the bar moves away from your mid-foot during your setup or between reps, best is to reset. Stand up, get the bar still, and put your mid-foot under the bar again. Then setup and pull. Again, don’t try to move the bar over your mid-foot, you’re unlikely to get in proper position. Reset instead.
The bar should move in a vertical line on the way down as well. And it should land right over your mid-foot again, ready for your next rep. Tape yourself from the side when you Deadlift. If the bar moves up and down in a vertical line, over your mid-foot, you’re likely to use proper form.
Hips

Your hip position for Deadlifts depends on your build. If you have long thighs like me, your hips will be higher than if you have short thighs. But your hips will be in proper position if you setup properly and this regardless of your build. So forget about your hip position and focus on your setup.
Deadlifts aren’t Squats. It doesn’t work to setup with low hips like in the bottom of Squats. This moves your knees too far forward. Your shins end in the way of the bar so you’ll hit them on the way up. Plus the bar has to move around your knees instead of straight up. A longer bar path is ineffective.
That’s why you can’t Deadlift heavy weight with low hips. They’ll rise before the weight leaves the floor to put you in a stronger position to apply force. It’s more effective to setup with higher hips rather than moving them mid-lift. This makes your hip position more consistent and improves form.
But your hips shouldn’t start too high. Your legs can’t straighten to lift the weight if you start with high hips – they’re already straight. This takes your knees/quads out of the movement. Your back and hips have to do all the work. Less muscles working means less weight you’ll Deadlift.
Deadlifts with high hips are Stiff-legged Deadlifts. They’re fine as assistance exercise for Deadlifts but don’t substitute them. You want to lift as heavy as you can to gain maximum strength and muscle mass. You can lift heavier if you setup with bent legs and use your knees. Don’t pull with high hips.
The best way to find the proper hip position is to forget about your hips. Setup with the bar over your mid-foot. Now grab the bar and bend your knees until your shins touch the bar. Keep the bar over your mid-foot and raise your chest. Your hips will be exactly where they should be.
Don’t copy someone’s hip position unless you have the same build. My long thighs put my hips higher. Someone with short legs who tries to Deadlift the same way will struggle. His legs will be too straight because of his different build. Copy how I set the bar over my mid-foot, not my hip position.
Watch out with people who review your Deadlift like Squats. There’s no parallel position to reach or start from here. No hips below knee caps. You just setup with the bar and your shoulder-blades over your mid-foot, and your shins against the bar. Your hip position doesn’t matter.
Shoulder-blades

Your shoulder-blades must be above your mid-foot when you setup. Every strong Deadlifter from Andy Bolton to Benedikt Magnusson to Mike Tuchscherer has his shoulder-blades above the bar when the weight leaves the floor. It’s the most effective way to Deadlift heavy weights.
Here’s why: your shoulder-blades transfer force generated by your legs into your back to the bar. You pull it in a vertical line over your balance point – your mid-foot. Gravity pulls the bar down in a vertical line too. So your shoulder-blades must be above the bar to pull against gravity.
This means your shoulder-blades, mid-foot and the bar must be aligned when you setup. There must be a perpendicular line running through them because this is the most efficient way to pull heavy weight off the floor – and this is regardless of your build, height, size, gender, etc.
Don’t squeeze your shoulder-blades on Deadlifts like on the Squat and Bench Press. This increases the distance the bar travels. Keep them back (retracted) by raising your chest when you setup. Lock the position by contracting your lats. But don’t try to make your shoulder-blades touch.
Shoulders

Your shoulders must be in front of the bar when you setup for Deadlifts. This puts your shoulder-blades above the bar and is the most effective way to Deadlfit as discussed above.
Shoulders above the bar doesn’t work. It puts your hips too low. Your knees and shins will come too far forward. You’ll hit them on the way up because they’ll be in the way of the bar. It will have to move around them instead of straight up which is ineffective. Keep your shoulders in front of the bar.
Keep your shoulders relaxed. You don’t need to shrug or roll them at the top of your Deadlifts. Your traps already work hard to keep your shoulders in place. Shrugging or rolling is unnecessary and bad for your shoulder joints. Let your shoulders hang while your legs lift the weight off the floor.
Back Angle
The proper back angle for Deadlifts depends on your build. If you have long thighs with a short torso like me your back angle will be more horizontal to the floor. Same if you have short arms. But your back angle will be more vertical if you have short thighs or long arms.
You should therefore not focus on your back angle (just like you shouldn’t focus on your hip position). Focus on setting up properly instead – bar over mid-foot, shoulder-blades above bar, and shins against bar. If they’re aligned, your back angle will be perfect regardless of your build.
Keep your back angle constant through your Deadlift. Don’t let your hips rise faster than your chest. This takes your quads out of the movement by straightening your legs too soon. Raise your hips and chest at the same time by pushing your feet through the floor.
Shins
The angle of your shins depends on your build too. But they should be incline when looking from the side. Vertical shins doesn’t work because it puts you too far behind the bar. You’ll lose balance and dig the bar into your shins. Just setup properly and forget about your shin angle.
Your shins can’t touch the bar when you stand with your mid-foot under it. If they do, the bar is too close and will hit your shins when you pull. Your shins should only touch the bar when you setup by grabbing the bar and bending over. Don’t let your shins push the bar away from your mid-foot.
The bar must stay in contact with your legs when you Deadlift to save your lower back. Dragging it over your shins to the top can feel uncomfortable at first and cause redness. Protect your shins by wearing long pants or socks. Or put athletic tape over your shins.
Your shins should not bleed when you Deadlift. They should not get bruised either. The bar should start against your shins during the setup, and then drag over them to the top. But if your shins get beat up, your form is probably off. Make sure you’re not to close to the bar and hips not too low.
Knees
Push your knees out when you Deadlift. Setup with your toes pointing out 15°. Then push your knees in the same direction as your toes during your setup and while you pull the weight. This will engage your groin muscles. More muscles working is more weight you can Deadlift.
Pushing your knees out also keeps them back and out of the way of the bar. You’re less likely to hit them on the way up. The bar can move up in a more efficient vertical bar line.
Lock your knees at the top of every rep so you have a strong position to hold the weight. Straighten your legs through their full range of motion until your knee joints are locked. The rep doesn’t count if you fail to finish your Deadlifts with locked knees.
Lower Back
Deadlift with your lower back neutral. Setup with the normal inward curve of your lower spine aka lordosis. This keeps the pressure on your spinal discs equal when you Deadlift.
Don’t pull with a rounded lower back. This squeezes the front of your spinal discs on the side of your stomach. It stretches the back of your discs.
Over-arching your lower back is bad for the same reason. It also puts uneven pressure on your spinal discs but by squeezing the back part. Your lower spine must have a natural curve, not hyper-lordosis. If you tend to over-arch your lower back, contract your abs to straighten your spine.
Set your lower back neutral before you pull the weight. Don’t try to do this after the weight has left the floor – it won’t work. Setup with the bar over your mid-foot, grab it and bend your legs until your shins touch the bar. Raise your chest and your lower spine will be neutral.
If you struggle to put your lower back neutral, try to arch it. Pull your hips to the ceiling while raising your chest. You can exaggerate this arching cue until your lower back stops rounding. But remember proper Deadlift form is not hyper-lordosis but a natural arch in your lower spine.
Once your lower back is neutral, lock it into position before you pull. Raise your chest, contract your abs and take a big breath. Hold it and then pull. Best is to contract your whole torso between every rep before pulling the weight again. Otherwise your back will tire and round.
Don’t try to pull the weight with your lower back. Your back doesn’t Deadlift the weight – it doesn’t move. It just keeps your spine neutral while transferring force generated by your legs to the bar. Your legs and hips lift the weight by starting bent and straightening out. Let them do the work.
Upper-Back
Your upper-back should also remain neutral when you Deadlift. It’s easier to keep your lower back neutral if your upper-back is neutral as well. You do this by raising your chest before pulling the weight. Keep your chest up up by taking a big breath and squeezing your lats.
Your upper-spine has a normal outward curve. It will look slightly rounded when you raise your chest. This is fine as long as your shoulders don’t slouch. Don’t try to get an arch in your upper-back like in your lower back – this is not the natural position of your upper-spine.
Head

Deadlift with your neck neutral. Your whole spine must be neutral so you have equal pressure on your spinal discs. Position your head so you have that natural inward curve in your cervical spine.
This means you shouldn’t be looking up when you setup for Deadlifts. This squeezes your spinal discs which is bad as discussed earlier. It also causes bad Deadlift form – you may try to relieve pressure in your neck from looking up by dropping your hips more. But this doesn’t work either.
It’s tempting to look up or forward in a gym full of mirrors. You’ll try to use them to check your form. But they’ll mess it up and mess your neck. Face the mirrors away if you can. If you can’t, ignore them. Videotape yourself instead to check your Deadlift form.
The other mistake is to look at your feet or the bar. This relaxes your upper-back and makes it more likely to round. Your lower back is more likely to round too which is bad as already explained. Your chest must stay up and this works best when you keep your upper-back and neck neutral.
Look at a point on the floor in front of you instead. If you do this right you’ll have a straight line from the top of your head to your hips when you setup for Deadlifts. Your neck will be neutral. This can feel weird if you’re used to look up. Stick with it and you’ll get used to it.
Setup

The proper Deadlift setup looks like a half Squat. Your build determines your hip height and back angle. But they’ll be where they should be if you setup in the following position:
- Bar over mid-foot – middle of your whole foot not just visible part
- Shins against bar – grab the bar and bend over until your shins touch the bar
- Shoulder-blades above the bar – shoulders in front of the bar, arms slightly incline
- Neutral spine – natural lower back arch, chest up, head inline with your spine
Setup by walking to the bar first. Put your mid-foot under it. Grab the bar while keeping your hips high. Then bend your legs until your shins touch the bar. Now straighten your spine by raising your chest. If the bar stayed over your mid-foot the whole time, you’re ready to pull.
You’re doing it right if your mid-foot and shoulder-blades are aligned with the bar. You should be able to draw a perpendicular through them when looking from the side. You should also be able to draw a straight line from your head to your hips. This is the most effective position to pull from.
Every rep must start from this position. The key is to lower the bar in a vertical line so it lands over your mid-foot again. Your back will tire and want to round as the reps go by. Lock it in the neutral position by raising your chest and taking a big breath before you pull the next rep.
Your toes should be slightly out, about 15 degrees. Push your knees out as well – it keeps your shins back and out of the way of the bar. Space is limited but try to push them in the same direction as your toes. This will engage your groin and helps you Deadlift more weight.
Way Up

Proper Deadlift form is lifting the bar in a vertical line. This is the most effective way to pull because it is the shortest distance between the floor and the lockout. And since you have the best balance when the bar moves over your mid-foot, it should leave the floor from that position.
Pull the weight slowly off the floor. Don’t jerk the bar. Don’t try to lift it with your arms. Take the slack out of the bar first. Pull on it with straight arms until the sleeves touch the top of the plate holes. Keep the tension, take a big breath, and then lift the weight off the floor. The bottom should be slow.
Drag the bar over your legs. If you setup correctly, your shins started against the bar. Keep it close to your center of mass by dragging the bar over your shins, knees and thighs to the top. Don’t let it drift away or it will be harder on your back. Protect your legs by wearing long pants or socks.
Push your knees out while you lift the weight. This keeps them back and out of the way of the bar. It also engages your groin muscles more. The more muscles involved, the heavier the weight you can Deadlift. Make sure you setup with your toes 15° out so you can push your knees out.
Raise your hips and chest at the same time. Don’t let your hips rise first or your legs will straighten too soon. This takes your quads out of the movement and makes the weight harder to Deadlift. Wait until the bar has left the floor to raise your hips and chest at the same time.
Try to push your feet through the floor instead of pulling the weight back. Imagine you’re doing the leg press – lift the bar by pushing the floor away with your feet. The floor will obviously not move. But this cue stops your hips from rising too soon. It helps properly involving your legs.
There should be no horizontal bar movement when you Deadlift. One, this increases the distance the bar must travel to reach the lockout. Two, it makes the weight harder on your lower back. If the bar moves horizontally (like in a J-curve), it didn’t start over your mid-foot. Fix your setup position.
If the bar doesn’t want to leave the floor, your grip might be weak. Step away from the bar, put chalk on, and try again with a mixed grip. You’ll have a better grip and should be able to lift the weight now. Don’t give up too quickly, keep pulling. If the bar still won’t move, it’s just too heavy.
Way Down

The way down must be a mirror of the way up. The bar must move down in a vertical line because this is the shortest distance to the floor. It must stay in contact with your legs to decrease lower back stress. And it must land over your mid-foot ready for your next rep. Your spine must stay neutral.
Unlock your hips and knees. Then lower the weight by moving your hips back. Keep your legs almost straight while moving mostly from your hips. The goal is to keep your knees back and out of the way of the bar. This way you can lower it in a vertical line to your mid-foot.
Don’t lower the weight by bending all from your knees. They’ll come too far forward and block the bar. You’ll then hit your knees which hurts. The bar will have to move around your knees to reach the floor. It will land over your forefoot which is an inefficient position to pull your next rep from.
Wait until the bar has passed your knees to bend them. Lower the weight by moving your hips back while keeping your legs almost straight. Keep the bar close by sliding it down your legs to your mid-foot. Keep your lower back neutral – don’t let it round or hyper-extend. Normal inward curve.
Lower the bar under control but not slow. It should be faster than the way up. But don’t drop the bar. One, that breaks the floor, plates and bar. Two, the way down builds strength and muscle too. Keep the bar in your hands and lower it under control back to the floor.
You’re lowering the bar correctly if it moves in a vertical line and lands over your mid-foot. The bar should never hit your knees, and your lower back shouldn’t hurt.
Lockout

Finish your Deadlift by locking your hips and knees. Stand tall with your chest up and shoulders back. Keep your lower back neutral so you have that normal inward curve. Hold the weight for a second at the top, over your mid-foot. Then lower it back to the floor under control. Done.
Don’t lean back. Some powerlifters do this to avoid red lights in competitions. They want the judges to see they pulled their shoulders behind their hips. But leaning back loads your spinal discs unevenly. It squeezes the back of your discs which is dangerous as explained above. Don’t do it.
Just stand up with the bar and lock your hips. Remember your back doesn’t lift the weight – it keeps your spine neutral. So don’t try to pull the weight back and then stand there with your butt sticking out. Lock your hips so your lower back ends in a stable and safe neutral position.
Lock your knees too. This isn’t bad for your joints because you’re not taking them past their range of motion – not hyper-extending. You’re using a normal range of motion by straightening your legs until your knees are locked. Heavy weight is easier to hold with locked than bent knees.
Shrugging or rolling your shoulders at the top is unnecessary. Your traps already work hard to keep your shoulders in position when you Deadlift. There’s no need to add a contraction at the top, and doing it anyway is bad for your shoulders. Let your shoulders hang at the top.
Breathing
Inhale before pulling the bar off the floor. Hold your breath while you pull the weight. Continue to hold your breath at the top. Lower the weight back on the floor and then exhale. This is the proper way to breathe on Deadlifts because it increases lower back safety and strength.
Here’s how this works: inhaling fills your lungs with air. It expands your chest and abdomen. Holding that air increases pressure in your torso which puts force on your spine. This creates a “natural belt’ that supports your back – it keeps it in proper position so it doesn’t bend.
Your blood pressure will increase when you hold your breath. But it will return to normal after your set. Deadlifts actually lower your blood pressure by increasing muscle strength. Stronger muscles put less demand on your heart because it takes them less effort to do what you do.
Ignore people telling you to exhale on the way up and inhale on the way down. Exhaling empties your lungs. It decreases pressure in your torso. It therefore also decreases lower back support. You’re more likely to hurt your back if you exhale on the way up. Don’t do this.
Exhaling at the top is bad for the same reason. The reps are short so you can hold your breath until the bar is back on the floor. If not, you’re waiting too long to pull after inhaling at the bottom. Wait to inhale until you’re ready to pull. Once you’ve taken a big breath, pull immediately.
Exhale once the bar is back on the floor. Then setup for your next rep by gripping the bar tight, raising your chest and setting your back neutral. Take a big breath and pull. Hold your breath at the top while holding the weight for a second. Then lower it back to the floor. Exhale, setup, inhale, repeat.
Between Reps
Every rep must start from a DEAD stop because this is a DEADlift. The weight must be still before you pull your next rep. Rest the bar on the floor for a second between reps. Use this pause to breathe and set yourself back in a strong position before you pull again.
Don’t bounce. You can Deadlift more reps if you drop the weight and pull it back up by bouncing it off the floor. But this takes work away from your muscles. You’re not lifting the weight from the floor to your knees – the rebound from the plates against the floor is. So bouncing is cheating.
Pulling from a dead stop is harder. But this is also why it builds more strength and muscle. Plus the pause gives you time to setup with proper form for your next rep. Bouncing gives you zero time for this which is why it causes bad form (it usually ends in a stiff-legged rounded back pull).
Keep the rest on the floor short so you can use the stretch reflex. Your hamstrings and glutes stretch on the way down. This makes them contract harder on the way up and increases strength. You lose the stretch reflex if you wait too long between reps. It should be just a second.
So don’t stand up between reps. It makes the next rep harder because you lose the stretch reflex. If you lower the bar correctly, it will land over your mid-foot. Your hips and shoulder-blades will be in proper position. The only thing left is to breathe, put your spine neutral, and get tight.
Avoid regripping the bar for the same reason. If you have to regrip then you didn’t grip correctly at the start – maybe you used a normal grip while this weight needs a mixed grip. Or you gripped mid-palm and had to relax because of hand pain. Grip properly before starting your Deadlift set.
Work hard on getting tight between reps to lock your spine in a neutral position. Grip the bar hard and plant your feet into the ground. Try to get your whole torso stiff by contracting your chest, abs and lats. Do this when you take that big breath right before you pull the weight off the floor.
Special Cases
Tall Guys

Many strong Deadlifters are tall: Brian Shaw is 6’8″, Terry Hollands is 6’6″, Zydrunas Savickas is 6’3″, Hafþór Júlíus Björnsson is 6’9″ tall. And yet they all Deadlift well over 400kg/880lb.
It’s because your height doesn’t matter. Look at The Mountain in the top picture: he pulls with his head neutral, shoulders in front of the bar, bar drags over his legs, etc. He follows all the Deadlift tips in this guide because Deadlifting for tall guys is the same as for guys of average height.
It’s the length of your limbs that matters. If you have long thighs like me, your knees will come more forward. So you’re more likely to bruise your shins during Deadlifts. But I’m only 5’8″ and have long thighs. Tall guys with long thighs think only they have such problems. They don’t.
Don’t let your height be an excuse. Follow these Deadlift tips and practice.
Big Guys
Andy Bolton was the first guy to Deadlift 1000lb. He weighs 350lb. Benedikt Magnusson has broken Andy’s world record by Deadlifting 1015lb. He weighs 379lb. Being big didn’t stop them from using proper form on the Deadlifts. They Deadlift exactly like this guide lays out.
Look at the picture above. They both setup with the bar over their mid-foot, their shoulder-blades over the bar, shoulders in front, head neutral, lower back neutral, etc. So this works even if you’re big.
The usual challenge for bigger guys is that their belly gets in the way. Widen your stance. Go narrower than on Squats but wider than hip-width apart. You can create further space for your belly by pointing your toes out and pushing your knees to the side. Most important, don’t make excuses.
Small Hands
Small palms and/or short fingers make it harder to hold the bar during Deadlifts. Less thumb overlaps your fingers. Your grip is less secure compared to Deadlifters with bigger hands like me.
But the size of your hands doesn’t matter until you reach an advanced level on Deadlifts. Women are proof of this: they have smaller hands and weigh less. And yet they routinely Deadlift 180kg/400lb. You can do it too, regardless of the size of your hands, if you do the work.
The key is to grip the bar tight, apply chalk and use the mixed grip. Finish every Deadlift set with static holds to further increase your grip strength. Be consistent, be patient and don’t make excuses. Your grip strength will increase, and so will your Deadlift.
Small palms can result in bigger calluses. They force you to grip the bar mid-palm because you have little room to play with. Don’t wear gloves – they make the bar even thicker, last thing you want. Just shave your calluses off every week so they don’t get trapped under the bar and tear.
Grip Strength
A strong grip is crucial for Deadlifts because you can’t lift a weight you can’t hold. Strengthening your grip helps you holding the weight longer. You fail less Deadlift reps on StrongLifts 5×5. You progress better as a result, increase your Deadlift and build bigger forearms muscles.
The best way to increase your grip strength for Deadlifts is to use white knuckling, chalk and the mixed grip. Squeeze the bar until your knuckles turn white. Use chalk to absorb sweat. Grip the bar with one hand facing up, one down. For extra grip work, do static holds.
What doesn’t work are straps, gloves and grippers. Straps cover a weak grip instead of strengthening it. Gloves make the bar thicker and harder to hold. Grippers build grip strength that doesn’t carry-over to Deadlifts. Stick with white knuckling, chalk and the mixed grip.
White Knuckling
Squeeze the bar until your knuckles turn white. The tighter your grip, the less the bar can move in your hands. Gravity will pull the bar down and out of your hands during Deadlifts. If you grip the bar loose, it will slide down, open your hands and you’ll lose the bar. So squeeze hard.
The full grip works best for white knuckling because you can squeeze harder. That means you should wrap your thumbs around the bar so they overlap your fingers. Don’t grip thumbless to “feel it more”. You’ll feel it more when your Deadlifts are heavy. The full grip works better for that.
You can also keep your hands closed longer with the full grip. Gravity will pull the weight down. The bar will open your hands and roll down to your fingers. Without your thumbs overlapping your fingers, you’d lose the bar quickly. So Deadlift with a full grip and squeeze the bar hard.
Mixed Grip
The mixed grip is holding the bar with one hand up, one down (like a baseball bat). This increases grip strength by putting four fingers and two thumbs on both sides of the bar. The normal grip puts eight fingers on one side but only two thumbs on the other side. So your thumbs always fail first.
The mixed grip also cancels the bar rotation. Gravity pulls the bar down which opens your hands. The bar rolls to you and opens your hands more because both palms face you. But it can’t roll anymore if you face one hand away. That’s how the mixed grip can add 20/45lb to your Deadlift.
The mixed grip isn’t cheating. You’re still Deadlifting the weight by yourself (unlike with straps). Your grip muscles still have to fight gravity. They still have to keep your hands closed so you don’t lose the bar. There’s just no more rotation. But your grip is working – with much heavier weights now.
Don’t avoid the mixed grip to strengthen your grip. You don’t want to limit your Deadlifts. Your grip won’t be weak if you grip normal on most sets, mixed on heavy sets. It will get stronger because you’ll increase your Deadlifts with the mixed grip. So you’ll work your grip with heavier weights.
Most people face their dominant hand up. I’m right handed and faced my right hand up for years. In 2014 I switched it around after a small injury. Grip was weaker at first but it’s now equally strong. It doesn’t seem to matter which hands you face up as long as you’re consistent with it.
Some people recommend switching the hand facing up on each set to avoid imbalances on the spine and shoulders. But you won’t use the mixed grip on every set – only the heavy ones. Plus StrongLifts 5×5 included plenty of balanced leg and back work with Squats/Rows to avoid imbalances.
If you’re skeptical, I asked my good friend World Champion Mike Tuchscherer about this. He never switches the hand facing up because that gives that arm half the practice. He wants full practice to increase grip strength, strengthen his arm in that position, and protect it against injury.
The best way to avoid biceps tears from the mixed grip is to keep your arms straight. Don’t Deadlift with bent elbows. Don’t jerk the bar off the floor or try to lift it with your arms. Grip the bar tight with locked elbows but relaxed arms. Let your stronger legs and back muscles Deadlift the weight.
You don’t need the mixed grip the first weeks of StrongLifts 5×5 – the weight is still light. Don’t use the mixed grip when you can hold the bar with the normal grip. Otherwise you have nothing to switch to the day the weight is too heavy to hold to. Use the normal grip as long as you can.
Once you approach the thee-plate 140kg/300lb Deadlift, you’ll notice it will be harder to hold on the bar. Here’s how to use the mixed grip then…
- Normal Grip for Warmups. Strenghten you grip with the bar rotation by using the normal grip on your lighter sets. Grip the bar with both palms facing you for as many warmup sets as you can. Hold the weight at the top to strengthen your grip even more (static hold).
- Mixed Grip for Heavy Sets. Once you can’t hold the weight with the normal grip anymore, use the mixed grip. So if you can’t finish your set with the normal grip, switch to the mixed grip and continue. Never let the normal grip stop you from Deadlifting weight.
Deadlifting mixed grip will feel weird at first. It can feel harder to setup properly, as if you lack space. But it’s just a matter of habit. Keep practicing and you’ll get used to it. The quickest way is to face the same hand up everytime. This way you get double the practice with this grip.
The bar will tend to drift forward on the side where your hand faces up. Keep it against your legs by pulling it back on that side. Don’t let the bar drift away or it will be harder to lift. Pull even.
If you get shoulder pain from the mixed grip, switch the hand facing up. If it feels more comfortable that way, stick with it. Again, it doesn’t seem to matter which hand you face up for grip strength. Use what you can use and stick with it.
Static Holds
Static holds means holding the weight without doing any movement. On the Deadlift you do this by holding the weight at the top for several seconds before returning it to the floor.
Static holds increase grip strength for Deadlifts by increasing time under tension. Let’s say your set takes ten seconds. If you hold the bar for ten more seconds at the end, you trained your grip to hold that weight for 20 seconds. Do this enough and holding for 10 seconds becomes piece of cake.
To do static holds you hold the weight at the end of your set. Just stand with the weight after your last rep. Keep your hips and knees locked but let your shoulders and arms hang. Hold it for ten seconds or so (less if you can’t), then lower the bar back to the floor. Simple but super-effective.
Do static holds on your last Deadlift set of the day at least. I do it on every set and it doesn’t tire my grip for my top sets. But I’ve been doing this for a while and have quite a strong grip. If this weakens your grip, only do statics holds on your top set until your grip strength increases.
Grippers
Grippers aren’t that effective to increase grip strength for Deadlifts. They build a different type of grip that has limited carry-over to Deadlifts.
- Deadlifts need support grip – the strength to keep your hand closed so you don’t lose the bar (gravity pulls the weight down which opens your hands)
- Grippers build crushing grip – the strength to close your hand against an external resistance (closing the Captain of Crush Grippers, giving strong handshakes, etc)
This is why static holds work better than grippers. They train your grip the exact same way you use it on Deadlifts. Plus they only take 10 seconds at the end of each set. And you don’t need to buy extra equipment – you already have the bar. You can save your money and buy steaks instead.
If you want to use grippers anyway, then don’t do quick closes and releases for reps. Keep the gripper closed for time instead. It will try to open your hand like gravity does during heavy Deadlifts. Keep your hand closed to build the support grip you need for heavy Deadlifts.
Keep in mind you’re gripping a lot already. Every StrongLifts 5×5 exercise, daily life, etc. Using grippers on top can cause nasty elbow pain that can keep you from lifting. Take it slowly. If it hurts, stop.
Equipment
Barbell
You’ll have the best grip with a powerlifting barbell with revolving sleeves and sharp knurling.
28mm beats 29mm and 30mm because your thumbs cover your fingers more when you grip the bar. Revolving sleeves are easier on your wrists because the plates can spin when you Deadlift. Deep, sharp knurling is better than smooth because it gives you a better grip.
The middle of the bar should have no knurling (except the very center for Squats). This way your shin touch the smooth part of the bar when you Deadlift. If the whole bar is knurled it will scrape your shins and make them to bleed. This hurts and causes bad Deadlift form.
Weightlifting bars are okay but not ideal. They spin more which is great for Olympic Lifting but not for Deadlifts. The bar will rotate in your hands more. This makes the bar harder to hold. You’ll have to switch to the mixed grip sooner with a weightlifting bar than with a powerlifting bar.
Cheap bars without knurling are hard to hold, even if you use chalk and the mixed grip. If the bar has fixed sleeves, it will spin with the plates, rotate in your hands and weaken your grip. Cheap bars also bend easily. This can hurt your confidence if it feels like the bar could break mid-set.
Invest in a quality Olympic Barbell. You’re using the barbell for every StrongLifts 5×5 exercise so it’s worth it. You’ll have a better grip for Deadlifts and you’ll feel safer with heay weights. A quality barbell isn’t cheap but it lasts a lifetime. Some options:
- Rogue Ohio Bar. I had one like this before, really good.
- CAP Barbell. Make sure you get the one with center knurling (so the bar doesn’t slide off your back when doing Squats).
Plates
The best plates for Deadlifts are round, made of iron and have 50mm holes. Diameter should be 17″ for the 20kg/45lb plates so the bar starts at mid-shin level when you setup for Deadlifts.
Hexagonal plates don’t work because they land unpredictably. The bar will land away from your shins on some reps. You’ll have to reset between reps to avoid back pain and shin scraping (but this turns your 1×5 Deadlifts in harder 5×1). Hex plates are for plate-loaded machines, not Deadlifts or Rows.
You don’t need rubber or bumper plates. Heavy Deadlifts will always make noise. Plus bumpers can encourage bouncing between reps. Iron plates force you to pause between reps so you don’t break the bar and the plates. Plus they’re cheaper and take less space than bumpers.
- Cast Iron Plates. 2″ holes, 17″ diameter, cheap
- Rogue Olympic Plates. 2″ holes, 17″ diameter, probably higher quality.
- Technique plates. Get a pair of these to get the bar to the proper height when lifting less than 135lb/60kg. I used this for my wife when she started lifting. You can use it with kids too.
- Weight tree. 50mm/2″ holes to keep your plates organized.
Here’s the minimum setup I recommend:
- 4x20kg, 2x10kg, 2x5kg, 2×2.5kg, 2×1.25kg
- 4x45lb, 2x25lb, 2x10lb, 4×5lb, 2×2,5lb (4x5lb so you can do 85-90lb on Overhead Press)
Include your 20kg/45lb and you can Deadlift 137.5kg/303lb with this setup. This will keep you busy for at least three months on StrongLifts 5×5. When you run out of plates, buy extra 20kg/45lb.
If start StrongLifts 5×5 with the recommended weights of 40kg/95lb, consider two full diameter plates of 25lb/10kg. This way you can setup with the bar at the proper mid-shin level.
Floor
It’s hard to Deadlift without making noise. Dropping weight makes noise, especially if it’s heavy. You could lower the weight more slowly to reduce noise. But this is stressful on your back and wastes strength for the next rep. Keeping the weight in the air is not an option as that is not a Deadlift.
Instead get rubber mats to decease the noise and protect your floor against the impact of the weight.
- Rubber Mat – I had similar ones in my home gym
- Rogue Deadlift Platform – if you have the space, this one is great
You can also build your own platform using horse mats and plywood. Here’s an example. I’ve built platforms like this in my current home gym.
Chalk
Chalk increases grip strength by absorbing sweat. It stops the bar from moving in your hands when you have sweaty hands due to hot weather or a hard session. I increased my Deadlift by 20kg/45lb almost overnight by using chalk. If you’re not using chalk you’re leaving kg/lb on the bar.
Chalk also reduces calluses from Deadlifting. You get calluses because the bar squeezes on your skin folds. Chalk fills up your skin folds which makes your palms smoother. Less of your skin gets trapped under the bar. This means less and smaller calluses than if you lifted without chalk.
Some gyms forbid chalk. You can solve that with liquid chalk, it leaves no traces. Babypowder doesn’t work – it decreases friction and will weaken your grip. The gym chalk you’re looking for is Magnesium Carbonate. It’s what rock climbers and gymnasts use.
- GSC Gym Chalk. Eight blocks for a total of 1lb. This should last you several months. Break one in pieces into a bucket. Then put it on your palms so it fills up your skin folds. It’s normal to have to re-apply chalk on your next set by the way.
- Primo Chalk Bucket, 1lb chalk in a convenient bucket. Double the price but higher quality. I’ve had eczema from chalk in the past. This one seems to be easier on the hands.
- Beasty Liquid Chalk. Liquid chalk leaves no traces. The chalk is dissolved in alcohol. Put it on your palms like hand sanitizer. After 10sec the alcohol evaporates and your hands are chalky. Use this if your gym doesn’t allow chalk – it leaves no dust and works better than gloves.
Boardchalk is not gym chalk. Eco chalk balls I don’t recommend because they don’t fill your skin folds like gym chalk does (unless you split them open but then you paid more for nothing).
Your skin can get beat up by the chalk, especially in cold winter. Chalk works by drying your hands. I have sensitive skin and am prone to eczema’s. So I must make sure I get rid of the chalk asap after training to avoid skin issues. Wash your hands when done, moisturize if needed.
Shoes
The best shoes for Deadlifts have thin, flat, hard soles. Thin soles shorten the distance the bar travels by putting you closer to the floor. Flat soles let you sit back better to engage your stronger posterior chain muscles more. Hard soles don’t compress which improves balance and power transfer.
Deadlifting barefoot puts you closest to the floor. But many gyms don’t allow it because it’s unsafe and unclean. Plus you have zero traction when Deadlifting barefoot. While it’s harder for your feet to slip during Deadlifts than Squats because there’s less hip rotation, shoes are more stable.
Deadlift slippers fix the issue of barefoot lifting. They’re socks with a thin rubber sole (they look like ballet slippers). This gives you traction while keeping you close to the floor. The world champion Deadlifter Andy Bolton uses Deadlift slippers. I’ve never used them.
Don’t Deadlift in running shoes. Their soles have air or gel filling that compresses to absorb impact. They compress differently on each rep which makes it impossible to control your form. Running shoes cause bad form, which increases the risk of injury. Don’t wear them for Deadlifts.
Deadlift with these shoes instead…
- Chuck Taylor. I lifted in these for 10 years. Flat soles, good traction, cheap. But the sole is made of rubber so it compresses a little. They’re also narrow which can be uncomfortable if you have wide feet like me (the reason I stopped using them eventually).
- Reebok Lite TR. Similar to Chuck’s but wider and with better ankle support. They’re bulkier, more expensive and can get hot. I lifted in these for three years.
- Reebok Nano. My current shoe for lifting weights – version 6. Hard sole, fairly flat, strong Kevlar canvas. Light and take little space for traveling. Look great.
Belt
Belts increase your Deadlift by giving your abs something to push against. Your abs contract harder which increases pressure in your trunk. This gives your lower back extra support and improves power transfer to the bar. You can easily increase your Deadlift by 15kg/30lb with a belt.
Deadlifting with a belt isn’t cheating. The International Powerlifting Federation (IPF) allows belts. They forbid straps because they make your grip muscles work less. But your abs don’t work less when you wear a belt. They work MORE because they have something to push against.
This is similar to how chalk allow your grip muscles to work harder. Chalk increases friction and help you hold on the bar better. So your grip muscles are exposed to heavier weights than if you didn’t use chalk. Same with the belt: your abs can contract harder and lift more weight.
Belt don’t make your abs weak. They’ll get stronger because you’ll work them harder and with heavier weights. My beltless Deadlift increased as my belted Deadlift did. I Deadlift heavier now without belt than before Deadlifting with belt. Your abs won’t become weak. They’ll get stronger.
Besides, you shouldn’t wear the belt during your whole workout. Wear it on your last warmup set and work sets only, and remove it between sets. This trains your abs both ways: beltless and belted.
Your belt should be the same width across to give your abs a big surface to push against. That makes bodybuilding belts inefficient for Deadlifts. Get one of these instead…
- Ader Powerlifting belt. 10mm thick, 4″ wide, single prong. Good price.
- Inzer Forever Belt. 10mm, 4″wide, single prong.
I have the Inzer – 10mm and single prong (easier to put on than 13mm/double prong). It’s 4″ wide and fits well despite my short torso. It never hurts but I wear it higher on Deadlfits than Squats.
Don’t wear the belt tight or it will hurt your ribs. Belts aren’t corsets. Wear it on top of your belly button, higher than on Squats, so it doesn’t dig in your hips when you setup for Deadlifts. If you’re short with a small torso, a 3″ or 2.5″ wide belt might fit better for you on Deadlifts.
Straps
Straps make the bar easier to hold by wrapping it to your wrists. They can help you Deadlift heavier weights if your grip is the limiting factor. But they do so by taking work away from your hands and forearm muscles. You can weaken your grip if you over-rely on straps.
I made this mistake. My grip held me back on Deadlifts so I started using straps. Then I used them on Rows and Pullups. Then I used them on every set and exercise. This turned my grip weak – I couldn’t hang on the pullup bar for 10 seconds. So I quit using straps and let my grip strengthen.
Many people misuse straps to cover their weak grip instead of fixing it. It’s tempting to wear straps on every set and exercise as I did. But the less your grip muscles must work to hold the bar, the weaker they become. This increases the need for straps – you can’t lift without anymore after a while.
Some people don’t care. They just want to build muscle. But Deadlifting without straps builds bigger forearms. Your hands, wrists and forearms muscles must work harder to keep the bar in your hands. This makes them stronger and thus more muscular – more strength is more muscle.
There’s no better way to build big and muscular forearms than Deadlifting without straps. The weight is easily five times heavier than on a wrist curl. Again, more weight is more strength is more muscle. You don’t need extra forearm exercises if you Deadlift heavy without straps. This saves time.
You also get the satisfaction of Deadlifting the weight yourself, without a pair of straps holding the bar for you. And you keep things simple by not needing another piece of equipment to train.
Note that Powerlifting competitions don’t allow straps. Belts are fine because they don’t lift the weight for you. They just gives your abs something to push against so they contract harder. But straps hold the bar for you. They make your grip muscles work less, not more. They’re therefore not allowed.
I don’t Deadlift with straps anymore, and have pulled 495lb without. My grip is strong enough to never hold me back. If I use straps it’s because I can’t mixed grip (on heavy Dumbbell Rows for example). Otherwise I stick with white knuckling, chalk and the mixed grip.
If you want to Deadlift with straps anyway, make sure you only use them on your heaviest set. Pull most sets without so your forearms get to work. This way you don’t end with a weak grip.
Gloves
Gloves add a layer between your palms and the bar. The idea is to protect your hands against the pressure of the weight. But gloves aren’t effective at this despite what the sellers claim.
Heavy weight puts pressure on your hands with or without gloves. It’s weight. Gravity pulls it down. Your skin can still fold under the bar if you grip it wrong (this causes hand pain and big callus). You’re more likely to grip the bar wrong with gloves because you can’t feel the bar.
Gloves also make the bar harder to hold. The extra layer between your hands and the bar increases the diameter of the surface you grip. It’s like turning a 28mm bar into 30mm. Less thumb overlaps your fingers. You’ll get less reps and need the mixed grip faster.
Gloves also add an unnecessary expense. The bar will wear them out quickly. It will pull on them until the stitches come loose. Your gloves will fall apart and you’ll need to buy new ones all the time. Chalk and a pumice stone cost less, last longer, and limit callus formation better.
Many people get gloves when they start lifting because their hands hurt. They hurt because you have no callus yet. Don’t use gloves and your skin will toughen up. It will form callus to protect against the pressure of the bar. Your hands will stop hurting if you stick it out. It won’t take long.
Gloves only make sense if it freezes in your gym, until the bar has warmed up. You could also wear gloves until that torn callus has healed. I’ve always preferred to tape it up. This way I don’t have an extra layer over my whole hand which hurts proper form and grip strength.
If you insist on Deadlifting with gloves, be warned you’ll be frowned upon by serious lifters. Success in the gym requires overcoming discomfort. Gloves send a signal that you can’t handle the pressure of the bar on your hands. They’ll consider you a newbie until you lift with your bare hands.
Deadlift Mistakes
Deadlifting Top-Down

Deadlifts aren’t Squats. You don’t walk the weight out of the rack, lower it and then Deadlift it back up. You start each rep with the weight on the floor. You then DEADlift this DEAD weight from that DEAD stop until your knees and hips are locked. This is the proper way to Deadlift.
Pulling top-down usually promotes bouncing. You end dropping the bar fast and pull it back up using the rebound of the plates on the floor. This creates fake strength at the bottom. It’s also harder to control a bar you dropped. You get an unpredictable bar path and thus bad form.
There’s one Deadlift variation where you pull top-down – the Romanian Deadlift. Here you keep your legs almost straight while moving from the hips. This stresses your posterior chain more but limits how heavy you can go. Romanian Deadlifts are assistance for Deadlifts, not a substitute.
Always pull the weight from the floor up.
Bouncing Your Deadlifts
Bouncing means dropping the bar quickly and using the rebound of the plates against the floor to pull the weight back up. It’s tempting to Deadlift this way because you get more reps. But it’s bad form.
Bouncing builds fake strength. You’re not pulling the weight off the floor to your knees. The rebound is. So you’re not strengthening the muscles which should do that work. You’re making them weak.
This becomes clear when you test your one rep max Deadlift. You can’t bounce that rep because the weight is dead on the floor. Don’t be surprised if you can barely Deadlift for one rep what you bounced for five. It’s because you never pulled five reps. You pulled one. The other four were partials.
Bouncing also increases the risk of injury. You’re dropping the bar too fast to control it. It will bounce unpredictably off the floor. It can bounce forward and away from your legs, which will stress your lower back more. Or it can bounce backwards into your shins, which will bruise them.
Worse, bouncing happens so fast that you can neglect to use your legs. The usual mistake is to keep your legs straight and pull with your hips and back only. This stresses your back more since your legs can’t help it to lift the weights. It’s even more dangerous if you let your lower back round.
The proper way to Deadlift is from a dead stop. Wait a second on the floor between reps. Use this pause to get tight and take a big breath before pulling your next rep. You’ll have better form, are less likely to get injured, and will build real strength from the floor.
Not Touching The Floor
Deadlifts aren’t Yates Row. You don’t keep the weight in the air between reps. You put it on the floor.
Keeping the weight in the air during your whole set will tire out your back. When it gets tired, the first thing it will want to do is round. Give your back a break between reps by putting the weight back on the floor. Then use that break to setup strong for your next rep. Put your spine neutral, lock it into position, get tight. Now take a big breath and pull. You’ll be stronger this way, and your back will be safer.
Some people keep the weight in the air to “keep tension on the muscles”. Again, if you want tension, put more weight on the bar. Plenty of tension when you’re Deadlifting four plates. And resting the bar on the floor between reps works better for that. Your back doesn’t get tired before everything else.
Some people do this because their gym forces them to. Print this guide for your gym manager so he gets what he’s making you do is bad for your back. Tell him to get rubber mats or build a platform to protect the floor. And remind him it’s a gym, not a library. Weights make noise – it’s weight.
Squatting Your Deadlifts
Deadlifts aren’t Squats. It doesn’t work to setup with low hips like at the bottom of your Squat. This puts your knees more forward and your shins more incline. You’ll hit them with the bar when you pull. This is how you end up with bruised knees and bloody shins from Deadlfits.
The proper Deadlift setup position looks like a half Squat. Your exact hip position depends on the length of your limbs. If you have a long thighs with a short torso like me, they’ll be higher than if you have short thighs with a long torso (so don’t copy me unless you have the same build).
The simplest way to find the proper hip position for Deadlift is to setup with the bar over your mid-foot. Bend over with straight legs and grab the bar. Now bend your knees without moving the bar until your shins touch the bar. Stop and raise your chest. Your hips were in proper position. Done.
Some people will tell you to drop your hips more. Maybe they don’t get higher hips are normal if you have long thighs with a short torso like me. Or maybe they don’t like the more horizontal back it causes. They want to see you pull with a more vertical torso to avoid “shear force”.
Their thinking is that shear force can make your spinal discs “slide”. Anyone who has done Deadlifts long enough knows this is silly. A spine that can’t stay neutral will round. Nothing slides. Plus your trunk muscles are there to keep your spine from rounding in the first place.
Don’t setup like on Squats and you’ll stop bruising your shins and knees.
Leaning Back At The Top
You don’t need to lean back at the top of Deadlifts. Just stand straight with the weight. Done.
Some powerlifters lean back in competitions. They end their Deadlifts by pulling their shoulders past their hips. This is an exaggeration of the lockout on purpose. The goal is to show the side judges that they locked out the weight. They want to make sure get no red lights.
But leaning back put pressure on your lower back. There’s no need to do this during regular training. Just stand up with the weight. You’re finished when your hips and knees are locked. Your shoulders will be above your hips, with a natural arch in your lower back.
Shrugging At The Top
Shrugging your shoulders at the top of Deadlifts is unnecessary. Your traps already work to keep your shoulders in place when you Deadlift. They stay tight while gravity pulls the bar down. This isometric contraction against heavy weights is enough work to stimulate growth. No need to shrug on top.
Rolling your shoulders is unnecessary for the same reason. It’s also dangerous as it can hurt your rotator cuff. Just don’t do it. Let your shoulders hang at the top of your Deadlifts.
More strength is more muscle. Chase that four plates 180kg/400lb Deadlift and you’ll get ski-slope traps without doing any shrugs. You can do this with StrongLifts 5×5.
Jerking Your Deadlifts
The guy in the video above is jerking his Deadlift. He’s trying to rip the bar off the floor and lift it using his arms. But his hips end up too high so he can’t use his leg muscles. Worse, his back rounds like a taco. Deadlifting like this is not only ineffective, it’s also plain dangerous.
Your arms will never be strong enough to lift what you can Deadlift. Most people can pull 100kg/220lb without too much work. But try to curl that. Your arms are small muscles compared to your legs. They can never lift the same amount of weight. It’s a waste of effort to try Deadlift with your arms.
If you jerk the bar anyway and bend your arms right before you pull, the weight will straighten them for you. Best case you only get some elbow pain. Worst case you tear your biceps.
The proper way to Deadlift is with straight arms. Grip the bar with locked elbows. Contract your triceps if if helps. Put your heels hip-width apart so your knees don’t push against your elbows.
Now pull SLOWLY. Take the slack out of the bar first by pulling on the bar until it touches the top of the plate holes. Stay tight while taking a big breath. Now get the bar off the floor by pushing through your feet. Once the weight is past your knees you can accelerate. But the bottom should be slow.
Dropping The Weight
Many guys, especially Crossfitters it seems, like to drop the weight from the top of their Deadlifts. There seems to be three reason why they do this:
- They’re afraid of hurting their back. Easy: the way down is just the opposite of the way up – bar close, neutral back. If you can’t do the way down, you shouldn’t do the way up.
- They keep hitting their knees. Easy too: stop bending your knees only and bend your hips too. Move your hips back and keep your knees back. This creates space for the bar.
- They’re looking for attention. The big one. When grunting or yelling isn’t enough, just drop the weight. You don’t fool us though when it turns to be only 100kg/220lb…
The first problem with dropping the weight is that it breaks the bar, plates and floor. Weightlifting bars and bumpers can handle it. But powerlifting bars and iron plates can’t. They’ll wear out, bend, chip and crack. The floor won’t like it either unless you have thick rubber mats or a platform.
Many people complain about gyms banning Deadlifts. But many people, sometimes the same, don’t handle the equipment with respect. I’d get mad too if you dropped my bar. This stuff is expensive. Don’t drop weight not made to be dropped. Don’t drop it on a floor that can’t handle it.
The second problem is that you can’t control where the bar lands if you don’t control it on the way down. You want the bar to land over your mid-foot. This way you can quickly pull the next rep using the stretch reflex. But you can’t do that if the bar lands wrong and you have to reset yourself first.
You can of course not care and pull the bar from a position that isn’t over your mid-foot. But that’s not effective. The bar will either be too far from your legs, which is more stressful on your back… or it will be too close and hit you shins. If you want a strong Deadlift, you have to use proper form.
Third, the way down matters too for gaining strength and muscle. It’s hard to skip it on the Squat or Bench Press. But you can do it easily on Deadlifts by dropping the weight or not resisting it on the way down. This is doing half the work and missing out on strength and muscle gains.
Lower your Deadlifts under control. Don’t drop them.
Using Mirrors
Mirrors are not an effective way to check your Deadlift form. You can only see your stance and grip when you face the mirror. You can’t see if your lower back is neutral, if your hips are in proper position, whether the bar moves in a vertical line, etc. Bad feedback makes it hard to improve form.
Standing with your side to the mirror doesn’t work either. The only way to see what you do is to turn your head while you Deadlift. This is a great way to tweak your neck. It will hurt for days.
The best way to check your form is by videotaping yourself. Get a gorilla pod so you can attach your phone anywhere. Shoot from the side and front to see every angle. Watch the videos between your sets, improve and fix on the next one. Keep practicing and your form will improve.
Deadlift Issues
Lower Back Pain
Deadlifts can hurt your back if you don’t keep your spine neutral. Always pull with a natural arch in your lower back. Maintain the arch you have when you stand. Your lower back shouldn’t round when you Deadlift. But it also shouldn’t have any excess arch (aka hyper-lordosis).
If you have sharp lower back pain after Deadlifts, or one side of your lower back hurts, it’s usually because you’re making one of these mistakes…
- Rounding. Deadlifting with your lower back bent squeezes your spinal discs from the front. This can result in lower back pain. Fix this by setting up properly before you pull. Raise your chest and arch your lower back until it’s neutral.
- Hyper-extension. Deadlifting with excess lower back arch also squeezes your spinal discs, but from the back. Fix this by contracting your abs. Wearing a belt can cue them to do this. Also, don’t lean back at the top. Just stand tall with locked hips and knees.
- Twisting. Deadlifting with your hips or shoulders leaning more to one side will twist your spine. Keep them neutral by gripping the bar evenly. Double-check your floor and shoes are even. And don’t lean or pull more with one side when you Deadlift.
If you’re getting lower back pain despite Deadlifting with a neutral spine, then double-check you’re pulling the weight with proper form. Check this:
- Keep The Bar Close. The bar must touch your legs from start to finish. Setup properly and protect your shins with long socks/pants/tape. Then drag the bar over your shins, knees and thighs to the top. Don’t let it drift away or you’ll stress your lower back more.
- Use Your Legs. Don’t try to Deadlift the weight using you lower back only. Engage your legs. Do this by setting up properly with your hips at the right height. Then pull the weight by pushing your feet through the floor. Imagine you’re doing the Leg Press – push, don’t pull.
All of this applies to the way down as well. Keep you lower back neutral when you lower the bar. Keep it close and in contact with your legs. Then lower the weight by pushing your hips back while bending your legs. Don’t drop the weight with a bent back and high hips.
Many doctors will give you painkillers to relieve your back pain from Deadlifts. They’ll tell you to rest for several days and avoid Deadlifting when you resume. The assumption here is that Deadlifts are bad. Rarely do they ask if you used proper form. It’s not their domain of expertise.
Painkillers will relieve your back pain from Deadlifts. But they only treat the symptoms, not the cause. Pain is your body telling you you’re doing something wrong. Without pain you would have continued the bad form and hurt yourself more. So it’s a bad idea to mask pain guiding you.
The best thing you can do to relieve your back pain from Deadlifts are spinal decompressions. This is the best lower back stretch you’ll find. You do it by hanging on the pullup bar for time. Chinese and Russian lifters do these a lot. I do them every single time I go to the gym.
Spinal decompressions stretch your spine vertically using gravity. Unlike the toe-touch stretch, they don’t compress your discs – there’s no bending. So you don’t irritate a disc bulge that could cause your back pain. Instead you reduce it and create space for trapped nerves causing the pain.
If you do spinal decompressions several times a day, you’ll find your back pain will quickly relieve, without taking any painkillers. Just hang as long as you can with your feet off the floor. Relax and let gravity stretch your spine. I usually hang for a minute, but hold as long your grip can hold.
Avoid stretches where you bend over and touch your toes. They can feel good. But if your back pain is caused by a disc bulge from pulling with bad form, they’ll just increase it. You want to reduce the disc bulge instead, and the best lower back stretch for that is hanging on the pullup bar.
Also, don’t wear a belt to make up for poor Deadlift form. Wear it for extra lower back support. It helps cuing your abs to contract. But don’t wear one and then Deadlift with a bent back.
Lower Back Rounding

The most common way to hurt your lower back Deadlifting is if you pull with a bent lower back. This squeezes the front part of your spinal discs.
Setup with that natural arch you have when you stand. Your lower back shouldn’t be flat but have a slight curve (aka lordosis). Maintain this arch in your lower back from the start of your Deadlift, until the lockout, and on the way back down.
- Setup. Stand with the bar over your mid-foot. Bend over and grab it. Bend your knees until your shins touch the bar. Now lift your chest. If this doesn’t put your lower back neutral, arch it – pull your hips to the ceiling. Lock the position by squeezing your lats and taking a big breath.
- Way Up. Don’t let your hips rise too fast like in the top picture or you’ll round. Maintain your back angle by pushing the floor away as if you were doing a Leg Press. Keep your chest up, your lower back arched and the bar close to your legs. Keep pushing until the bar moves.
- Way Down. Lower the weight by moving your hips back. Bend your legs slightly but keep your knees back so the bar doesn’t hit them on the way down. Keep your chest up and lower back neutral. Lower the bar while keeping it close, against your legs.
Reset your spine between reps. Your back will get tired and want to round. You can avoid this by setting up in a strong position every time. That means you raise your chest again, put your spine neutral again, squeeze your lats again and take a big breath again. Only then you pull.
Don’t setup with a bent back and try to get it neutral during the lift. For one, this rarely works. Two, Dr Stuart McGill Phd says this is even worse for your spine than pulling bent back.
Stretching your hamstrings rarely fixes lower back rounding on Deadlifts. The issue isn’t that your hamstrings are tight. The issue is that your lower back isn’t tight enough. It’s loose. Get it tight before your pull. If you can’t get that natural arch, raise your hips to the ceiling during your setup.
Arching Too Much
Your lower back should have a natural arch when you Deadlift. The same curve as when you stand. It shouldn’t have an excess arch or hyper-lordosis. This is unnecessary and bad for your back.
The issue with arching too much during Deadlifts is similar to pulling with a bent lower back. You’re compressing your spinal discs. The difference is that you’re doing it from the back now instead of the front.
I hurt my back a lot when I started Deadlifting because people kept saying “arch your back”. You do want a natural arch in your lower back so it doesn’t round. But you don’t want to over-arch.
- Natural Arch. Setup with a natural arch in your lower back. It should have the same curve as when you stand. Don’t arch your back more than that. It should feel comfortable and not squeeze your discs. Also, don’t finish your Deadlifts by leaning back. Just stand tall.
- Squeeze Your Abs. If you can’t keep your lower back from over-arching, squeeze your abs harder. Contract them as if someone was about to punch you in the stomach. Consider wearing a belt to cue your abs to contract when you Deadlift.
Hips Rise Too Fast
Your hips will rise faster than your chest if you Deadlift without using your legs, or if you setup with your hips too low in the first place. The former is bad because it means your back will have to work more than it should. The latter is bad because the bar will usually scrape your shins.
In the top picture you can see her hips start in the proper position. But they rise while the bar stays on the floor. This straightens her legs before they can help to Deadlift the weight. Her hips and back have to pull the weight alone, as if doing a stiff-legged Deadlift. Worse, her lower back rounds.
- Setup Properly. Avoid your hips starting too low by setting up properly. Stand with the bar over your mid-foot, bend over and grab it, then bend your knees until your shins touch the bar. Raise you chest and your hips will be in the proper position – not too high or too low.
- Get Tight. The goal is to maintain your back angle while you break the bar off the floor. You do this by getting tight. Squeeze the bar and your lats. Lock your hips into position by contracting your glutes and hamstrings. Raise your chest, take a big breath, and then pull.
- Don’t Pull – Push. The Deadlfit is a pull. But it helps to think of it as a push so you can engage your legs instead of trying to pull it with just your back. Get the bar off the floor by pushing your feet into the floor. Imagine you’re doing a Leg Press – push the floor away.
Don’t let your hips move before the bar leaves the floor. Your hips and chest must rise at the same time. Keep your hips where you’ve put them during your Deadlift setup. Push your feet through the floor as hard as you can. Only when the bar leaves the floor can your hips rise with your chest.
Hitting The Knees
Hitting your knees on Deadlifts hurts. It’s also ineffective: the bar can’t drop in a vertical line because your knees are in the way. It must roll over them instead. So it lands over your forefoot instead of mid-foot. Pull from here and the bar will go up in a J-curve, bruising your shins in the process.
Hitting your knees is also bad for your lower back. The closer you hold the weight, the less stressful it is because it’s closer to your center of mass. But you can’t keep the bar close if your knees force it to move away from your body on the way down. So you’re hurting your back on top of your knees.
The solution is to get your knees out of the way of the bar. Keep them back on the way down. You do this by moving from the hips. Lower the bar by pushing your hips back. Bend your legs too but keep your knees back. This creates space for the bar to go down in a vertical line without hitting them.
Once the bar reaches your knees, then you can bend your legs more to lower the weight to the floor. If you do this right, the bar will land over your mid-foot without hitting your knees. It will be right where it should be to Deadlift your next rep in vertical line up.
Don’t drop your Deadlifts to avoid hitting your knees. Just learn to do it right.
Bruised Shins

Deadlifts bruise your shins and make them bleed when you pull with bad form. If you setup with your hips too low or the bar too close to your shins, you’ll hit and scrape them on the way up. It’s even easier to get bloody shins if you Deadlift in shorts using a bad bar with aggressive knurling.
Bruising your shins hurts. Keep bruising them and they’ll bleed. Wounds turn into scars that stick out of your shins. The bar will rip off those scars next time you Deadlift. They’ll hurt, bleed again and you’ll end with bigger scars. Unless you fix your Deadlift form, your shins can never heal properly.
Worst, they can infect. Happened to me once in Thailand. A bar with aggressive knurling scraped my right shin. It bled and I forgot to disinfect it. The next morning my leg hurt – the wound was black. I ended up in the hospital to clean it out and get anti-infectives plus a tetanus shot.
But more annoying was that I couldn’t Deadlift properly for two weeks. Just touching my shin hurt. I had to pull with the bar away from my legs to not hurt the wound again. This is an ineffective way to pull – I felt it more in my back, and not in a good way. And yet many people Deadlift like this.
It seems right to Deadlift with the bar away from your shins so you can’t bruise them. But it’s bad for your spine. The further the bar from your body, the more stressful on your lower back. You have to keep it close to your center of mass. The closest is when you drag the bar over your shins.
Shin scraping is therefore unavoidable. I have vertical marks on my shins from Deadlfiting. The skin has thickened to protect against the bar (just like my hands adapted by forming calluses). But my shins don’t get beat up from Deadlifts, and rarely bleed. The key is to use proper form…
- Bar over Mid-Foot. Bar over forefoot is too far away. It will move back to your mid-foot when you pull because that’s your balance point. You’ll pull in a J-curve and hit your shins. But the bar can’t be too close or your shins will be in its way. Setup with the bar over your mid-foot. Your shins shouldn’t touch it yet when you stand in front of it.
- Hip-Width Stance. Setup with your heels hip-width apart so you shins face the smooth part of the bar. If it has none in the middle but is covered with knurling, use a better bar.
- Feet 15° Out. Long thighs put your shins more forward, more in the way of the bar. If you have long thighs like me, setup with your feet pointing 15° out. Push your knees out while you pull the weight. This will keep your shins back so you don’t bruise them on the way up.
- Don’t Squat your Deadlift. The lower your hips, the more incline your shins, and the more they block the bar. Keep your shins back and out of the way by raising your hips. The exact height depends on your build. But they’ll be where they should be if you setup properly – with the bar over your mid-foot and your shoulder-blades over the bar.
Deadlift on an even floor. The bar can’t move before you pull or between reps. It should stay still over your mid-foot. If the bar rolls towards your shins, it will hit them on the way up.
Deadlifting in shorts is a bad idea. Your shins will turn red when you drag the bar over your legs to the top. This can feel uncomfortable and tempt you to pull with the bar away from your shins. But again – this is ineffective for Deadlifting heavy weights and more stressful for your lower back.
Best is to wear long pants for Deadlifting. Anything will do as long as it doesn’t restrict movement or creates bumps that get caught by the bar. Sweatpants are fine for Deadlifts.
Deadlift socks are also fine if it’s too hot for pants. They protect your shins by putting a layer between them and the bar. They’re like the socks of soccer players and skiers. I’ve never worn them.
Shin guards are overkill. They’re for Crossfitters who do high reps Deadlifts for time. It’s hard to keep proper form when you pull that fast. So your shins get beat up. But not when you do simple sets of fives on StrongLifts 5×5. You can control the weight and don’t need excess padding.
Shin guards can actually encourage bad form. Let’s say your shins are beat up because you Squat your Deadlifts. The excess padding of shin guards remove any feedback that would otherwise make you stop. There’s no pain so you can keep pulling with bad form instead of fixing it.
Knee sleeves to protect your shins against the bar also doesn’t make much sense. They create bumps on your shins. The bar will catch the knees sleeves on the way up. This slows the bar and makes it harder to Deadlift. Just lower the bar correctly and you won’t hit your knees on the way down.
Stick with long pants and maybe Deadlift socks to protect your shins. And use proper form.
If you hurt you shins Deadliting, put athletic tape over the wound. Put it vertically, not horizontally, so the bar can’t pull it off. The tape will protect the wound and stop the bleeding so you can finish you workout. Make sure you disinfect the wound post workout and clean the blood on the bar.
Put athletic tape on your scared shin for several workouts. This way the bar can’t rip off the scar and tear the weakened skin again. Tape it everytime for extra protection so it can heal without messing with your Deadlift progress. And fix your form so this can’t happen in the first place.
Callus Tears

Deadlifts tear calluses when you grip the bar wrong. The usual mistake is to hold the bar mid-palm. Your skin will fold under the bar when gravity pulls it down. It will form calluses to protect against the pressure. Some calluses will become too big, get pulled by the bar, and eventually tear.
Torn calluses are not cool. They just take time away from deadlifting. It takes a good week for a torn callus to heal. You can easily tear the weakened skin again the weeks after by Deadlifting heavy. The smart thing is to avoid callus tears in the first place so you don’t slow your progress.
- Grip The Bar Low. Deadlift with the bar low in your palm, on top of your big calluses, close to your fingers. Your skin won’t fold under the bar because you’re gripping below your main skin folds. This grip can feel weird at first. Stick to it and you’ll get used to it.
- Use Chalk. Get gym chalk – magnesium carbonate. Put it on your hands when you Deadlift. It will prevent torn calluses by filling up your skin folds. Less skin will get trapped under the bar because your palms are smooth. Use liquid chalk if your gym doesn’t allow chalk.
- Shave Your Callus. Don’t let your calluses become huge or they’ll get trapped under the bar. Get a pumice stone and shave your calluses off once a week. Don’t be aggressive, you don’t want to weaken your skin. Just level off your calluses with the rest of your hands.
I rarely tear a callus nowadays. It happens maybe once a year, usually when I do something my hands aren’t used to (last tear was when weight lifters in my gym got me to do Power Cleans again). If you grip the bar properly, use chalk and take care of your hands, Deadlifts will rarely tear a callus.
If you tear a callus during Deadlifts, here’s what to do:
- Wrap. Stop the bleeding by covering the wound with athletic tape or nose tissue. You should be able to finish you workout despite the torn callus (I usually do). Especially if you tore a callus on your fingers – just wrap it with athletic tape and you’ll be fine. Clean the bar when done.
- Cut. Disinfect the wound then cut the flap out and trim the edges. Level it with the rest of your hands. Don’t cut deep or you’ll weaken the skin around the wound (you don’t want that to tear later). Just clear the dead skin so new tissue can grow. Don’t leave the flap or glue it back on. It will just take longer to heal and easily tear again. Just cut the dead skin out.
- Soak. Get salty warm water and soak your hands for 10 minutes. It will hurt but it’s the fastest way for your torn callus to heal. Do this twice a day for two to three days to speed up recovery. Wait five days before Deadlifting heavy again.
Protect your callus with athletic tape when you resume Deadlifting. Pull lighter for a while to avoid tearing the callus again. As long as you keep Deadlifting, you shouldn’t lose too much strength. But use this as a lesson to avoid callus tears in the future: proper grip, chalk, and callus care.
Deadlift variations
Sumo Deadlift
The Sumo Deadlift is a Deadlift using a wide aka sumo stance. Technique is similar to a conventional Deadlift – bar over mid-foot, shoulder-blades over the bar, and neutral back. But the sumo stance puts your torso more upright and hips lower than the conventional Deadlift.
This impacts the muscles worked. Sumo Deadlifts work your lower back muscles less because your torso is more vertical. It’s harder to keep a horizontal back neutral than a vertical one. Conventional Deadlifts are therefore more effective for building a strong lower back.
The sumo stance works your groin more because it starts stretched. It also works your quads more because your hips start lower – your knees are more bent. But Squats work your quads even more. They also work your groin. So this is no reason to choose sumo.
I rarely pull sumo because my hips don’t seem to agree with it. When I do, I go semi-sumo so I don’t hurt my hips. I’ve always pulled conventional-style, and pull more that way than sumo-style.
There are very strong Deadlifters who pull sumo. They may influence you to pull sumo too. Wait until you can Deadlift 180kg/400lb with proper form. Build basic strength first before experimenting with sumo. And don’t switch because you can’t figure out conventional.
There’s a minority of people who can’t Deadlift with proper form due to their build. They have long thighs with very short arms. This makes it impossible to get their shoulders-blades over the bar conventional-style. Sumo is the only way for them. You’re unlikely to have this problem.
Trap Bar Deadlifts
The trap bar or hex bar is an hexagonal shaped bar made for shrugs. It allows you to do heavy shrugs like with a barbell. But there’s no friction of the bar against your legs because of the hexagonal shape of the trap bar. Some people prefer to Deadlift with a trap bar than with a regular barbell.
But trap bar Deadlifts aren’t Deadlifts. The bar doesn’t block your shins to come too far forward when you setup. You can pull with an upright torso like when Squatting high bar. Trap bar Deadlifts are more like half Squats with the bar in your hands, and the weight hanging from the side instead of front.
The trap bar has become popular because it lets you get away with bad form. You can’t scrape your shins because the bar is further away. Your lower back can’t round because your torso can be more upright. This torso position makes the weight less stressful on your lower back.
But this is also why the trap bar is less effective to build a strong back. It doesn’t teach you to pick up a heavy weight from the front by bending through your legs with a neutral back. It doesn’t teach you to pick up a heavy box or kid. The movement is closer to picking up a wheelbarrow.
The trap bar is usually a band-aid solution for people who lack the patience to learn proper Deadlift form. But it’s less effective than Deadlifting with a bar, and thus no substitute for it.
Stiff-legged Deadlifts
The Stiff-legged Deadlfit is a Deadlift done with straight legs. The weight also starts and returns to the floor on each rep. But your quads can’t push the weight off the floor by straightening your legs – they’re already straight. So your hamstrings and glutes have to do all the work.
Stiff-legged Deadlifts are great assistance for advanced Deadlifters. But they don’t substitute them. You can go heavier with Deadlifts because they use more muscles – your quads can help lifting the weight. Deadlifts are therefore more effective for gaining strength and muscle.
Romanian Deadlifts
The Romanian Deadlift is a Deadlift done top-down with straight legs. You take the bar out of the rack at thigh height. You then lower to your knees with straight legs and quickly come back up. This works your hamstrings and glutes more while taking your knees out of the movement.
Romanian Deadlifts are also a great assistance exercise for Deadlifts. But they also don’t substitute them because taking out your quads limits how heavy you can go. They’re a great stretch for your hamstrings though if you keep your legs straight throughout.
Popular Deadlift Questions
I’m afraid of Deadlifts. What should I do?
You should Deadlift. The sooner the better. Because it’s normal to be intimidated by Deadlifts or afraid of injury. Weight is intimidating and there’s a real risk of injury. But you won’t fix that by avoiding them. The only way to overcome the fear of Deadlifts is to actually Deadlift.
Here’s how it works: every rep you Deadlift without getting hurt boosts your confidence. You believe you’re going to be okay because you were okay last time. So you add weight, and if you’re okay again, get another boost in confidence. This creates a positive feedback loop that overcomes fear.
The fear itself never goes away. I still have fear sometimes when approaching maximum weights, and this despite lifting for almost two decades. The difference is experience has taught me how to handle the fear. It’s quite simple: you have to become comfortable being uncomfortable.
What doesn’t work is to substitute Deadlifts for machines or other exercises that look similar. This won’t make you more comfortable at Deadlifts. It’s not specific training. You have to Deadlift to get better at Deadlifts. Here’s how:
- Start light. Light weights are less intimidating and do less damage if you can’t lift with proper form yet. Stop caring about what people think. Swallow your ego and start with 40kg/95lb on StrongLifts 5×5. Go even lighter if this sounds like too much.
- Focus on Form. Proper form builds confidence. Read this Deadlift guide over & over again, and apply everything. Setup the same way on every set. Pull each rep the same way. Every rep you do successfully will increase your confidence and help you overcome fear.
- Add Weight. Increase your Deadlifts slowly, by 2.5kg/5lb each workout. It may not sound much but it adds up. You could be Deadlifting 400lb/180kg in 12 months by doing this.
If you can find a coach to show you how to Deadlift, that’s great. If not, videotape yourself to see what you do. Compare with the tips in this guide. Don’t use mirrors, they don’t give a full view. Tape yourself from the side, look at it between sets, improve on the next set. Be patient and keep practicing.
Can I Deadlift in the smith machine?
No. Using a bar attached to rails doesn’t make this safer. This isn’t a Squat or Bench Press where you can get stuck under the weight. If you fail to Deadlift the weight, you just return it to the floor. If it turns out to be too heavy to lift, then the weight never leaves the floor in the first place. It’s safe.
The only thing the smith machine achieves is transforming Deadlifts into a less effective bastardised version. You can’t balance the bar because it’s attached to rails. This takes work away from your muscles. It makes the exercise less effective for gaining strength and muscle.
You also can’t control where the bar goes because it’s fixed on rails. You’re locked doing unnatural movements. The plates can rarely touch the floor because the lowest bar position is too high. That means you can’t Deadlift dead weight from the floor, you’re doing Rack Pulls instead.
Use a real barbell. If your gym doesn’t have any, it’s not a gym. Switch to a real one so you can do real Deadlifts and get real results. Maybe you can build a home gym. Or you can continue doing inferior exercises and getting inferior results. Your priorities will determine your choices and results.
Should I Deadlift in the Power Rack?
No. As explained above, if you fail mid-rep you just return the weight to the floor. If it’s too heavy to pull, it never leaves the floor in the first place. You can’t get stuck under the weight on Deadlifts. And each rep starts on the floor. So you don’t need the safety pins or J hooks of the Power Rack.
It’s fine to Deadlift inside the Power Rack if there’s limited space in your gym. Otherwise leave it for the Squatters. I never Deadlift inside the Power Rack.
How do I prevent calluses from Deadlifts?
You can’t. Your hands build calluses to protect you against the pressure of the bar. This is a byproduct of lifting like building muscle is. If your skin didn’t harden, your hands would hurt. You want calluses to form so you can Deadlift heavy without getting hand pain or needing gloves.
What you can and should do is prevent big calluses to form. The bar traps and tears them more easily because they bulge out of your hands. This hurts and can cause you to skip Deadlifts. Big calluses also make your hands look dirty. You want your calluses to stay small.
To prevent big calluses to form, grip the bar properly. Not mid-palm or your skin will fold under the bar. Hold it low in your palm, close to your fingers. Then use chalk on your heavy sets to further fill up your skin folds and create a smooth surface for the bar. This limits skin folding.
Why do Deadlifts hurt my hands?
You don’t have calluses yet. Don’t use gloves but stick it out for a few workouts. The pain will be gone once calluses have formed on your hands. Make sure you grip the bar correctly to avoid excess skin folding which could cause unnecessary hand pain. Hold it low hand, close to your fingers.
You shouldn’t get hand pain if you started StrongLifts 5×5 with the recommended starting weights. The lighter weights give your hands time to adapt to the pressure of the bar and form calluses. If you started heavier, consider dropping the weight until calluses have formed.
Keep in mind that you lose your calluses when you stop lifting. You lose them like you lose muscle. You may still have the strength to Deadlift heavy, but not the calluses to protect your hands. So give your hands a few workouts to form calluses again before you lift heavy.
Painful calluses on your fingers are harder to fix. I have one on the middle of my right index finger. The bar seems to trap that callus no matter how I grip it and despite using chalk. The only thing that works is to wrap athletic tape around the middle of my finger to cover the callus. Try it.
How do I remove calluses on my hands?
You don’t want to remove your calluses. You need them to protect your hands when you Deadlift. If you remove your calluses, your hands will hurt. You wont’t be able to hold the bar and Deadlift heavy. This limits your strength and muscle gains. Don’t try to remove your calluses!
Limit their growth instead. Keep them small. The best way to do this is to shave them off each week. This keeps your calluses from growing big. It keeps them from getting trapped under the bar. It keeps you from playing with them when bored. And it keeps your hands looking clean.
Use a pumice stone to level off your calluses with the rest of your hands. You don’t want them gone since they protect your hands against the pressure of the bar. You just want them to stop bulging out of your hands. The point is that they don’t get trapped under the bar when you Deadlift.
Shave the dead skin off by working on your whole hands first. Then shave the big calluses – side to side, up & down, and in circles. If you go gentle, nothing will hurt, tear or bleed. Your calluses will be leveled off and barely noticeable. Your hands will look clean.
Don’t be aggressive. You don’t want to weaken the softer skin around your calluses. The bar will pull on that skin next time you Deadlift. Weaken it and it will tear. The whole callus will come off. This hurts, takes week to recover, and is a dumb way to slow your progress. Be gentle.
That means no cheese grater or razor – they’re too aggressive. No scissors and nailclippers either. And don’t bite or rip your calluses off with your nails when you’re bored. You don’t want to cut into live skin, rip too much off and create tears. It’s a stupid way to damage your hands for Deadlifts.
Stick with the pumice stone. Put it in your shower. Wet shaving seems to work better. Calluses turn white and bulge out when you soak your hands in warm water. This makes them easier to shave off. Shave your hands at the end when your hands are soft and moist. It only takes five minutes.
Best is to shave your calluses off after your last Deadlift session of the week. This way your hands have several days to recover before your next Deadlift session. In case you were aggressive, your skin has a couple of days to recover and toughen up. This prevents tears.
What if my grip fails during Deadlifts?
Avoid it in the first place. Use chalk, the mixed grip and white knuckling. And hold the bar low, close to your fingers. This way you don’t get hand pain that forces you to relax your grip mid-set.
If your grip fails mid-set, you can try to regrip the bar. But this will make the next rep harder as you’ll lose some stretch reflex. It can feel even harder than the first rep since you’re already tired from the previous reps. You risk failing to move the bar at all despite regripping the bar.
You can try the monkey grip instead. Don’t regrip but hold on to the bar. Ignore your thumbs failing – hold the bar with your fingers, on top of the middle bones. Your fingers just need to be strong enough to hold on the bar for a few more seconds until your set is over.
I use the monkey grip a lot since my right thumb always fails first during hard Deadlift sets. I broke that thumb while skiiing several years ago. It’s been weaker than my left thumb ever since. So I often have to rely on the monkey grip on the right side to keep the bar in my hands.
But the monkey grip is less safe. You can lose the bar and damage your equipment. The bar can hit your knee caps on the way down in the process. This has never happened to me, but it’s possible. If you know what you’re doing, give the monkey grip a try. Otherwise just regrip.
Should I hook grip or mixed grip?
Keep it simple and use the mixed grip for Deadlifts. It’s as secure as the hook grip but doesn’t put pressure on your thumbs. So it increases grip strength instantly without causing thumb pain.
The hook grip puts your thumbs between the bar and your fingers. Your fingers rest on your thumbs instead of under it. This increases grip strength but without needing to hold the bar with one hand up and one down. Your palms face you instead, like with the normal grip.
Olympic lifters use the hook grip for the Snatch and Clean & Jerk. They can’t use the mixed grip as it doesn’t work for these lifts. They can’t use straps either – strapping yourself to the bar is dangerous if you fail to lift the weight overhead. The hook grip is their only option.
It has become popular to use the hook grip for the Deadlift too. The benefit is that it doesn’t load your shoulders unevenly because both palms face you. Some say this makes the hook grip safer than the mixed grip – it prevents muscle imbalances and biceps tears. However:
- Muscle imbalances are a non-issue as already discussed. You’re Deadlifting with the normal grip on most sets. And you’re doing plenty of balanced exercises for your shoulders, back and legs. So unless your shoulders can’t take the asymmetry, the mixed grip is fine.
- Biceps tears from the mixed grip aren’t that common. Go to a powerlifting competition – most Deadlift with a mixed grip and yet biceps tears are rare. When they happen it is usually because of bad form – pulling with bent arms or hitching. Steroid-use also seem to be a factor.
The hook grip is definitely safer for people who have torn their biceps in the past, and who don’t want to risk tearing it again. But that doesn’t mean the mixed grip causes biceps tears. Bad form does. Keep your arms straight when you Deadlift. Don’t pull with bent elbows.
The main reason to use the mixed grip instead of the hook grip is that it doesn’t squeeze and hurt your thumbs. You don’t have to lift lighter until your thumbs adapt to the pressure. You can use the mixed grip today on your heaviest set and get an immediate boost in grip strength.
Keep in mind that the stress on your thumbs is higher when you use the hook grip on Deadlifts than on Olympic lifts. The set lasts longer – the weight moves more slowly, you hold it at the top, and control it on the way down. You also use much heavier weights. It will hurt your thumbs more.
Stick with the mixed grip. Especially if you have small palms or short fingers. If it feels uncomfortable on your shoulders, try to switch your grip around by facing the other hand down.
How do I Deadlift with hex plates?
Bad. The bar will land on the corners of your hex plates. It will move out of alignment. This forces you to pull the bar from a bad position – too far which causes back pain, or too close which bruises your shins. The only solution is to reset between reps. But this makes the set harder.
Hex plates are made for plate-loaded machines, not Deadlifts or Rows. One side will land on the flat part. the other on the corner. The bar will have to tilt back or forth to balance itself from the corner to the flat part. But this moves the bar out of alignment and away from your mid-foot.
The problem is worst when you Deadlift two-three plates a side (100-140kg/220-300lb). Beyond four plates, the problem fixes itself because the corners average out. This gives the weight plenty of corners to balance itself on. But you need to be able to Deadlift 180kg/400lb first…
Lowering the bar slowly doesn’t fix it. The hex plates will land on the corners regardless. Keeping the weight in the air also doesn’t work – it’s not a Deadlift unless each rep starts from a dead stop on the floor. Pulling from the lowest pins in the Power Rack doesn’t work for the same reason.
The best solution is to get round plates. They behave predictably which allows you to control how the bar lands. You can pull each rep from your mid-foot consistently. This saves you from lower back pain and bruised shins that you otherwise get with hex plates.
Two round plates is often enough. Hex plates are usually smaller than Olympic plates. Put one plate of 20kg/45lb on each side of the bar, and the hex plates will stop touching the floor. If your gym has no round plates, maybe you can convince your gym manager to get a pair.
If not, then reset between reps. Lower the bar to the floor, release your grip, and stand up. Then move your mid-foot under the bar again. You will lose stretch reflex by resetting though. Your set of five reps will turn into five harder singles because of the longer rest. But it’s that or switching to a real gym.
Should my back be sore after Deadlifts?
Soreness doesn’t matter. It doesn’t mean you’re building more strength and muscle. What matters is the weight. If you increase how much you Deadlift with a neutral spine, then your back got stronger – whether you got sore or not. Otherwise you couldn’t lift the weight with a neutral spine.
Soreness usually happens if you do something new. If you suddenly do five sets instead of one. Or if you do 20 reps instead of five. Or if you quit Deadlifting and now resume with a weight that is heavier than what you should be using after a break. All of this can cause soreness.
My lower back usually doesn’t get sore from Deadlifts. The last time was when I trained in a gym with smaller diameter plates. They forced me to pull from a lower position than I’m used to (as if doing deficit deadlifts). My lower back got pumped and was slightly sore the next day.
But aside from that my lower back doesn’t get that sore from Deadlifts. If I get sore, it’s usually in my upper-back. The area between my shoulder-blades can be sore for a day. This is most likely from contracting my upper-back hard before pulling the weight so my spine doesn’t round.
If your back hurts after deadlifts you’re probably doing something wrong. Check your form. Make sure your lower back doesn’t round, And make sure you lift the weight with your legs not your back. Just stand up with the weight until your hips and knees are locked. No need to pull back.
What’s a good lower back stretch?
Spinal decompressions. Hang on the pull-up bar for time and let gravity stretch your spine. This is like inverted table therapy except you can do it in the Power Rack without other equipment.
Spinal decompressions are better than toe-touch stretches. There is no bending or arching of your lower spine. So there’s no uneven pressure on your discs that could irritate disc bulges. You stretch your spine and create space instead. This reduces disc bulges and relieves lower back pain.
Technique is simple. Grip the pullup bar with both palms facing away from you, about shoulder-width apart. The bar is ideally high enough for you to hang with straight legs without your feet touching the floor. This prevents your lower back from arching and keeps it neutral.
Hang on the pullup bar as long as you can. I usually do sets of up to one minute between sets, several times during my workout. I don’t use straps because my grip is strong enough to hold on the bar. But feel free to use straps if your grip gives out too quickly.
Should I Squat my Deadlifts?
No. Deadlifts aren’t Squats. They’re Deadlifts. If you try to Squat the weight, you’ll start with too low hips. They’ll end further away of the bar which makes the weight harder to pull. Your shins will also come more forward so you’ll hit them on the way up. It doesn’t work.
There are some strong lifters who setup in a low Squat position before Deadlifting the weight. The Russian Olympic lifter Mikhael Koklyaev does this for example. Check the image below..

Notice he starts in a bad position with his hips too low, shoulders over the bar and arms bent. But he raises his hips before pulling the weight. When the bar leaves the floor he is in the proper Deadlift setup position – bar over mid-foot, shoulder-blades above bar, and bar against shins.
I think this is a habit he built from Olympic lifting. They Squat low before cleaning and snatching the bar. This loads their leg muscles and creates a stretch reflex. It increases speed from the floor so they can pul heavier weights. But you’re not olympic lifting. You’re deadlifting.
If you try to Squat low first and then raise your hips, you’ll probably make mistakes. You’ll push the bar away from your mid-foot with your shins. You’ll raise your hips too much or not enough. So whatever benefit you could get from Squatting low first, you lose because of the bad form that follows.
Keep it simple. Setup with the bar over your mid-foot, shoulder-blades over bar, and shins against bar. When you can Deadlift four plates then maybe you can try Squatting low first. I don’t do it.
Should I drop my hips into my Deadlift?
No. You shouldn’t do it for the same reason you shouldn’t Squat into your Deadlifts. Whatever benefit it gives you lose if you fail to move in proper position before pulling the weight. It’s harder to setup properly after quickly dropping your hips. You’re more likely to make technical mistakes.
Deadlift champion Andy Bolton starts with high hips. He then drops and raises them several times before pulling the weight. This loads his hamstrings and glutes. It increases strength by using stretch reflex. But he’s in proper position when the bar leaves the floor. And you’re not Andy Bolton.

There are many things elite athletes do that regular lifters can’t get away with because they’re less experienced. It’s too easy to end in a bad position – back not neutral, hips too high, hips too low, bar not over mid-foot. etc. This neutralizes any benefit dropping your hips may give.
Keep it simple and Deadlift without dropping your hips first.
If rounded back Deadlifts are bad, why do some powerlifters do it?
Competitive Powerlifters Deadlift to win. They use the technique that helps them Deadlift the heaviest weight possible. That technique may not be healthy for their lower back. But athletes often prioritize winning over long-term health. Drug abuse illustrates this best.
World records also don’t always reflect how they Deadlift most of the time. Max attempt look ugly. It’s harder to maintain proper form. It could be that they round their back more when attempting PRs in competitions. Maybe they pull with a more neutral back the rest of the year in training.
And they might be rounding less than you think. Strong Deadlifters can have huge back muscles that bulge out. This can create a more rounded look of their upper-spine. Their lower back can look flatter as well if their bigger back muscles fill up the normal inward curve of their lower spine.
That said, many successful Deadlifters have pulled rounded-back style. Konstantins Konstantinovs (426kg/939lb beltless in 2009), Bob People (329kg/725lb weighing only 82.5kg/181lb in 1949), Vince Anello (373kg/821lb which was 4x times his body-weight), etc.
The benefit of pulling with a rounded back is that it lowers your shoulders and brings your hips closer to the bar. Lower shoulders decrease the range of motion. Bar closer to hips artificially shortens your thighs (especially if they’re long like mine). Efficiency increases and so you can lift heavier weight.
The issue is that rounding makes the lockout harder. The weight leaves the floor more easily. But once it reaches your knees, your back is forced to finish the weight. Your legs can’t help since they’re already straight. You’ll be tempted to hitch and re-bend your arms. And you’ll fail at the top more often.
Note that rounded-back Deadlifters like Konstantinovs don’t do full lower back rounding. Dr Stuart McGill Phd says the last three degrees of lumbar flexion are most dangerous. The round-back deadlifters in gym round their back fully, like a taco. Powerlifters like Konstantinovs don’t.
Notice also how Konstanstinovs maintains the spinal curve he sets up with. The rounded-back Deadlifters wannabes usually start neutral but then round. Or they start rounded and round more while they pull. Moving your spine while lifting heavy is extremely dangerous.

Most important, Konstantinovs has been Deadlifting for years. His back and abs are stronger. They protect his spine more against injury. He also has perfected his technique through years of practice. The rounded-back Deadlifters trying to imitate him have weak muscles and bad form.
It’s one thing to round slightly when attempting a PR once a year. It’s another thing to do it every time you Deadlift. But some people are looking for ways to rationalize their bad form – “Konstantinovs is doing it, so why can’t I?” Because you’re not him! You lack his experience and strength.
But it’s your spine so you can Deadlift however you want. I’ve done my fair of rounded-back Deadlifts trying to reach my goals at all cost. Back pain taught me to stop and pull neutral.
How can I increase my Deadlift?
Deadlift more. This is the best way to get to four plates (180kg/400lb). This works because the more you Deadlift, the more you can practice proper form. This refines and perfects your technique over time. Your lifting efficiency improves which increases how much you can Deadlift.
This doesn’t mean you should Deadlift daily. It means increasing your Deadlifts without Deadlifting doesn’t work. Pulling sumo instead doesn’t work either. You want to get better at piano, you have to play piano – not guitar. Same here: you must Deadlift to increase your Deadlift.
The simplest, most effective program to increase your Deadlift to 180kg/400lb is StrongLifts 5×5. It can easily double your Deadlift in 12 moths if you start light, use proper form and add 5lb/2.5kg each workout. Read the guide, watch the videos and use the apps to help you.
Increasing your Deadlift from 0 to 100-120kg/220-265lb is easy. You just have to Deadlift consistently and add weight over time. The details matter more as you get stronger and reach for the three and then four plates Deadlift. Here are some tips to help you get there….
- Warmup properly. Start light and work your way up. Practice proper form on the light weights. Lift them as if they were heavy – put the same effort and focus into them. Use the warmup calculator in my apps for the exact sets, reps and weights.
- Rest longer. ATP is your primary energy source for lifting. Every set you do depletes it. But 95% is back after you rest for five minutes. So rest at least five minutes before your heaviest set and you’ll pull more. Use the built-in rest timer in my apps to guide you.
- Improve your grip. Grip the bar low in your hands, close to your fingers, not mid-palm. Use chalk or liquid chalk. Switch to the mixed grip on your heavy sets. Do static holds at the end of each set to increase your grip strength. If you do all of this you won’t need straps.
- Wear a belt. Get a belt with an equal width all around. Wear it on your last warmup sets and heavy sets. The belt will give your abs a surface to push against which helps them contract harder. This increases support for your spine and helps you Deadlift more.
- Eat & Sleep. Your body needs food and sleep to recover from your workouts. Lack of sleep kills motivation to train hard. Lack of food makes you weak. Try to sleep eight hours a night. Eat at least three meals a day. Get a good meal an hour before lifting.
Most important, hammer down on your technique. Every deadlift champion lifts with solid technique because it increases efficiency. It takes work but it’s crucial to increase your Deadlift.
How can I improve my form?
The best way is to get feedback from a coach who knows how to Deadlift with proper form. Someone who can Deadlift at least 400lb. Someone who wasn’t born strong but had to work hard to increase his Deadlifts. Someone who therefore understands what it takes. Someone not using drugs.
Maybe you can’t find a coach where you live. I couldn’t in Belgium. So I solved that by videotaping my lifts to get feedback. Tape yourself from the side so you can see what you’re doing. Review the videos between sets and post-workout. Then try to improve the next time you Deadlift.
Here are the main things to look for. Get these right, and you’re already 80% there.
- Proper setup – bar over mid-foot, shoulder-blades over bar, shins against bar
- Neutral spine – head neutral, chest up, normal lower back arch
- Vertical bar path – ever rep, way up and down
If you notice your Deadlift form is off, don’t try to fix everything at once. You’ll get overwhelmed if you have to think about too many things while you pull. Instead, pick one thing to focus on during your next set. If you get it right, then pick the next thing to fix on your next set.
Mastering proper form will take you through the four stages of competence. At first you don’t know you’re pulling wrong. But you tape yourself and notice the errors. So you focus on doing it right when you Deadlift. Eventually you stop having to think about it – it just becomes natural.
ut you’ll keep going through these four stages no matter how advanced you are. There will always be aspects of your form that you can improve. All great Deadlifters keep refining their technique despite their years of experience. I do too. It’s one of the things I enjoy most about lifting.
Your technique will be more consistent if what you do before you Deadlift the weight is consistent. So setup the same way everytime. Walk to the bar the same way, put the same foot under it first, grab it with the same hand first, etc. Every set should look the same whether it’s light or heavy.
Join the Stronglifts community to get free access to all the spreadsheets for every Stronglifts program. You’ll also get 15% off Stronglifts Pro, and daily email tips. Enter your email below to sign up today for free.


